Salta al contenuto principale

Sony Xperia Z5 Compact Screen Replacement

Cosa ti serve

  1. Sony Xperia Z5 Compact Screen Replacement, Charging port flex: passo 1, immagine 1 di 2 Sony Xperia Z5 Compact Screen Replacement, Charging port flex: passo 1, immagine 2 di 2
    • Power off and remove SIM card tray.

  2. Sony Xperia Z5 Compact Screen Replacement: passo 2, immagine 1 di 3 Sony Xperia Z5 Compact Screen Replacement: passo 2, immagine 2 di 3 Sony Xperia Z5 Compact Screen Replacement: passo 2, immagine 3 di 3
    • Heat up the back cover to soften the adhesive.

    • Place the suction cup to open a gap from top side, then insert guitar picks and slide it to cut the adhesive underneath.

    • Remove back cover.

  3. Sony Xperia Z5 Compact Screen Replacement: passo 3, immagine 1 di 2 Sony Xperia Z5 Compact Screen Replacement: passo 3, immagine 2 di 2
    • Remove all 10 Phillips screws.

    • Disconnect NFC clip and flashlight clip.

  4. Sony Xperia Z5 Compact Screen Replacement: passo 4, immagine 1 di 3 Sony Xperia Z5 Compact Screen Replacement: passo 4, immagine 2 di 3 Sony Xperia Z5 Compact Screen Replacement: passo 4, immagine 3 di 3
    • Remove the plastic bracket.

    • Pry up and remove back frame.

  5. Sony Xperia Z5 Compact Screen Replacement: passo 5, immagine 1 di 3 Sony Xperia Z5 Compact Screen Replacement: passo 5, immagine 2 di 3 Sony Xperia Z5 Compact Screen Replacement: passo 5, immagine 3 di 3
    • Remove front camera.

  6. Sony Xperia Z5 Compact Screen Replacement: passo 6, immagine 1 di 3 Sony Xperia Z5 Compact Screen Replacement: passo 6, immagine 2 di 3 Sony Xperia Z5 Compact Screen Replacement: passo 6, immagine 3 di 3
    • Remove rear camera.

  7. Sony Xperia Z5 Compact Screen Replacement: passo 7, immagine 1 di 3 Sony Xperia Z5 Compact Screen Replacement: passo 7, immagine 2 di 3 Sony Xperia Z5 Compact Screen Replacement: passo 7, immagine 3 di 3
    • Remove loudspeaker.

  8. Sony Xperia Z5 Compact Screen Replacement: passo 8, immagine 1 di 3 Sony Xperia Z5 Compact Screen Replacement: passo 8, immagine 2 di 3 Sony Xperia Z5 Compact Screen Replacement: passo 8, immagine 3 di 3
    • Release charging port connector.

    • Remove plastic protective bar.

    • Pry up motherboard assembly from this side. There are three flex connectors connecting the motherboard underneath. So pry up the motherboard assembly gently.

  9. Sony Xperia Z5 Compact Screen Replacement: passo 9, immagine 1 di 1
    • Remove charging port flex.

  10. Sony Xperia Z5 Compact Screen Replacement, Screen: passo 10, immagine 1 di 2 Sony Xperia Z5 Compact Screen Replacement, Screen: passo 10, immagine 2 di 2
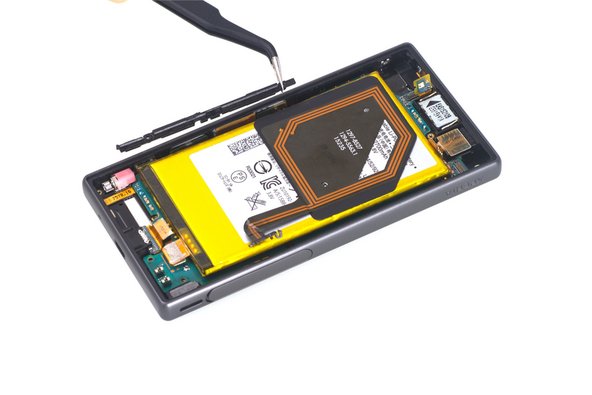
    • Remove the motherboard/battery assembly.

    • Using a spudger, release the battery connector from the motherboard.

  11. Sony Xperia Z5 Compact Screen Replacement: passo 11, immagine 1 di 2 Sony Xperia Z5 Compact Screen Replacement: passo 11, immagine 2 di 2
    • Using a suction cup, create a space between the screen and the phone.

    • Using an opening tool, pry the LCD screen up.

Conclusione

To reassemble your device, follow these instructions in reverse order.

Un'altra persona ha completato questa guida.

0 Commenti

Aggiungi Commento

Visualizza Statistiche:

Ultime 24 Ore: 0

Ultimi 7 Giorni: 3

Ultimi 30 Giorni: 10

Tutti i Tempi: 760