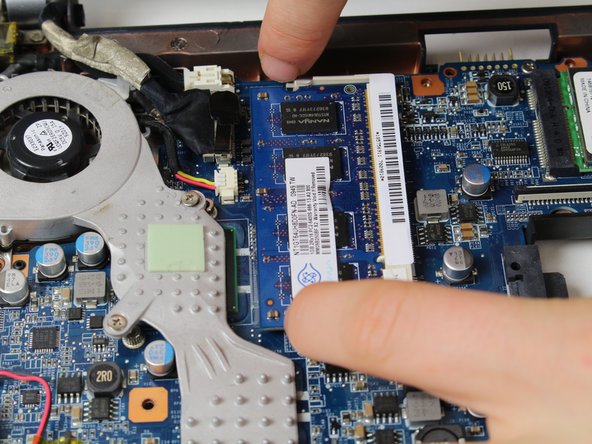
Salta al contenuto principale

Sony Vaio VPCW211AX RAM Replacement

Cosa ti serve

  1. Sony Vaio VPCW211AX RAM  Replacement, Keyboard: passo 1, immagine 1 di 1
    • Start with the laptop face up on a flat surface.

  2. Sony Vaio VPCW211AX RAM  Replacement: passo 2, immagine 1 di 1
    • Open the laptop with the keyboard facing you.

  3. Sony Vaio VPCW211AX RAM  Replacement: passo 3, immagine 1 di 2 Sony Vaio VPCW211AX RAM  Replacement: passo 3, immagine 2 di 2
    • Use a plastic opening tool to pry up the keyboard. Start at the end closest to the screen.

    • Be careful around the edges; work your way around the keyboard until all of it is detached.

    • There will be a ribbon cable attached to the bottom of the keyboard. Be sure not to rip the cable when lifting the keyboard from the laptop frame.

  4. Sony Vaio VPCW211AX RAM  Replacement: passo 4, immagine 1 di 2 Sony Vaio VPCW211AX RAM  Replacement: passo 4, immagine 2 di 2
    • Carefully detach the ribbon from the base of the computer with your hands.

    • Remove the keyboard.

  5. Sony Vaio VPCW211AX RAM  Replacement, RAM: passo 5, immagine 1 di 1
    • Use a Philips #0 screwdriver to remove the 7 top case screws.

  6. Sony Vaio VPCW211AX RAM  Replacement: passo 6, immagine 1 di 1
    • Using a metal spudger, pry open at the seams.

    • Open the gray top of the laptop from the base black portion.

    • Slide the spudger along the seam, and then carefully open the top.

  7. Sony Vaio VPCW211AX RAM  Replacement: passo 7, immagine 1 di 2 Sony Vaio VPCW211AX RAM  Replacement: passo 7, immagine 2 di 2
    • Open the top carefully without disconnecting the two parts.

    • Be mindful and careful of the ribbon cable attaching the two parts together.

  8. Sony Vaio VPCW211AX RAM  Replacement: passo 8, immagine 1 di 2 Sony Vaio VPCW211AX RAM  Replacement: passo 8, immagine 2 di 2
    • Using your fingers, pry apart the two side metal pieces that hold the part in place as shown on the picture.

  9. Sony Vaio VPCW211AX RAM  Replacement: passo 9, immagine 1 di 1
    • After that step, the RAM should pop up on its own as shown in the picture.

  10. Sony Vaio VPCW211AX RAM  Replacement: passo 10, immagine 1 di 2 Sony Vaio VPCW211AX RAM  Replacement: passo 10, immagine 2 di 2
    • Carefully press the sides near the right edge of the part and remove it from it's base.

Conclusione

To reassemble your device, follow these instructions in reverse order.

Un commento

I have a 21212L and you have to remove the screws under the flap to remove the keyboard firstm you also do not have to remove the top assembly at all.

Samuel Gottschall - Replica

Aggiungi Commento

Visualizza Statistiche:

Ultime 24 Ore: 0

Ultimi 7 Giorni: 2

Ultimi 30 Giorni: 4

Tutti i Tempi: 735