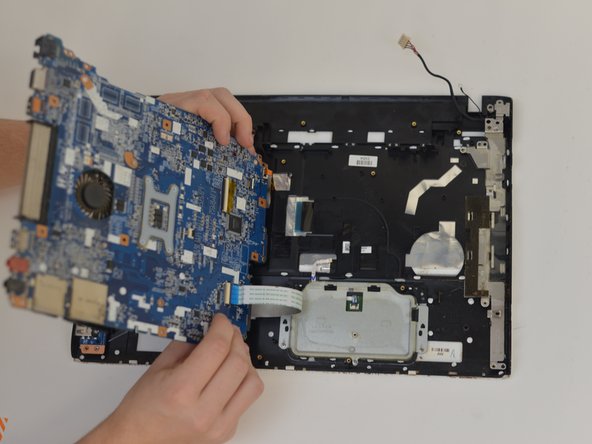
Salta al contenuto principale

Sony Vaio SVE151G11L Motherboard Replacement

Cosa ti serve

  1. Sony Vaio SVE151G11L Motherboard Replacement, Battery: passo 1, immagine 1 di 1
    • Turn the laptop over so its underside is facing upwards and visible.

  2. Sony Vaio SVE151G11L Motherboard Replacement: passo 2, immagine 1 di 1
    • Standing so that the barcode and warning labels are upright and legible, push the left tab up and away from yourself.

  3. Sony Vaio SVE151G11L Motherboard Replacement: passo 3, immagine 1 di 1
    • Standing so that the barcode and warning labels are upright and legible, push the right tab up and away from yourself.

  4. Sony Vaio SVE151G11L Motherboard Replacement: passo 4, immagine 1 di 1
    • Locate the small gap where the battery and the laptop shell meet. Lift from the gap and rotate the battery up and away from yourself.

  5. Sony Vaio SVE151G11L Motherboard Replacement: passo 5, immagine 1 di 1
    • Pull battery away from laptop.

  6. Sony Vaio SVE151G11L Motherboard Replacement, Hard Disk Drive: passo 6, immagine 1 di 1
    • Flip laptop over so the bottom is facing upwards.

  7. Sony Vaio SVE151G11L Motherboard Replacement: passo 7, immagine 1 di 1
    • Remove 2 bottom screws in the top right on the HDD cover, with a size P000 screwdriver.

  8. Sony Vaio SVE151G11L Motherboard Replacement: passo 8, immagine 1 di 2 Sony Vaio SVE151G11L Motherboard Replacement: passo 8, immagine 2 di 2
    • Pop open the cover to the HDD.

  9. Sony Vaio SVE151G11L Motherboard Replacement: passo 9, immagine 1 di 1
    • Remove the screws on the HDD with a Phillips #000 screwdriver.

  10. Sony Vaio SVE151G11L Motherboard Replacement: passo 10, immagine 1 di 2 Sony Vaio SVE151G11L Motherboard Replacement: passo 10, immagine 2 di 2
    • Pull plastic tab away from the laptop.

    • Lift HDD away from laptop.

  11. Sony Vaio SVE151G11L Motherboard Replacement, Motherboard: passo 11, immagine 1 di 1
    • Flip the laptop over on its backside.

  12. Sony Vaio SVE151G11L Motherboard Replacement: passo 12, immagine 1 di 1
    • Remove the screws holding the motherboard in place.

  13. Sony Vaio SVE151G11L Motherboard Replacement: passo 13, immagine 1 di 2 Sony Vaio SVE151G11L Motherboard Replacement: passo 13, immagine 2 di 2
    • Pop the motherboard away from the frame.

  14. Sony Vaio SVE151G11L Motherboard Replacement: passo 14, immagine 1 di 1
    • Remove the ribbon cable from the motherboard.

  15. Sony Vaio SVE151G11L Motherboard Replacement: passo 15, immagine 1 di 2 Sony Vaio SVE151G11L Motherboard Replacement: passo 15, immagine 2 di 2
    • Remove motherboard from the laptop.

Conclusione

To reassemble your device, follow these instructions in reverse order.

Altre 2 persone hanno completato questa guida.

Alex Theg

Membro da: 10/15/18

758 Reputazione

4 Guide realizzate

Team

0 Commenti

Aggiungi Commento

Visualizza Statistiche:

Ultime 24 Ore: 3

Ultimi 7 Giorni: 9

Ultimi 30 Giorni: 23

Tutti i Tempi: 1,686