Questa versione può contenere modifiche errate. Passa all'ultima istantanea verificata.
Cosa ti serve
-
Questo passaggio è privo di traduzione. Aiuta a tradurlo
-
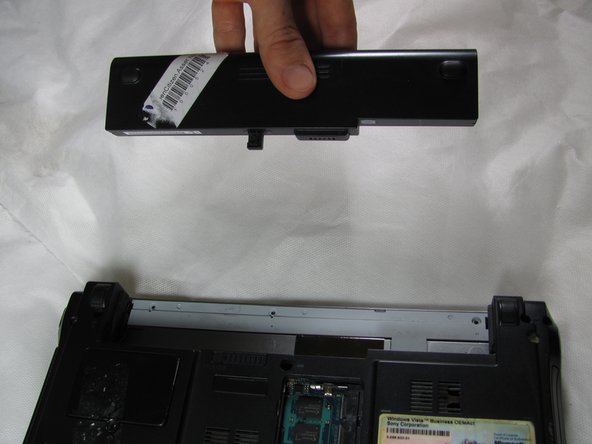
Flip the computer so that the bottom is facing up.
-
Look to the long edge where the computer screen is hinged and find the "release slide". It is located at the top left corner of the square indent.
-
-
Questo passaggio è privo di traduzione. Aiuta a tradurlo
-
Use your finger to slide the release to the left.
-
-
Questo passaggio è privo di traduzione. Aiuta a tradurlo
-
While holding the release slide with one hand, use your opposite hand to pull the battery from its slot by gently shaking the battery left and right to help slide it out.
-
-
Questo passaggio è privo di traduzione. Aiuta a tradurlo
-
Take out the screw in the center of the computer.
-
-
Questo passaggio è privo di traduzione. Aiuta a tradurlo
-
Flip the computer right side up.
-
Open screen so that keyboard is visible.
-
-
-
Questo passaggio è privo di traduzione. Aiuta a tradurlo
-
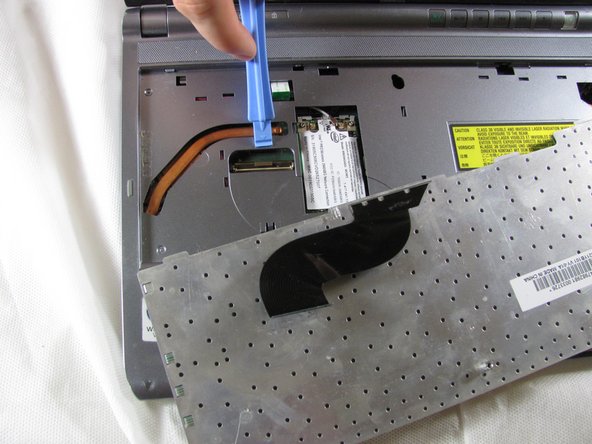
Use a plastic opening tool to gently lift the keyboard at a corner.
-
Slide the tool around the perimeter of the keyboard and it will start to lift.
-
-
Questo passaggio è privo di traduzione. Aiuta a tradurlo
-
Once the keyboard has been lifted at a few edges, lift the keyboard with both hands.
-
-
Questo passaggio è privo di traduzione. Aiuta a tradurlo
-
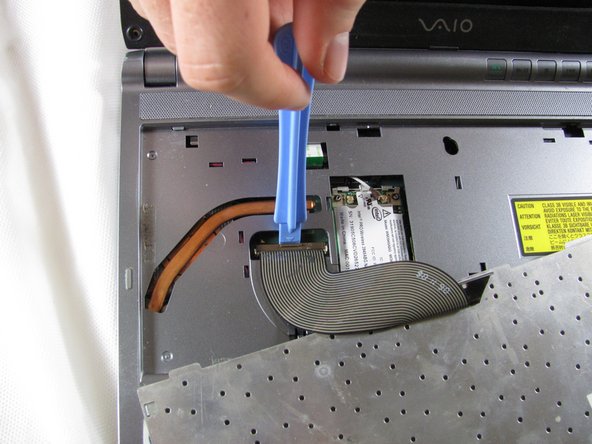
Locate the ribbon cord behind the keyboard.
-
Locate a brown clamp attaching the keyboard to the computer.
-
Use a plastic opening tool to lift the clamp and release the cable.
-
-
Questo passaggio è privo di traduzione. Aiuta a tradurlo
-
Flip computer over and remove the 6 screws.
-
-
Questo passaggio è privo di traduzione. Aiuta a tradurlo
-
Flip computer over again and unclip the plastic cover.
-
-
Questo passaggio è privo di traduzione. Aiuta a tradurlo
-
Locate the hard drive disk. The hard drive disk will be covered by a shiny lid.
-
Unscrew the lid with a #00 Phillips Head Screwdriver.
-
There are 3 screws holding it in.
-
Grab the lid by one corner and pull off the lid.
-
-
Questo passaggio è privo di traduzione. Aiuta a tradurlo
-
Find the brown clip attached to the hard disk drive on the side facing the optical disk drive.
-
Carefully pull out the brown clip with your fingers.
-
-
Questo passaggio è privo di traduzione. Aiuta a tradurlo
-
Hold the hard disk drive on the side where the brown clip was attached and lift it upwards to pull it out.
-


Annulla: non ho completato questa guida.
Altre 6 persone hanno completato questa guida.
Team

Cal Poly, Team 5-3, Forte Spring 2012 Membro di Cal Poly, Team 5-3, Forte Spring 2012
CPSU-FORTE-S12S5G3
5 Membri
12 Guide realizzate
4 Commenti
Step 10 is actually 7 screws, not 6. There are two screws next to the battery that need to be removed.
Watch out for the ribbon cable in step 11. There are two, one for the trackpad and one for the activity lights. If you have a WWAN card installed, you may have additional coax wires as well. There is also a clip directly below the keyboard ZIF connector and to the left of the trackpad. You will need tweezers to bend it up and out of the way.
I was unable to fully remove the palm rest assembly, but I could flip it over at a 90 degree angle to get the HDD out.
I was able to successfully swap this hard drive with an iFlash mSATA. I used a Transcend 256GB mSATA SSD. I've had bad luck with Dogfish ones, they're cheap garbage and you do not want to take this apart again.
Update the iFlash to mSATA does not work, it makes the optical drive disconnect. That's not acceptable to me, so I will be trying this instead:
The SSD does work and XP was able to install successfully from a flash drive.
Final update, this worked and the optical drive appears now. Either the ribbon cable in the Vaio is too thin, or the tolerances on this cheap adapter are terrible, but I had to use some electrical tape to force contact. It was too loose otherwise and nothing was being picked up.
The whole thing is upside down in the machine, so you have to carefully bend the ribbon cable for insertion.
All in all, success! Don't buy the iFlash adapter, I think it assigns itself a value (Primary, Secondary, Cable Select) that doesn't play nice with the laptop's IDE controller.