Salta al contenuto principale

Sony Vaio PCG-4121GL SD Card Board Replacement

Cosa ti serve

  1. Sony Vaio PCG-4121GL SD Card Board Replacement, Battery: passo 1, immagine 1 di 2 Sony Vaio PCG-4121GL SD Card Board Replacement, Battery: passo 1, immagine 2 di 2
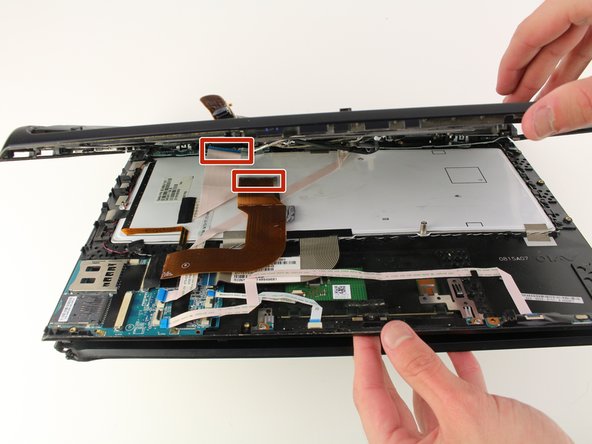
    • Remove the two 3mm Phillips #0 screws on the bottom of the computer that secure the plastic backing.

  2. Sony Vaio PCG-4121GL SD Card Board Replacement: passo 2, immagine 1 di 3 Sony Vaio PCG-4121GL SD Card Board Replacement: passo 2, immagine 2 di 3 Sony Vaio PCG-4121GL SD Card Board Replacement: passo 2, immagine 3 di 3
    • Pull the bottom plate towards yourself until it unhinges fully.

    • Once the plate is free from the backing remove it completely.

  3. Sony Vaio PCG-4121GL SD Card Board Replacement: passo 3, immagine 1 di 1
    • Look for the blue tab that is located to the bottom left of the battery.

  4. Sony Vaio PCG-4121GL SD Card Board Replacement: passo 4, immagine 1 di 3 Sony Vaio PCG-4121GL SD Card Board Replacement: passo 4, immagine 2 di 3 Sony Vaio PCG-4121GL SD Card Board Replacement: passo 4, immagine 3 di 3
    • Pull the blue tab towards yourself until you hear a click.

    • Once the blue tab is released, pull up on the battery.

    • Once the battery can move freely, take it out completely.

    • It may be helpful to have a spudger to make it easier to release the blue tab.

  5. Sony Vaio PCG-4121GL SD Card Board Replacement, SD Card Board: passo 5, immagine 1 di 2 Sony Vaio PCG-4121GL SD Card Board Replacement, SD Card Board: passo 5, immagine 2 di 2
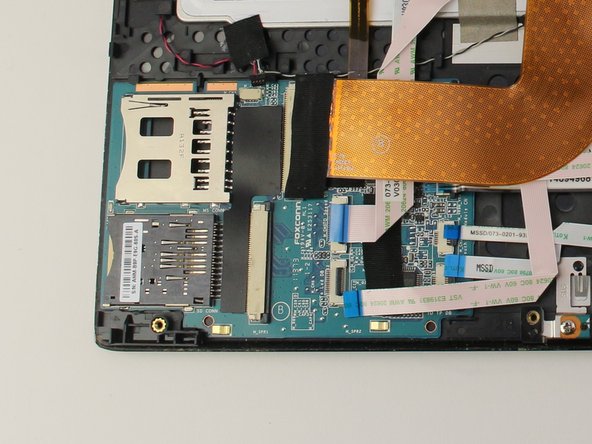
    • Remove seven 3mm Phillips #0 screws from the bottom of the computer.

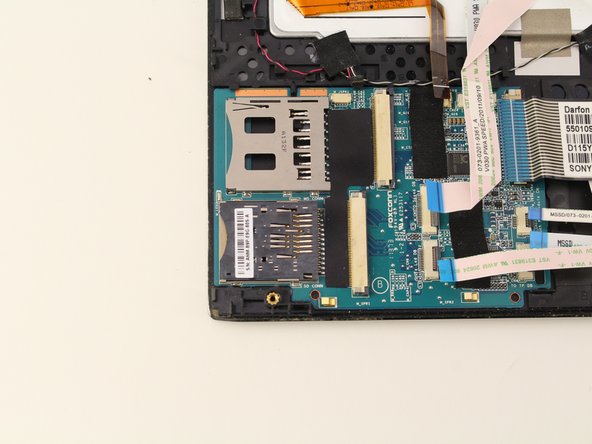
    • Remove eight 5mm Phillips #0 screws.

  6. Sony Vaio PCG-4121GL SD Card Board Replacement: passo 6, immagine 1 di 3 Sony Vaio PCG-4121GL SD Card Board Replacement: passo 6, immagine 2 di 3 Sony Vaio PCG-4121GL SD Card Board Replacement: passo 6, immagine 3 di 3
    • Carefully remove the disk drive from its compartment.

  7. Sony Vaio PCG-4121GL SD Card Board Replacement: passo 7, immagine 1 di 2 Sony Vaio PCG-4121GL SD Card Board Replacement: passo 7, immagine 2 di 2
    • Remove the three 2mm Phillips #00 screws located on the top right edge.

  8. Sony Vaio PCG-4121GL SD Card Board Replacement: passo 8, immagine 1 di 2 Sony Vaio PCG-4121GL SD Card Board Replacement: passo 8, immagine 2 di 2
    • Gently pull apart the top and bottom plastic bodies.

    • Carefully remove the cable connectors.

    • Slowly detach bottom component to avoid tearing wires/connectors.

  9. Sony Vaio PCG-4121GL SD Card Board Replacement: passo 9, immagine 1 di 3 Sony Vaio PCG-4121GL SD Card Board Replacement: passo 9, immagine 2 di 3 Sony Vaio PCG-4121GL SD Card Board Replacement: passo 9, immagine 3 di 3
    • Pull apart your device and set aside the screen of your laptop.

    • Locate the SD Card Board in the bottom left of the computer body.

  10. Sony Vaio PCG-4121GL SD Card Board Replacement: passo 10, immagine 1 di 2 Sony Vaio PCG-4121GL SD Card Board Replacement: passo 10, immagine 2 di 2
    • Remove the cables from their connectors.

    • Do not apply too much force to the cable connectors or they may tear.

  11. Sony Vaio PCG-4121GL SD Card Board Replacement: passo 11, immagine 1 di 2 Sony Vaio PCG-4121GL SD Card Board Replacement: passo 11, immagine 2 di 2
    • Lightly press down on the bottom left corner of the plastic frame.

    • Pull SD Board out towards you once it feels loose.

    • Once the SD Board is free from the plastic, remove completely

    • The SD Card slot is shown.

Conclusione

To reassemble your device, follow these instructions in reverse order.

Un'altra persona ha completato questa guida.

Bryce McNeil

Membro da: 01/24/19

391 Reputazione

1 Guida realizzata

Team

Cal Poly, Team S2-G2, White Winter 2019 Membro di Cal Poly, Team S2-G2, White Winter 2019

CPSU-WHITE-W19S2G2

4 Membri

10 Guide realizzate

0 Commenti

Aggiungi Commento

Visualizza Statistiche:

Ultime 24 Ore: 1

Ultimi 7 Giorni: 12

Ultimi 30 Giorni: 26

Tutti i Tempi: 869