Questa versione può contenere modifiche errate. Passa all'ultima istantanea verificata.
Cosa ti serve
-
Questo passaggio è privo di traduzione. Aiuta a tradurlo
-
Use the Phillips head screw driver to remove the eleven 6 mm screws.
-
Use the Phillips head screw driver to remove the one 4 mm screw securing the CD drive.
-
-
Questo passaggio è privo di traduzione. Aiuta a tradurlo
-
Insert the plastic opening tool into the slit of the CD drive.
-
Then pull it outwards.
-
Grab the CD drive with your hand.
-
Take the CD drive all the way out.
-
-
-
Questo passaggio è privo di traduzione. Aiuta a tradurlo
-
Insert the plastic opening tool into the slit between the back cover and the rest of the computer.
-
Move the plastic opening tool around all sides of the device.
-
Peel off the back cover.
-
-
Questo passaggio è privo di traduzione. Aiuta a tradurlo
-
Use the Phillips head screw driver to remove the four 7 mm screws.
-
Lift the battery out with your hand.
-
-
Questo passaggio è privo di traduzione. Aiuta a tradurlo
-
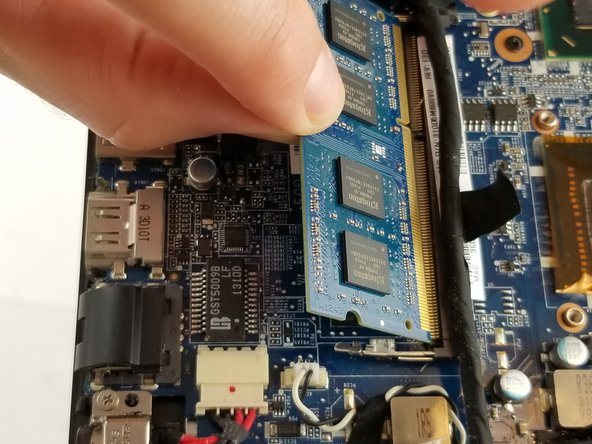
The RAM is a small rectangular component located on the opposite side of the lab top from where you pulled out the CD disc drive.
-
-
Questo passaggio è privo di traduzione. Aiuta a tradurlo
-
Push down on the metal prongs encircled to allow the RAM component to spring up diagonally from the lab top.
-
When the RAM is sprung up, pull it out in the same direction it is currently at, to remove it from the lab top.
-


Annulla: non ho completato questa guida.
Un'altra persona ha completato questa guida.
Team

USF Tampa, Team S11-G3, Cheng Spring 2018 Membro di USF Tampa, Team S11-G3, Cheng Spring 2018
USFT-CHENG-S18S11G3
4 Membri
11 Guide realizzate