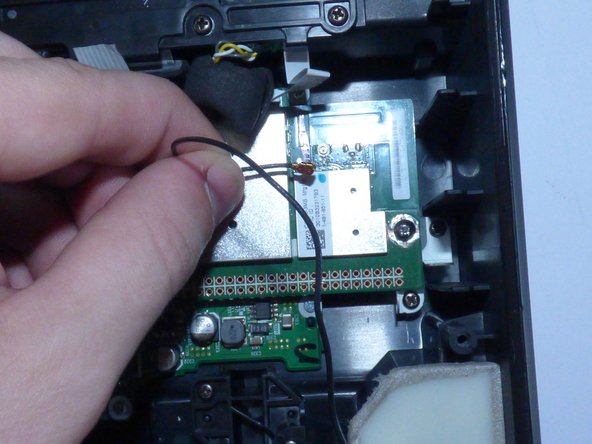
Salta al contenuto principale

Sony SRS-X7 Antenna Replacement

Cosa ti serve

  1. Sony SRS-X7 Antenna Replacement, Sony SRS-X7 Faceplate Disassembly: passo 1, immagine 1 di 2 Sony SRS-X7 Antenna Replacement, Sony SRS-X7 Faceplate Disassembly: passo 1, immagine 2 di 2
    • On the bottom of the device, you'll see 4 rubber pieces at the corners. Peel off these rubber pieces.

    • Unscrew the 4 10mm Philips J1 screws beneath them.

  2. Sony SRS-X7 Antenna Replacement: passo 2, immagine 1 di 3 Sony SRS-X7 Antenna Replacement: passo 2, immagine 2 di 3 Sony SRS-X7 Antenna Replacement: passo 2, immagine 3 di 3
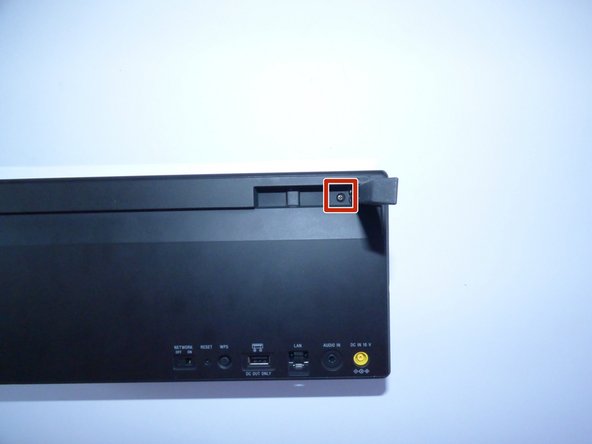
    • The black stickers between the 4 foam pieces are there to protect the unit's warranty. If you try to send the device back to Sony after poking through said stickers, they will not accept it as the device has been tampered with.

    • Poke through said stickers and unscrew the 2 10mm Philips J1 screws beneath those.

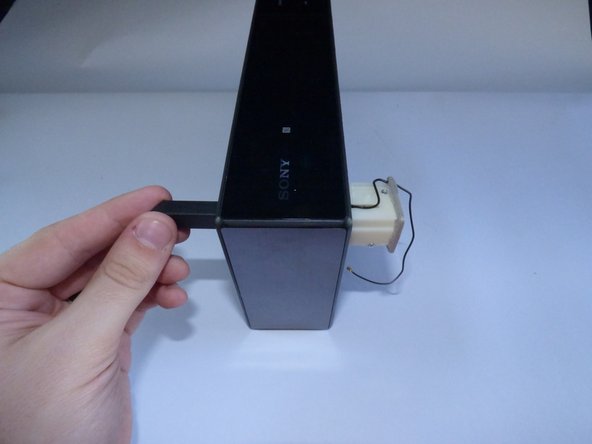
    • Insert the blue plastic tool into the corner of the bottom faceplate and slide along the edge.

    • It will be a bit difficult as there is adhesive holding the faceplate to the unit, but with it bit of playing it should come off with ease.

  3. Sony SRS-X7 Antenna Replacement: passo 3, immagine 1 di 2 Sony SRS-X7 Antenna Replacement: passo 3, immagine 2 di 2
    • Using a metal spudger, insert it into one of the corners or sides of the units faceplate and lightly pry open.

    • While pried, insert a plastic opening tool and slide along the edges of the unit.

    • Repeat the last step on each side of the unit's faceplate, until the faceplate is off.

    • The first time you attempt to take the faceplate off of the speaker, it will be difficult because there is adhesive holding it to the unit. After this time, disassembly and reassembly should be easier.

  4. Sony SRS-X7 Antenna Replacement: passo 4, immagine 1 di 2 Sony SRS-X7 Antenna Replacement: passo 4, immagine 2 di 2
    • With the faceplate now off, the speakers should be revealed. There should be 8 visible screws around the border of the speakers. Remove the 8 10mm Philips J1 screws.

    • Take the 2 20mm Philips J1 screws out of the middle of the speaker as shown.

  5. Sony SRS-X7 Antenna Replacement: passo 5, immagine 1 di 2 Sony SRS-X7 Antenna Replacement: passo 5, immagine 2 di 2
    • The speaker should come out of the unit with ease, however you should use caution as it is still connected to the motherboard.

    • Take the whole speaker out, and disconnect the connectors from the motherboard by lightly pulling on them.

  6. Sony SRS-X7 Antenna Replacement, Antenna: passo 6, immagine 1 di 2 Sony SRS-X7 Antenna Replacement, Antenna: passo 6, immagine 2 di 2
    • Take the gold connector off the motherboard of the device.

  7. Sony SRS-X7 Antenna Replacement: passo 7, immagine 1 di 3 Sony SRS-X7 Antenna Replacement: passo 7, immagine 2 di 3 Sony SRS-X7 Antenna Replacement: passo 7, immagine 3 di 3
    • Stand the antenna in the upright position.

    • Unscrew the 10mm Philips J1 screw beneath the antenna.

    • Push the antenna through the inside of the unit to remove it.

Linea Traguardo

Tyler Lamar

Membro da: 03/10/16

685 Reputazione

5 Guide realizzate

Team

Un commento

Replacement antenna costs ~$80. Okay, I am able to continue to life without Wi-Fi on my speaker.

(As already mention: Step 3 is missing the removal of 4 screws. You should also open the speaker cover from the bottom to the top.)

Linus H. - Replica

Aggiungi Commento

Visualizza Statistiche:

Ultime 24 Ore: 0

Ultimi 7 Giorni: 0

Ultimi 30 Giorni: 2

Tutti i Tempi: 699