Salta al contenuto principale

Sony ICF-CS15iP Disassembly

Documento in evidenza

  1. Sony ICF-CS15iP Disassembly, Remove all 18 screws from the device’s outer shell.: passo 1, immagine 1 di 2 Sony ICF-CS15iP Disassembly, Remove all 18 screws from the device’s outer shell.: passo 1, immagine 2 di 2
    • All of these damned screws are approx. a PH1 size.

  2. Sony ICF-CS15iP Disassembly, Remove back and base covers.: passo 2, immagine 1 di 3 Sony ICF-CS15iP Disassembly, Remove back and base covers.: passo 2, immagine 2 di 3 Sony ICF-CS15iP Disassembly, Remove back and base covers.: passo 2, immagine 3 di 3
    • Pull on the back to ease it off, and there will be some wires that will need to be disconnected. (Green circled wire not necessary to remove but recommended)

  3. Sony ICF-CS15iP Disassembly, Remove power and antenna board.: passo 3, immagine 1 di 1
    • Unfasten the 4 screws holding in the board.

  4. Sony ICF-CS15iP Disassembly, Remove display.: passo 4, immagine 1 di 2 Sony ICF-CS15iP Disassembly, Remove display.: passo 4, immagine 2 di 2
    • Remove the following screws:

  5. Sony ICF-CS15iP Disassembly, Remove dock: passo 5, immagine 1 di 1
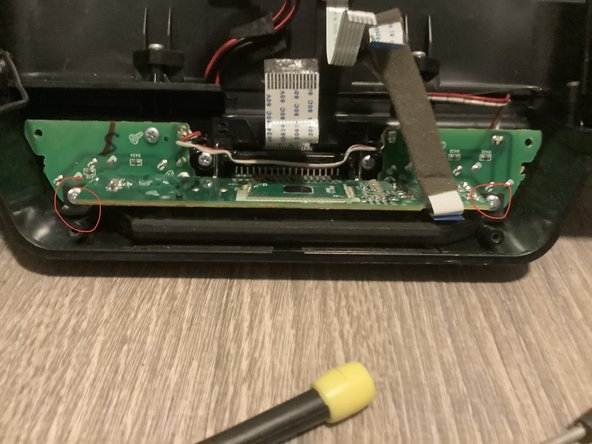
    • Remove the following screws and be careful with the dock connector, as it has springs that can fly to oblivion.

  6. Sony ICF-CS15iP Disassembly, Remove speaker assembly.: passo 6, immagine 1 di 1
    • Remove the following screws:

  7. Sony ICF-CS15iP Disassembly, Take a break (optional): passo 7, immagine 1 di 1
    • I chose to eat pretzels, you can have a 10 course meal prepared by Gordon Ramsay

  8. Sony ICF-CS15iP Disassembly, Remove speakers.: passo 8, immagine 1 di 1
    • These are some good 4 ohm 5 watt speakers.

  9. Sony ICF-CS15iP Disassembly, Remove top buttons.: passo 9, immagine 1 di 1
    • My specific board has some damage from the previous owner, and I only made it worse lol.

  10. Sony ICF-CS15iP Disassembly, Remove rear buttons.: passo 10, immagine 1 di 1
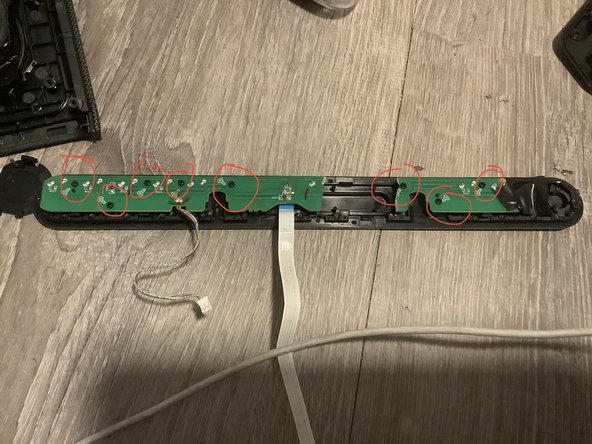
    • This is definitely all the screws that need to be unfastened.

    • I used a PH1 and PH0 screwdriver.

Conclusione

To reassemble your device, follow these instructions in reverse order.

Documenti Allegati

Adrian Lopez

Membro da: 01/14/21

500 Reputazione

3 Guide realizzate

0 Commenti

Aggiungi Commento

Visualizza Statistiche:

Ultime 24 Ore: 4

Ultimi 7 Giorni: 11

Ultimi 30 Giorni: 30

Tutti i Tempi: 190