Questa versione può contenere modifiche errate. Passa all'ultima istantanea verificata.
Cosa ti serve
-
Questo passaggio è privo di traduzione. Aiuta a tradurlo
-
Bring the LCD screen to the fully open position.
-
Remove the three 5 MM Phillips #1 screws on the front of the LCD screen.
-
-
Questo passaggio è privo di traduzione. Aiuta a tradurlo
-
Flip the camera with the lens facing up.
-
Turn the LCD screen so you can see the 5 MM Phillips #1 screw on the inside; remove the screw.
-
Spin the LCD screen around to get the 5 MM Phillips #1 screw in the same place on the other side.
-
Use the plastic opening tool to gently separate the back of the screen from the unit.
-
-
Questo passaggio è privo di traduzione. Aiuta a tradurlo
-
With the back off, spin the LCD screen back around.
-
Using the plastic opening tool, gently lift up the holder that keeps the ribbon in place.
-
Gently slip the ribbon from its housing.
-
-
-
Questo passaggio è privo di traduzione. Aiuta a tradurlo
-
While holding the entire LCD screen unit in the palm of your hand use your thumb and forefinger to grasp the big ribbon and gently wiggle it out of its housing.
-
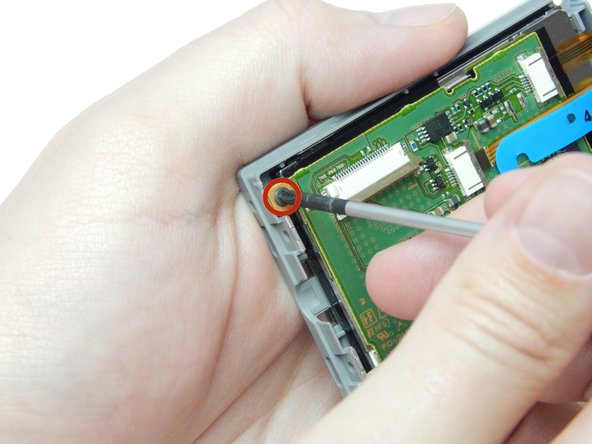
Remove the one screw that holds the board onto the back of the LCD screen unit.
-
-
Questo passaggio è privo di traduzione. Aiuta a tradurlo
-
Using tweezers, gently wiggle the locks up and out on the ribbon housings of the three ribbons still connected to the LCD board.
-
Slip the ribbons out of their housings.
-
-
Questo passaggio è privo di traduzione. Aiuta a tradurlo
-
While holding the ribbons back with your thumb remove the board and set in a safe place.
-
Keeping the ribbons to the side remove the LCD filter. This exposes the LCD screen.
-


Annulla: non ho completato questa guida.
Un'altra persona ha completato questa guida.

Team

USF Sarasota-Manatee, Team 1-2, Stewart Winter 2015 Membro di USF Sarasota-Manatee, Team 1-2, Stewart Winter 2015
USFSM-STEWART-W15S1G2
4 Membri
11 Guide realizzate