Salta al contenuto principale

Sony Handycam DCR-HC30 Flex Cable Replacement

Cosa ti serve

  1. Sony Handycam DCR-HC30 Flex Cable Replacement, Flex Cable: passo 1, immagine 1 di 2 Sony Handycam DCR-HC30 Flex Cable Replacement, Flex Cable: passo 1, immagine 2 di 2
    • To begin, the LCD screen must be removed.

    • Bring the LCD screen to the fully open position.

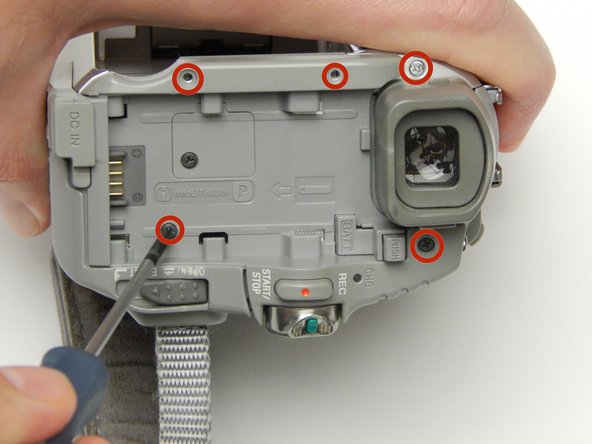
    • Remove the three 5 MM Phillips #1 screws on the front of the LCD screen.

  2. Sony Handycam DCR-HC30 Flex Cable Replacement: passo 2, immagine 1 di 3 Sony Handycam DCR-HC30 Flex Cable Replacement: passo 2, immagine 2 di 3 Sony Handycam DCR-HC30 Flex Cable Replacement: passo 2, immagine 3 di 3
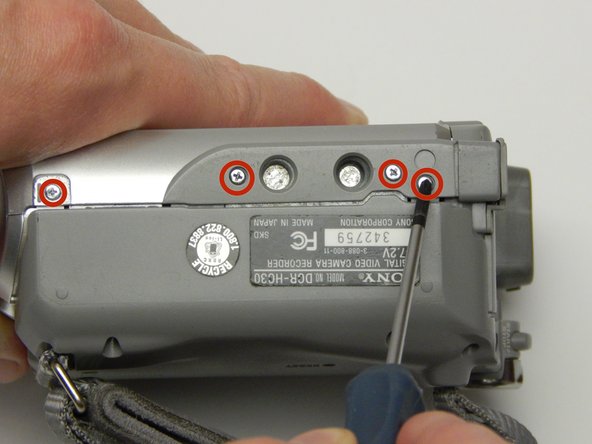
    • Flip the camera with the lens facing up.

    • Turn the LCD screen so you can see the 5 MM Phillips #1 screw on the inside; remove the screw.

    • Spin the LCD screen around to get the 5 MM Phillips #1 screw in the same place on the other side.

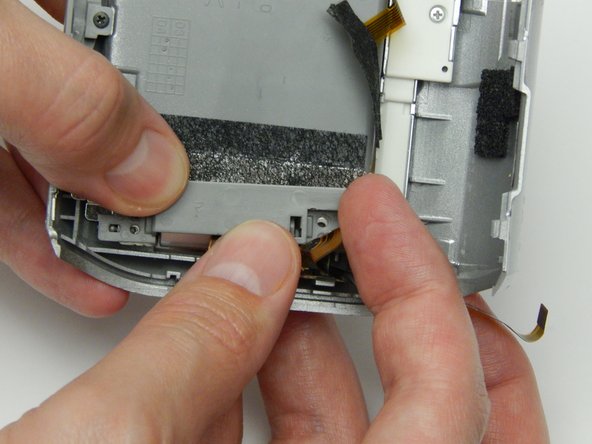
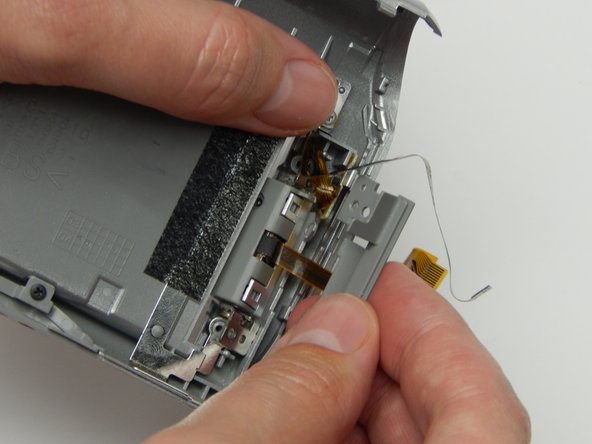
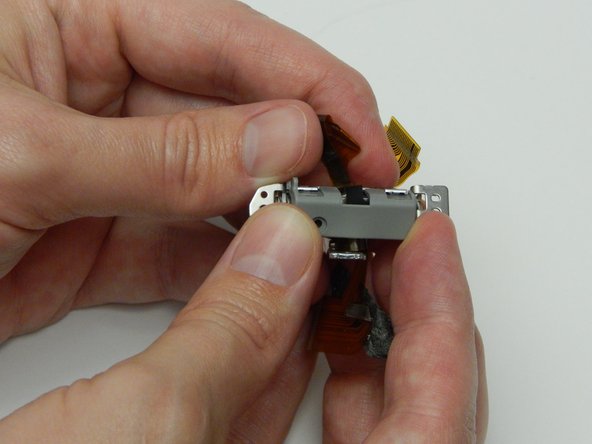
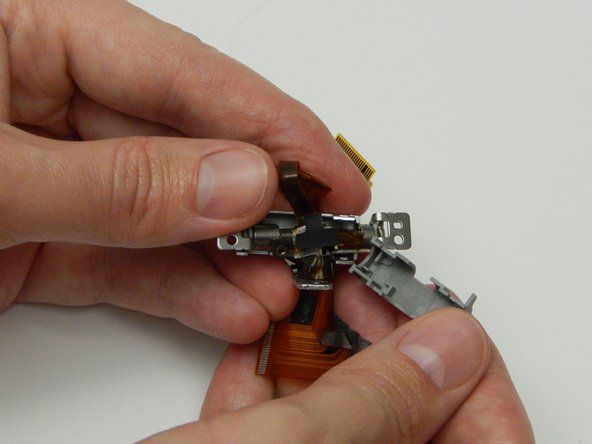
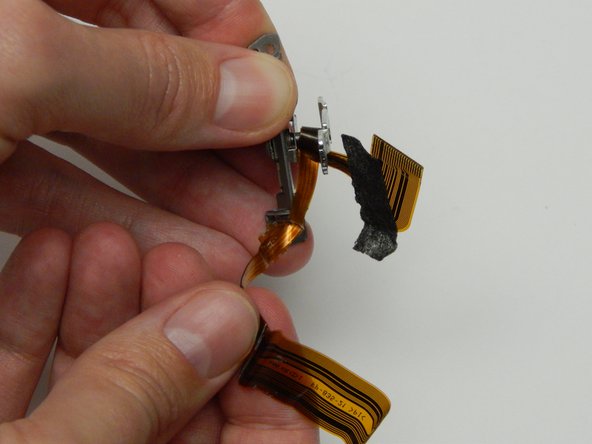
    • Use the plastic opening tool to gently separate the back of the screen from the unit.

  3. Sony Handycam DCR-HC30 Flex Cable Replacement: passo 3, immagine 1 di 3 Sony Handycam DCR-HC30 Flex Cable Replacement: passo 3, immagine 2 di 3 Sony Handycam DCR-HC30 Flex Cable Replacement: passo 3, immagine 3 di 3
    • The parts are very small and fragile and can break easily.

    • With the back off, spin the LCD screen back around.

    • Using the plastic opening tool, gently lift up the holder that keeps the ribbon in place.

    • Gently slip the ribbon from its housing.

    • When this step is completed the camera will separate from the LCD screen. From here on you will only be working with the camera itself.

  4. Sony Handycam DCR-HC30 Flex Cable Replacement: passo 4, immagine 1 di 3 Sony Handycam DCR-HC30 Flex Cable Replacement: passo 4, immagine 2 di 3 Sony Handycam DCR-HC30 Flex Cable Replacement: passo 4, immagine 3 di 3
    • With the LCD screen off the unit it is time to work on the rest of the screws.

    • Face the camera with the viewfinder towards you.

    • Remove the five 5 MM Phillips #1 screws circled here.

    • Flip the camera where the bottom faces toward you.

    • Remove these four circled 5 MM Phillips #1 screws.

  5. Sony Handycam DCR-HC30 Flex Cable Replacement: passo 5, immagine 1 di 3 Sony Handycam DCR-HC30 Flex Cable Replacement: passo 5, immagine 2 di 3 Sony Handycam DCR-HC30 Flex Cable Replacement: passo 5, immagine 3 di 3
    • Remove the last 5 MM Phillips #1 screw that is somewhat hidden in the resting place of the LCD screen.

    • For the next step make sure to be careful so as to not break any of the clips that hold the camera's two halves together.

    • With the bottom of the camera facing you grasp each half of the camera and gently pull the halves apart.

    • There will be some slight popping sounds as the clips release.

  6. Sony Handycam DCR-HC30 Flex Cable Replacement: passo 6, immagine 1 di 3 Sony Handycam DCR-HC30 Flex Cable Replacement: passo 6, immagine 2 di 3 Sony Handycam DCR-HC30 Flex Cable Replacement: passo 6, immagine 3 di 3
    • Remove the two 5 MM Phillips #1 screws found on the underside according to the picture.

    • Gently slip the flex cable out of its housing (indicated at the orange circle).

    • Lift the plastic covering on the hinge where the LCD screen had previously been.

  7. Sony Handycam DCR-HC30 Flex Cable Replacement: passo 7, immagine 1 di 2 Sony Handycam DCR-HC30 Flex Cable Replacement: passo 7, immagine 2 di 2
    • Flip the camera upside down and face the LCD screen side toward you.

    • Remove the flex cable assembly and thread the cable through the opening.

  8. Sony Handycam DCR-HC30 Flex Cable Replacement: passo 8, immagine 1 di 3 Sony Handycam DCR-HC30 Flex Cable Replacement: passo 8, immagine 2 di 3 Sony Handycam DCR-HC30 Flex Cable Replacement: passo 8, immagine 3 di 3
    • Using the spudger, depress the clips within the holes as shown. Make sure to flip the assembly over and do the other side as well.

    • While grasping the metal section of the assembly, remove the plastic covering that was attached with the clips.

  9. Sony Handycam DCR-HC30 Flex Cable Replacement: passo 9, immagine 1 di 3 Sony Handycam DCR-HC30 Flex Cable Replacement: passo 9, immagine 2 di 3 Sony Handycam DCR-HC30 Flex Cable Replacement: passo 9, immagine 3 di 3
    • While grasping the metal assembly, gently unravel the flex cable.

    • The flex cable is tightly wound around a metal rod in the center of the assembly.

    • Remove the flex cable from the assembly.

Conclusione

To reassemble your device, follow these instructions in reverse order.

Altre 6 persone hanno completato questa guida.

4 Commenti

What is the flex cable function? How do we know if it’s broken?

Pablo - Replica

You might not know unless you take the camcorder shell off, but in my case, the flex ribbon completely split at the hinge of the flip screen and I could see the severed flex ribbon poking out from the hinge.

Bob Gordon -

Good video of the change of flex FP 835, congratulations for the well explained. Can you help me, indicating if you know where the flex FP 836, Board complete or A-7112-125A, better known as flexible cable FP 836, is placed. I am interested in knowing where the end that has a fiberglass part with a metal part. According to the service manual that I obtained, it indicates that it goes inside the hinge, but I don't see that this is the case, even in your video, only explaining the flex 835. If you can help me, I will appreciate it. I don't speak English so I translated it. A photograph would be enough to see where the fles fp836 goes. Thank you

Mario Rodrigo Valdizon Catalan - Replica

You can get a replacement touch screen flex ribbon on eBay at: https://www.ebay.com/itm/302055909485 . I bought from this seller and the ribbon will absolutely work in the SONY 40x Optical Zoom, DCR-HC52 model camcorder to repair a touch screen that is no longer responsive due to broken flex ribbon/cable. eBay description claims same ribbon works for SONY models: DCR-HC37E, HC38, HC52, HC54, HC62, and HC37. I just repaired my HC52 model today (March 19, 2023) and can only vouch for it working in the HC52 model.  Repair is tricky, if questions on how to repair, you can e-mail me at rwg215@gmail.com  There is one hidden screw under the panel that has the “Nightshot Plus” switch. You have to open the cassette bay to get that panel off after unscrewing the visible screw on top of the panel and once slid off, you will see a hidden screw under that panel. There is also a hidden latch in the touch screen rotating hinge that is easy to miss and if put back wrong, it may prevent your screen from rotating.

Bob Gordon - Replica

Aggiungi Commento

Visualizza Statistiche:

Ultime 24 Ore: 0

Ultimi 7 Giorni: 18

Ultimi 30 Giorni: 93

Tutti i Tempi: 4,782