Questa versione può contenere modifiche errate. Passa all'ultima istantanea verificata.
Cosa ti serve
-
Questo passaggio è privo di traduzione. Aiuta a tradurlo
-
Place the phone with the back facing up. Remove the back cover and the battery.
-
-
Questo passaggio è privo di traduzione. Aiuta a tradurlo
-
Remove the 5mm screws from back of the phone, image indicates where they are. There should be 8 screws. Use a T-6 bit.
-
-
Questo passaggio è privo di traduzione. Aiuta a tradurlo
-
Use a case opening tool to release clips holding together the case. It should be easier starting at the bottom right side of the phone, as indicated in the image. Insert the tool and run it down the side of the phone, using a prying motion to pull it apart.
-
-
Questo passaggio è privo di traduzione. Aiuta a tradurlo
-
Case should be in two pieces. Take the side indicated in the left side of the image and put it out of the way.
-
-
-
Questo passaggio è privo di traduzione. Aiuta a tradurlo
-
Insert a flat head screw driver under the two clips and pry up. The chip should come loose with just a ribbon cable holding it to the rest of the phone.
-
-
Questo passaggio è privo di traduzione. Aiuta a tradurlo
-
Flip the chip to the left and remove the ribbon cable from the rest of the phone using a flat head screw driver. Gently insert the screw driver under the cable and pry up.
-
-
Questo passaggio è privo di traduzione. Aiuta a tradurlo
-
If the volume rocker and camera button haven't fallen off yet, remove them and put them off to the side. Using your fingers or a screwdriver, pull off the black plastic piece on the very top of the phone. This is the audio jack.
-
-
Questo passaggio è privo di traduzione. Aiuta a tradurlo
-
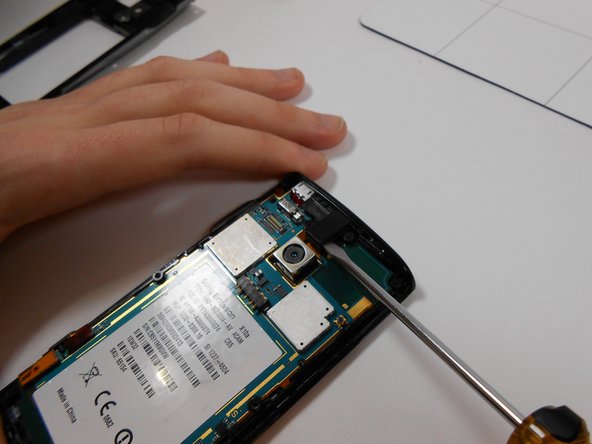
Using a flat head screw driver, undo the ribbon cables connected to the phone. There should be two on the left, one on the right, and one on the top.
-
-
Questo passaggio è privo di traduzione. Aiuta a tradurlo
-
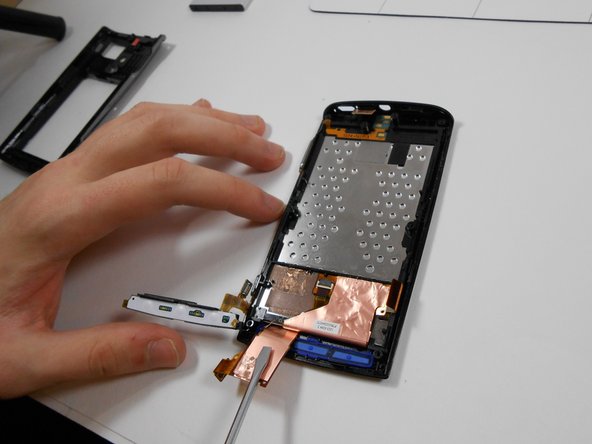
Gently insert a flat head screw driver under the logic board and pry to remove it from the phone casing. There should be a notch where a screw driver can fit as indicated in the image.
-
-
Questo passaggio è privo di traduzione. Aiuta a tradurlo
-
Logic board should be removed from the phone. Put it off to the side.
-
-
Questo passaggio è privo di traduzione. Aiuta a tradurlo
-
Using a flat head screw driver, disconnect the glue holding the left ribbon cable to the phone. Once unglued, the cable should flip back and still be connected to the phone. Pull up the black plastic piece being pointed to in the image.
-
-
Questo passaggio è privo di traduzione. Aiuta a tradurlo
-
Using a flat head screwdriver, pry up the board. Should have to pry from the left and from the right. Nothing is holding in the power button on the top of the phone, go ahead and remove it.
-
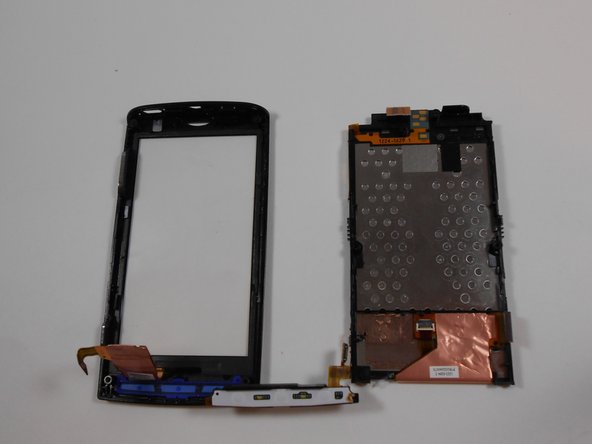
The piece on the right side of the picture is the LCD screen. It appears that the speakers and other components are directly attached to the LCD and must be replace as one unit.
-


Annulla: non ho completato questa guida.
Altre 3 persone hanno completato questa guida.
Team

UMass Dartmouth, Team 1-5, Shastany Fall 2013 Membro di UMass Dartmouth, Team 1-5, Shastany Fall 2013
UMASSD-SHASTANY-F13S1G5
2 Membri
3 Guide realizzate