Salta al contenuto principale

Sony Cyber-shot DSC-WX220 Flash Replacement

Cosa ti serve

  1. Sony Cyber-shot DSC-WX220 Flash Replacement, Battery: passo 1, immagine 1 di 1
    • Slide the gray switch from lock to open position.

  2. Sony Cyber-shot DSC-WX220 Flash Replacement: passo 2, immagine 1 di 2 Sony Cyber-shot DSC-WX220 Flash Replacement: passo 2, immagine 2 di 2
    • Pull down on the blue tab to release the battery.

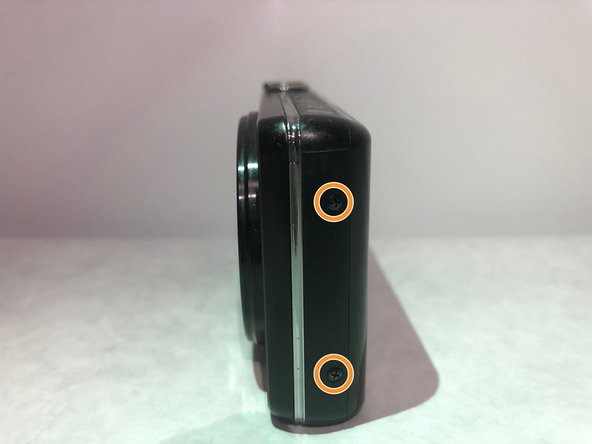
  3. Sony Cyber-shot DSC-WX220 Flash Replacement, Outer Case: passo 3, immagine 1 di 3 Sony Cyber-shot DSC-WX220 Flash Replacement, Outer Case: passo 3, immagine 2 di 3 Sony Cyber-shot DSC-WX220 Flash Replacement, Outer Case: passo 3, immagine 3 di 3
    • Use a PH00 screwdriver to remove the five 3.5 mm screws.

    • Use a PH00 screwdriver to remove the two 2.5 mm screws.

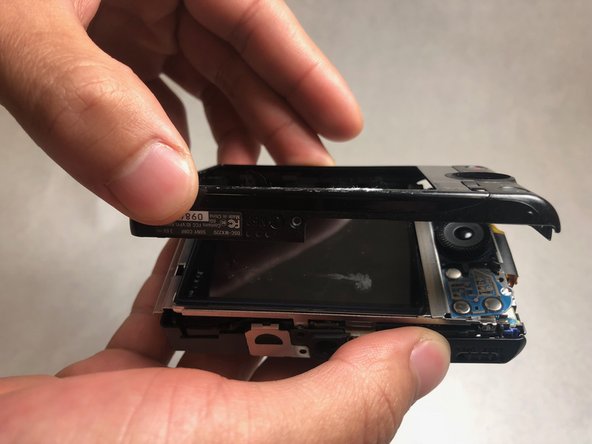
  4. Sony Cyber-shot DSC-WX220 Flash Replacement: passo 4, immagine 1 di 2 Sony Cyber-shot DSC-WX220 Flash Replacement: passo 4, immagine 2 di 2
    • Pry apart the case gently using a plastic opening tool.

  5. Sony Cyber-shot DSC-WX220 Flash Replacement, Flash Assembly: passo 5, immagine 1 di 1
    • Pry back the panel to the right of the screen using a plastic opening tool.

  6. Sony Cyber-shot DSC-WX220 Flash Replacement: passo 6, immagine 1 di 1
    • Working on the left side of the screen, pry the metal panel off from the motherboard housing using a plastic opening tool.

  7. Sony Cyber-shot DSC-WX220 Flash Replacement: passo 7, immagine 1 di 1
    • Pull out the ZIF cable from the motherboard.

    • When removing the ZF cable, pull it straight out to avoid damaging the cable.

  8. Sony Cyber-shot DSC-WX220 Flash Replacement: passo 8, immagine 1 di 1
    • Pull the capacitor out of the shell.

    • Be careful not to shock yourself on the capacitor(metal components on the top)

  9. Sony Cyber-shot DSC-WX220 Flash Replacement: passo 9, immagine 1 di 1
    • Unpin the flash assembly.

  10. Sony Cyber-shot DSC-WX220 Flash Replacement: passo 10, immagine 1 di 1
    • Lift flash component toward you and gently pull the ZIF cable up and away from the camera.

Conclusione

To reassemble your device, follow these instructions in reverse order.

Kate Glazer

Membro da: 03/20/18

621 Reputazione

5 Guide realizzate

Team

IUPUI, Team S6-G3, Baechle Spring 2018 Membro di IUPUI, Team S6-G3, Baechle Spring 2018

IUPUI-BAECHLE-S18S6G3

3 Membri

5 Guide realizzate

0 Commenti

Aggiungi Commento

Visualizza Statistiche:

Ultime 24 Ore: 0

Ultimi 7 Giorni: 0

Ultimi 30 Giorni: 10

Tutti i Tempi: 544