Salta al contenuto principale

Sony Cyber-shot DSC-WX100 LCD Screen Replacement

Cosa ti serve

  1. Sony Cyber-shot DSC-WX100 LCD Screen Replacement, Battery: passo 1, immagine 1 di 1
    • Open the flap indicated to allow access to the battery slot.

    • The gray switch indicated has to be moved to the right in order to release the flap.

  2. Sony Cyber-shot DSC-WX100 LCD Screen Replacement: passo 2, immagine 1 di 1
    • If the old battery is still in the slot, then make sure the camera is turned off prior to removal.

    • If there is a battery currently in the slot, remove by first pulling downwards on the blue component. This will allow you to remove the battery from the slot.

  3. Sony Cyber-shot DSC-WX100 LCD Screen Replacement, Outer Casing: passo 3, immagine 1 di 3 Sony Cyber-shot DSC-WX100 LCD Screen Replacement, Outer Casing: passo 3, immagine 2 di 3 Sony Cyber-shot DSC-WX100 LCD Screen Replacement, Outer Casing: passo 3, immagine 3 di 3
    • Remove all of the 1mm screws using a Philips #000 Screwdriver.

    • Remover the rest of the screws (2mm) from the camera covers using a Phillips #000 Screwdriver.

  4. Sony Cyber-shot DSC-WX100 LCD Screen Replacement: passo 4, immagine 1 di 2 Sony Cyber-shot DSC-WX100 LCD Screen Replacement: passo 4, immagine 2 di 2
    • Use the plastic opening tool to gently remove the front and back plates of the camera.

  5. Sony Cyber-shot DSC-WX100 LCD Screen Replacement: passo 5, immagine 1 di 2 Sony Cyber-shot DSC-WX100 LCD Screen Replacement: passo 5, immagine 2 di 2
    • Use a plastic opening tool to gently release the two indicated tabs.

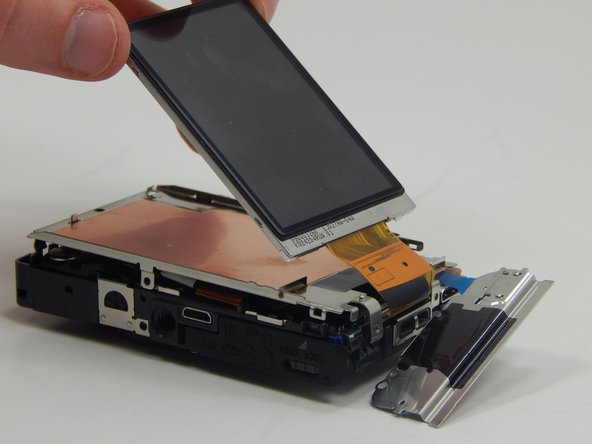
    • Pull up on the lower end of the plate. Lift it so the plate is high enough so that the marked bump is not holding it in place.

    • Pull away from the camera at the end of the metal plate with the blue circuits to then remove the plate from the rest of the camera.

    • For help please watch the video.

  6. Sony Cyber-shot DSC-WX100 LCD Screen Replacement: passo 7, immagine 1 di 3 Sony Cyber-shot DSC-WX100 LCD Screen Replacement: passo 7, immagine 2 di 3 Sony Cyber-shot DSC-WX100 LCD Screen Replacement: passo 7, immagine 3 di 3
    • Remove this screw (1mm) with a Phillips #000 Screwdriver.

    • Gently lift the LCD from the metal plate.

    • Remove the metal plate that was underneath the LCD screen from the camera.

  7. Sony Cyber-shot DSC-WX100 LCD Screen Replacement: passo 8, immagine 1 di 3 Sony Cyber-shot DSC-WX100 LCD Screen Replacement: passo 8, immagine 2 di 3 Sony Cyber-shot DSC-WX100 LCD Screen Replacement: passo 8, immagine 3 di 3
    • Use the plastic opening tool to pry the black bar upwards.

    • Pull the LCD screen from out of the slot.

Conclusione

To reassemble your device, follow these instructions in reverse order.

Un'altra persona ha completato questa guida.

Peter Prins

Membro da: 03/19/15

262 Reputazione

2 Guide realizzate

Team

Un commento

be careful with capacitor !!! i touched it 5-10 minutes after battery was removed and felt electricity in my chest, ears… be careful :D

k.bilius - Replica

Aggiungi Commento

Visualizza Statistiche:

Ultime 24 Ore: 0

Ultimi 7 Giorni: 8

Ultimi 30 Giorni: 17

Tutti i Tempi: 1,283