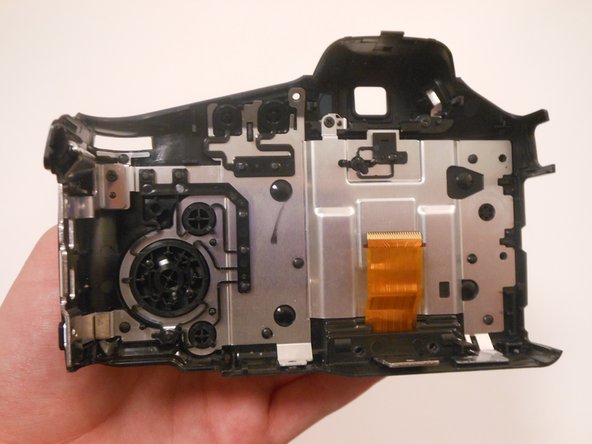
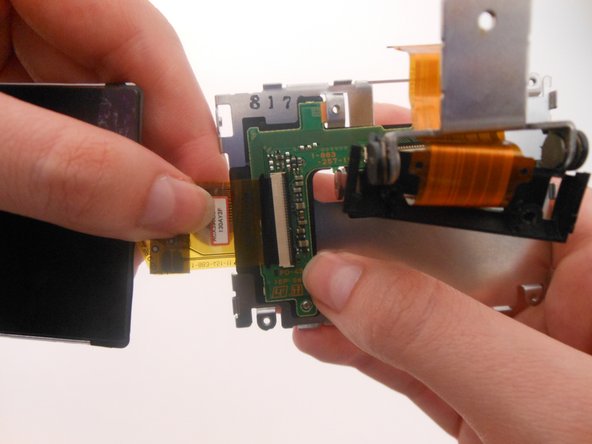
Salta al contenuto principale

Sony Cyber-shot DSC-HX100V LCD Screen Replacement

Cosa ti serve

  1. Sony Cyber-shot DSC-HX100V  LCD Screen Replacement, LCD Screen: passo 1, immagine 1 di 1
    • Make sure the camera is turned off.

    • Press the ON/OFF button to turn off the camera.

    • Be careful, data may be lost if the camera remains on.

  2. Sony Cyber-shot DSC-HX100V  LCD Screen Replacement: passo 2, immagine 1 di 3 Sony Cyber-shot DSC-HX100V  LCD Screen Replacement: passo 2, immagine 2 di 3 Sony Cyber-shot DSC-HX100V  LCD Screen Replacement: passo 2, immagine 3 di 3
    • Use the Phillips screwdriver size #00 to remove the 1.59mm #00 screws.

    • Remove 2 screws on the side of the camera.

    • Remove 4 screws on the bottom of the camera.

    • Remove 1 screw next to the eyepiece.

  3. Sony Cyber-shot DSC-HX100V  LCD Screen Replacement: passo 3, immagine 1 di 1
    • Tilt the screen forward.

    • Remove the two 1.59mm #00 screws on the left with the Phillips #00 screwdriver.

  4. Sony Cyber-shot DSC-HX100V  LCD Screen Replacement: passo 4, immagine 1 di 1
    • Pull the back panel of the camera upward.

    • Use the spudger to help pry open the back panel.

  5. Sony Cyber-shot DSC-HX100V  LCD Screen Replacement: passo 5, immagine 1 di 2 Sony Cyber-shot DSC-HX100V  LCD Screen Replacement: passo 5, immagine 2 di 2
    • Open the back panel to view the inside of the camera.

    • Gently pull the orange ribbon cable to separate the two parts of the camera.

    • Set the front part of the camera to the side.

  6. Sony Cyber-shot DSC-HX100V  LCD Screen Replacement: passo 6, immagine 1 di 2 Sony Cyber-shot DSC-HX100V  LCD Screen Replacement: passo 6, immagine 2 di 2
    • Flip the entire back panel so that the screen is facing upwards.

    • Lift the screen upwards to separate it from the back panel.

    • Place the back panel off to the side. Now we will be focusing on the screen.

    • Turn the screen so that the side with the screw is facing you.

    • Remove the 1.59mm #00 screw with the Phillips #00 screwdriver.

  7. Sony Cyber-shot DSC-HX100V  LCD Screen Replacement: passo 7, immagine 1 di 1
    • Flip the screen over to view the backside.

    • Use a Phillips #00 screwdriver to remove the 1.59mm #00 screw.

  8. Sony Cyber-shot DSC-HX100V  LCD Screen Replacement: passo 8, immagine 1 di 1
    • Flip the screen so that the screen is facing downwards and the orange ribbon cable is on top.

    • Lift the small, black panel to remove it from the screen.

  9. Sony Cyber-shot DSC-HX100V  LCD Screen Replacement: passo 9, immagine 1 di 1
    • Lift up the entire panel with the orange ribbon cable.

    • Behind the orange ribbon cable is a small, black panel.

    • Lift the panel upwards and remove it.

  10. Sony Cyber-shot DSC-HX100V  LCD Screen Replacement: passo 10, immagine 1 di 1
    • Flip the screen so that the orange ribbon cable is facing downwards.

    • Press on the sliding panel and slide it upwards to remove it.

  11. Sony Cyber-shot DSC-HX100V  LCD Screen Replacement: passo 11, immagine 1 di 1
    • Remove the frame from the screen.

  12. Sony Cyber-shot DSC-HX100V  LCD Screen Replacement: passo 12, immagine 1 di 2 Sony Cyber-shot DSC-HX100V  LCD Screen Replacement: passo 12, immagine 2 di 2
    • Lift the screen upwards to view the inside.

    • Use the Phillips screwdriver size #00 to remove the 1.59mm screw inside the green square.

  13. Sony Cyber-shot DSC-HX100V  LCD Screen Replacement: passo 13, immagine 1 di 2 Sony Cyber-shot DSC-HX100V  LCD Screen Replacement: passo 13, immagine 2 di 2
    • Using a Phillips #00 screwdriver, remove the three 1.59mm #00 screws from the back panel.

    • Lift up the black panel on the backside to remove.

  14. Sony Cyber-shot DSC-HX100V  LCD Screen Replacement: passo 14, immagine 1 di 2 Sony Cyber-shot DSC-HX100V  LCD Screen Replacement: passo 14, immagine 2 di 2
    • Lift the entire screen upwards.

    • Gently tug the orange ribbon cable to remove the screen from the silver panel.

Conclusione

To reassemble your device, follow these instructions in reverse order.

Altre 8 persone hanno completato questa guida.

Un commento

I followed the steps and removed cracked LCD. upon reassemly of parts after connecting replacement LCD, I found it was very difficult to connect orange ribbon back to camera body because not enough room to work with and cable is too thin and flexible. So it is better to start from Step 7 after found out someone posted the method without detaching from camera body.

Btw, I reassembled with new LCD but camera wont turn on the LCD panel at all. Changed it back to old, only cracked screen, one but now it wont come up either. So I am stuck to know what could have gone wrong.

Shon - Replica

Aggiungi Commento

Visualizza Statistiche:

Ultime 24 Ore: 3

Ultimi 7 Giorni: 9

Ultimi 30 Giorni: 42

Tutti i Tempi: 5,878