Salta al contenuto principale

Sony Cyber-shot DSC-H20 Flash Assembly Replacement

Cosa ti serve

  1. Sony Cyber-shot DSC-H20 Flash Assembly Replacement, Flash Assembly: passo 1, immagine 1 di 2 Sony Cyber-shot DSC-H20 Flash Assembly Replacement, Flash Assembly: passo 1, immagine 2 di 2
    • Slide open the battery cover and remove the battery and the Memory Stick Duo.

    • Return the battery cover to its closed position.
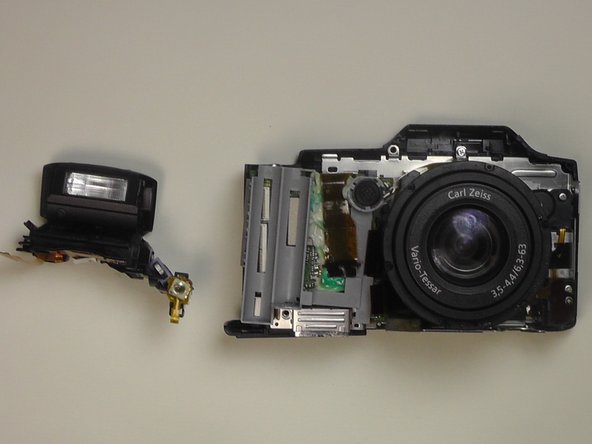
  2. Sony Cyber-shot DSC-H20 Flash Assembly Replacement: passo 2, immagine 1 di 1
    • Remove all three screws from the bottom of the camera.

  3. Sony Cyber-shot DSC-H20 Flash Assembly Replacement: passo 3, immagine 1 di 2 Sony Cyber-shot DSC-H20 Flash Assembly Replacement: passo 3, immagine 2 di 2
    • Remove the screws on the left and right sides of the camera.

  4. Sony Cyber-shot DSC-H20 Flash Assembly Replacement: passo 4, immagine 1 di 3 Sony Cyber-shot DSC-H20 Flash Assembly Replacement: passo 4, immagine 2 di 3 Sony Cyber-shot DSC-H20 Flash Assembly Replacement: passo 4, immagine 3 di 3
    • Press down on the flash cover to raise the flash.

    • Remove both screws that hold the flash cover to the body of the camera.

  5. Sony Cyber-shot DSC-H20 Flash Assembly Replacement: passo 5, immagine 1 di 2 Sony Cyber-shot DSC-H20 Flash Assembly Replacement: passo 5, immagine 2 di 2
    • Place the camera upside down with the battery port positioned upward.

    • Slide open the battery port.

  6. Sony Cyber-shot DSC-H20 Flash Assembly Replacement: passo 6, immagine 1 di 3 Sony Cyber-shot DSC-H20 Flash Assembly Replacement: passo 6, immagine 2 di 3 Sony Cyber-shot DSC-H20 Flash Assembly Replacement: passo 6, immagine 3 di 3
    • Pry the front cover of the camera off with the plastic opening tool.

  7. Sony Cyber-shot DSC-H20 Flash Assembly Replacement: passo 7, immagine 1 di 1
    • Remove the power shutter unit

  8. Sony Cyber-shot DSC-H20 Flash Assembly Replacement: passo 8, immagine 1 di 2 Sony Cyber-shot DSC-H20 Flash Assembly Replacement: passo 8, immagine 2 di 2
    • Unscrew the screw located at the back left corner of the flash component.

    • Set the flash component aside.

Conclusione

To reassemble your device, follow these instructions in reverse order.

Un'altra persona ha completato questa guida.

Team

USF Tampa, Team 1-1, Leahy Winter 2015 Membro di USF Tampa, Team 1-1, Leahy Winter 2015

USFT-LEAHY-W15S1G1

3 Membri

10 Guide realizzate

Un commento

how to bye power sutter unit

aloke mondal - Replica

Aggiungi Commento

Visualizza Statistiche:

Ultime 24 Ore: 0

Ultimi 7 Giorni: 0

Ultimi 30 Giorni: 4

Tutti i Tempi: 1,373