Salta al contenuto principale

Sony Alpha NEX-C3 LCD Screen Replacement

Cosa ti serve

  1. Sony Alpha NEX-C3 LCD Screen Replacement, LCD Screen: passo 1, immagine 1 di 1
    • Turn off the camera by sliding the power switch.

  2. Sony Alpha NEX-C3 LCD Screen Replacement: passo 2, immagine 1 di 1
    • Tilt up the LCD screen.

  3. Sony Alpha NEX-C3 LCD Screen Replacement: passo 3, immagine 1 di 1
    • Use a Phillips head 000 screwdriver to remove the two 2.0mm screws on the bottom of the LCD screen.

  4. Sony Alpha NEX-C3 LCD Screen Replacement: passo 4, immagine 1 di 3 Sony Alpha NEX-C3 LCD Screen Replacement: passo 4, immagine 2 di 3 Sony Alpha NEX-C3 LCD Screen Replacement: passo 4, immagine 3 di 3
    • Use a Phillips head 000 screwdriver to remove the two 1.0mm screws on the smaller backplate of the LCD screen that covers the ribbon cable.

    • The smaller backplate should easily come off. Put it to the side.

  5. Sony Alpha NEX-C3 LCD Screen Replacement: passo 5, immagine 1 di 2 Sony Alpha NEX-C3 LCD Screen Replacement: passo 5, immagine 2 di 2
    • Use a Phillips head 000 screwdriver to remove the two 1.0mm screws on the bigger backplate of the LCD.

  6. Sony Alpha NEX-C3 LCD Screen Replacement: passo 6, immagine 1 di 2 Sony Alpha NEX-C3 LCD Screen Replacement: passo 6, immagine 2 di 2
    • Using the plastic opening tool, remove the larger backplate from the LCD screen.

  7. Sony Alpha NEX-C3 LCD Screen Replacement: passo 7, immagine 1 di 1
    • With your hands, gently remove the black plastic piece on the backside of the LCD screen.

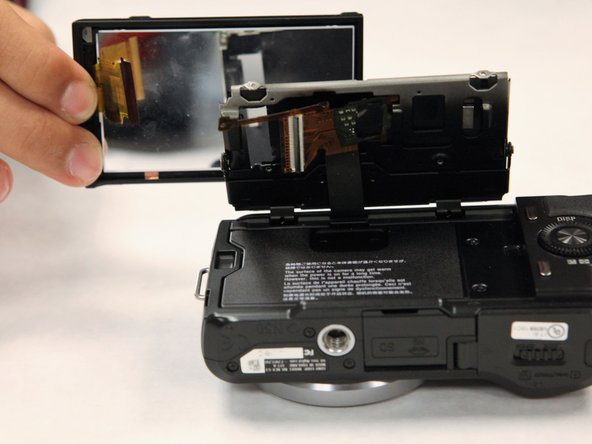
  8. Sony Alpha NEX-C3 LCD Screen Replacement: passo 8, immagine 1 di 2 Sony Alpha NEX-C3 LCD Screen Replacement: passo 8, immagine 2 di 2
    • Using tweezers, gently pull up and away on the ribbon cable connected to the motherboard, after which, the LCD screen should come off.

    • The motherboard ribbon cable has a specific connector.

Conclusione

To reassemble your device, follow these instructions in reverse order. However, when installing the ribbon cable, the connector has a specific step. The connector has a tiny flap that clamps down onto the ribbon cable in order to make it secure.

Un'altra persona ha completato questa guida.

Un commento

Sir, my unit has many lines that appear on the screen. However, the lcd glass is pristine & has no cracks. Which part is defective? Is the lcd mother board the culprit? Thank you.

Stevie B - Replica

Aggiungi Commento

Visualizza Statistiche:

Ultime 24 Ore: 0

Ultimi 7 Giorni: 2

Ultimi 30 Giorni: 20

Tutti i Tempi: 2,446