Introduzione
Samsung è tornata, ragazzi! Il più grande costruttore mondiale di telefoni entra di forza nel 2017 lanciando quello che è quasi lo smartphone più grande del mondo: con i suoi 6,2 pollici, il Galaxy S8+ si fa notare per l'impatto visivo. Ma come si comporta sul tavolo degli smontaggi? Vediamo un esploso di questo smartphone.
Oh, stavi cercando il nostro smontaggio Galaxy S8 standard? Bene, non andare oltre.
Vuoi seguire da vicino gli smontaggi futuri? Seguici su Twitter, fai amicizia con noi su Facebook oppure seguici su Instagram per tutte le ultime notizie.
Cosa ti serve
-
-
Avete visto finora il raffinato esterno dell'S8+ nelle immagini promozionali Samsung, mentre noi ora andremo più in profondità. Tra gli elementi che già conosciamo ci sono:
-
Display Super AMOLED da 6,2 pollici, con bordi dual-edge e risoluzione 2960 × 1440 (529 ppi)
-
Processore Qualcomm Snapdragon 835 o Samsung Exynos 8895, con 4 GB di RAM
-
Fotocamera posteriore da 12 megapixel con autofocus dual pixel e acquisizione video 4K; fotocamera anteriore da 8 megapixel
-
Memorizzazione interna da 64 GB, espandibile tramite scheda MicroSD (fino a 256 GB in più)
-
Livello di impermeabilizzazione IP68
-
Android 7.0 Nougat
-
-
-
Le interfacce nella parte inferiore comprendono un jack cuffie, un connettore USB-C, una presa microfono e la griglia dell'altoparlante.
-
La parte anteriore è liscia e praticamente priva di alcun rilievo: il pulsante home fisico è stato sostituito da un sensore di pressione posizionato sotto il display, cosa che rende questo dispositivo davvero monolitico.
-
Infine, chi è abituato a cambiare spesso SIM ne prenda nota: ci sono due forellini quasi identici nella parte superiore dell'S8+. Una è per infilarci l'attrezzo di espulsione SIM, l'altro ospita un microfono. Meglio non fare confusione.
Samsung went with easier solution in regard of fingerprint reader because synaptic did not finish developing the on screen sensor; while they are under pressure to release a new flagship in a rather empty market for them after the Note 7 fiasco.
I would love to understand the damage (especially to the IP rating) that may have been caused by pushing the sim ejector through the top mic hole.
-
-
-
È il momento di fare qualche breve confronto prima di iniziare a fare sul serio.
-
In questa triade, c'è l'S7 Edge a sinistra, l'S8+ in centro e l'S8 a destra.
-
Grazie a una cornice sottile e all'insolito rapporto tra i lati di 18,5:9, l'S8+ riesce a farci stare un display da 6,2 pollici in circa lo stesso ingombro esterno dell'S7 Edge con il suo 5,5".
-
Rispetto a quello che era in vendita l'anno scorso, l'unica differenza rilevante è la migrazione del gruppo flash e lo spostamento del lettore di impronte digitali.
-
-
-
Abbiamo aspettato abbastanza e non vediamo l'ora di guardarci dentro. Per fortuna sappiamo come fare.
-
Una buona dose di calore assicurato dal nostro iOpener ammorbidisce l'adesivo abbastanza da poter sollevare il vetro posteriore e iniziare la nostra battaglia all'interno.
-
E adesso siamo quasi dentro…
-
-
-
Staccato il cavo, possiamo mettere fuori dai piedi il vetro. L'S8+ e l'S8 seguono la mossa dell'S6 del pannello in vetro posteriore. Questa soluzione risparmia a Samsung lo sforzo ingegneristico che richiede l'integrazione di antenne in un telefono con il fondello in metallo, tutto questo pagando un prezzo in termini di affidabilità e riparabilità.
-
Sembra che Samsung abbia progettato questo cavo per essere sicuri che si separi con il pannello posteriore. Con un gioco quasi assente, anche il più delicato sollevamento del pannello stacca il cavo dal suo piccolo connettore a pressione. Questo lo rende molto meno soggetto a danni di certi sensori di impronte digitali visti in precedenza.
-
Staccato il cavo, possiamo mettere fuori dai piedi il vetro. S8+ e S8 seguono la mossa dell'S6 del pannello in vetro posteriore. Questa soluzione risparmia a Samsung lo sforzo ingegneristico che richiede l'integrazione di antenne in un telefono con il fondo in metallo, tutto questo però pagando un prezzo in termini di durata e riparabilità.
-
L'associazione di 'rompibilità' e una procedura di apertura del cavolo non aiuteranno di certo quando sarà il momento di assegnare il punteggio di riparabilità.
What is the fingerprint reader made from this year? The S7 fingerprint reader in the home button was prone to scratching and peeling last year. Is the fingerprint reader covered by glass this year in the S8 and S8+? Very curious to know as I like things to last and wear well.
-
-
-
-
Con il telaio intermedio che viene via un pezzo alla volta, la situazione sembra molto simile a quella dell'S7 e dell'S7 Edge.
-
Questa volta il gruppo dell'antenna superiore è combinato con il pannello di carica NFC/wireless, come nel Note 7.
-
La bobina dovrebbe poter eseguire anche le funzioni Samsung Pay, fungendo da MST; presumibilmente la bobina agisce come elettromagnete per imitare la striscia sulla carta di credito quando viene passata sul lettore di card.
-
-
-
Speriamo che le procedure di collaudo migliorate di Samsung siano quello che mancava al Note7, dato che l'aspetto della batteria ci sembra più o meno lo stesso.
-
E ancora non è facile tirar via questo adesivo. Anche quando la batteria è completamente rimossa, la colla non se ne vuole andare.
-
L'S8+ adotta una batteria da 13,48 Wh (3500 mAh per 3,85 V), identica capacità del Note7, appena inferiore ai 13,86 Wh dell'S7 Edge.
-
Samsung continua a battere Apple nella guerra della capacità delle batterie, con l'iPhone 7+ che fa registrare 11,1 Wh (2900 mAh per 3,82 V).
-
-
-
Estraiamo la scheda madre grondante componenti e iniziamo a staccare le fotocamere.
-
La vecchia Sony "Hero" lascia il posto alla Sony "Dream1" come fotocamera posteriore. Al di là delle variazioni dell'etichetta, però, questa ha lo stesso hardware della fotocamera dell'S7/S7 Edge: Samsung ha migliorato il software, nulla di più.
-
Quindi ecco la fotocamera anteriore e un'altra per la scansione dell'iride, già vista nel Note7.
The image sensor is also different. Being an IMX333. On top of that the ISP has been upgraded. Far from just "sofware improvements, nothing more" I could tell the moment I took a RAW photo on both using 500 iso. Despite using RAW, bypassing the jpeg processing, the S8 image was noticeably less noisy with much less color blotching
-
-
-
Abbiamo tolto di mezzo la fotocamera per studiare bene il silicio della scheda madre. Le nostre scoperte comprendono:
-
4 GB di RAM LPDDR4 Samsung K3UH5H50MM-NGCJ sovrapposti al processore Snapdragon 835 MSM8998
-
Memoria UFS Toshiba da 64 GB THGAF4G9N4LBAIR (NAND flash + controller)
-
Codec audio Qualcomm Aqstic WCD9341
-
Skyworks 78160-11
-
Avago AFEM-9066
-
Interfaccia PMIC (gestione alimentazione) Silicon Mitus SM5720
-
-
-
Estraiamo la scheda secondaria di interfaccia I/O. Ci sono notevoli segnali della cura rivolta agli ingressi, come la cornice della griglia dell'altoparlante e i minuscoli sigilli sul connettore USB-C e sul jack cuffie.
-
Il jack cuffie in sé e per sé rimane un arnese modulare: buone notizie per la riparabilità, perché si tratta di un componente destinato a una forte usura.
-
È anche visibile una collezione di guarnizioni che aiutano a dare al telefono il suo rating di impermeabilità IP68. Il jack cuffie, la porta USB-C e la griglia degli altoparlanti adottano interessanti barriere contro gli ingressi indesiderati.
Is the voltage regulator on the daughter board?
My S8+ indicated moisture when I plugged in the charging cable, the next day it did not but It will not take a charge. Even wirelessly. So I think it is the voltage regulator that is fried. If it is on the daughter board I can pillage one from another Google Locked phone and fix mine.
You think this will work?
-
-
-
Dopo un'occhiata al condotto termico e alle superficie di contatto, estraiamo altri pezzi dallo chassis.
-
Tiriamo fuori il buon vecchio motore di vibrazione.
-
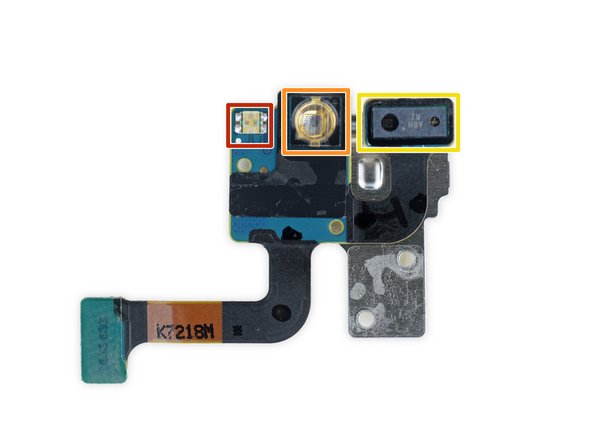
Ed ecco il simpatico gruppo sensori (con indicatore di umidità):
-
LED RGB (probabilmente)
-
Emettitore infrarossi (forse per la fotocamera di scansione dell'iride)
-
Misuratore di distanze (probabilmente) per diminuire la luminosità dello schermo durante le chiamate.
I thought the IR camera/emitter on the front should be part of the iris scanning system and not pulse reading
Exactly. Yellow is the proximity sensor, orange an IR LED for the iris scanner and red the notification LED, as stated.
Not as stated, the description says it's for illuminating fingers for pulse reading,,,
djlobb01 -
-
-
-
Alla ricerca del misterioso non-pulsante home, ci tuffiamo nel display nonostante le note precedenti… difficoltà.
-
Per fortuna questo display/digitizer si stacca dal suo telaio con un certo sforzo, ma senza danni.
-
Sperando di trovare qualche dettaglio nascosto sotto il cablaggio del display, lo stacchiamo e troviamo… un cavolo di niente. Nessuna informazione sul modello e nessun sensore di pressione visibile. Speriamo di avere più fortuna la prossima volta.
There is a force sensor..hope everybody can see it which connects to the display/timing/touch controller board
This interests me most.... So there is no pressure sensor at all?? How does the S8 register a home button "press" without any kind of pressure pad/sensor?
A pressure sensor isn't needed, it just needs to see how big an imprint your finger is making as the harder you press, the bigger the contact area is on the screen
that seems like a conductive layer beneath with a sponge covering. this could be a force sensor.
-
-
-
E questo è tutto per l'S8+. Se la tua voglia di smontaggi non è ancora saziata, puoi balzare sulla nostra analisi del Galaxy S8 standard.
-
Nel frattempo, è giunta l'ora di dare un punteggio a questo telefono.
Hiya!
I was wondering if you guys could maybe do a comparison?
1) like the SD835 vs the A10 size.
2) volume of battery on S8 vs iphone7
3) size, efficency and density of the two motherboards (i think iphones is much smaller)
4) size and effectiveness of the two vibration motors (since S8 seems 1/3 the size)
4) also could you compare the two speakers (S8 and iphone7) against the and dual front speaker moto phone?
I ask because once again I am under the impression that the moto speakers are 1/3 the size of the main speakers in the two leaders and the same size as the ear speaker on the two.
5) and also maybe the effectiveness of the hydrophobic coating on the moto phones vs the two leaders?
6) and finally compare their internals density and effeicency to the Xiaomi Redmi 3s (because as far as I know, that is the smallest 5inch phone with a 4000mA battery)
I think that would be a really cool and enlightning.
love your work guys.
cheers.
-
- Molti componenti sono modulari e possono essere sostituiti in modo indipendente.
- La batteria può essere sostituita, ma l'adesivo tenace e il pannello posteriore incollato rendono tutto difficile senza che ve ne sia la necessità.
- I vetri anteriore e posteriore raddoppiano la possibilità di rottura e l'adesivo tenace presente su entrambi rende difficile accedere alle parti interne per qualsiasi tipo di riparazione.
- A causa del vetro curvo, la sostituzione del vetro anteriore senza distruggere il display è estremamente difficile.


Considerazioni Finali
Punteggio Riparabilità


(10 è il più facile da riparare)
Un ringraziamento speciale a questi traduttori:
61%

albertob ci sta aiutando ad aggiustare il mondo! Vuoi partecipare?
Inizia a tradurre ›
32 Commenti
Hi: the breakdown exercise did you get a positive id on who is providing the USB-C controller chip? Thx!
I don't like glue on the battery and its not just that its the same capacity as we already see on the Samsung Galaxy S7 its kinda sad.
Man i now i will probably wait for one plus 5 or next google device because these two have big support on XDA community and they have regulari updates.
OnePlus are great with updates. My friend had Nougat on his OnePlus 3 before any of the leading phone makers (excluding Google Pixel obviously).
djlobb01 -
The S8/S8+ use a Sony IMX333 or Samsung S5K2L2 up from the IMX266 S5K2L1 found in last year's S7/S7E.
Thanks as always, guys. I seem to miss the speaker, though. Is it under the light gray grille?
Ah, ok. I see. It is the component in the lower midframe (https://d3nevzfk7ii3be.cloudfront.net/ig...).
Do you know how the home button works since there's no pressure sensor?
Does it have a separate "taptic engine" or uses the same vibration motor?
Thanks.
It likely works by measuring the surface area of the finger placed on the screen. When you press harder to activate the virtual button your finger will create a larger surface area on the screen which can be measured as more force being applied.
Leo Best -
Because samsung opted for Toshiba UFS storage if they also manufacture UFS storage
Why would you expect to find a pressure sensor behind the displyay? The screen does not deform, the digitiser just has to look for the contact patch of your finger getting bigger as you press harder on that area.
Open the Samsung Dex Dock as well!
Are the s8 and s8+ motherboards the same?
Photos [|3]
Hi, could you see a photo in high resolution, how is the earphone hooked? The frontal bone, I get curious about how it is maintained and how it is, and if it could sink without meaning to. Thank you
Do you mean the earpiece speaker? It can be seen in this photo, the last photo in step 6, at the top of the phone. It is adhered to the case and connected via spring contacts to the back of the motherboard. The speaker grille can be seen in this photo, the second image on step 13 at the top of the phone.
Can someone tell me what type the 14 Phillips screws used to hold down the NFC antenna, charging coil, and loud speaker? In addition, what are the 5 Phillips screws used to hold down the charging port PCB?
accidently I entered the ejection pin in the bottom mic.hole in S8 please advise if I already damaged the mic and/or the water resistant sealed?
I want to share my experience with you all.
We at HiGenius.nl fix smartphones all the time like Samsung S8 Plus too. unfortunately i did not see in this video that the sim tray is different than ever before. This because the tray is attached at the back of the board. So dont be surprised while you see this for the first time. Just be very cautious while removing the board. it wil follow so don’t worry.
I recently disassembled my Samsung galaxy s8 Plus the other day to replace the usb-c port as it would no longer lock in the charging cable.
However upon putting it back together and re-inserting the SIM card, it can no longer connect to my network provider. I get no mobile data or cell reception at all. However Wifi connections still work.
I was wondering if you may have an idea at what piece, board ect may play a role in connecting to the network.
The SIM works fine in another samsung phone that I previously used, so it is definitely hardware.
I’ve done network setting resets, WiFi calling is not on, and ive factory reset.
Sort of wishing I just bought a wireless charger at this point…
Thanks,
ZL
Something like that happened to me with an ASUS phone, the cause of the problem was that I did not properly connected the antenna (it was a little loose).
Hops this helps!
My galaxy s8 replaced screen isn't black what other part do i need to buy
The pictures don’t match what is received for the Galaxy S8+. It’s also not clear where to attach the perimeter adhesive. On the lip of the back cover or just inside the well area. In addition, after exposing the adhesive (after removing the clear side), no matter how weel you pre-align the position, you can’t count on the adhesive to stick to whichever method questioned above, without some of it not releasing cleanly from the colored backing. Yes. firm pressure was applied before moving a little further down. At times the adhesive stuck so strongly to the colored backing, it stretched the adhesive out of shape.
I have repaired hundreds of laptops and all in ones, so I understand there are subtleties in a repair, and I found it quite confusing replacing the battery and fingerprint sensor and other necessary parts related to doing that repair with the either inaccurate, outdated, or lack of detail provided (but much needed) in this guide.
can i buy motherboard for samsung galaxy 8plus scv35
hhera,n - Replica