Introduzione
La linea Galaxy di smartphone Samsung di solito faceva molto bene nel settore riparabilità, ma l'ultimo modello al top di gamma è incappato in una caduta, facendo registrare un poco entusiasmante 5/10. Il nuovo e ridisegnato S6 ci riporterà in alto tra le stelle o affonderà ancora di più nelle profondità di un buco nero di riparabilità? Sali a bordo anche tu con noi mentre smontiamo il Samsung Galaxy S6!
Interessati alla controparte arrotondata dell'S6? Guardatevi lo smontaggio del Samsung Galaxy S6 Edge.
Vieni con noi nella stratosfera dei social network! Troverai notizie lampo su Twitter, puoi seguirci su Facebook e sfogliare la nostra galleria immagini su Instagram.
Cosa ti serve
-
-
Rispetto all'S5, sulla carta l'S6 fa bella figura. Le sue specifiche ricalcano punto per punto quelle dell'elegante S6 Edge:
-
Display da 5.1" Super AMOLED con schermo touchscreen capacitivo (1440 x 2560, ~577 ppi, 16 milioni di colori)
-
Processore Exynos 7 Octa 7420 con GPU integrata Mali-T760 GPU e 3 GB di memoria
-
Fotocamera posteriore da 16 MP con funzione HDR, Flash a LED e registrazione dual-video
-
Supporto integrato per ricarica wireless
-
Opzioni memoria interna da 32, 64 o 128 GB
-
Corpo in vetro Gorilla Glass 4
-
Ha più potenza. Ha più pixel. Ma sembra che manchi qualcosa. Se è qualcosa che da fuori non si vede, lo sapremo mettendoci dentro le mani. È ora di smontare!
-
-
-
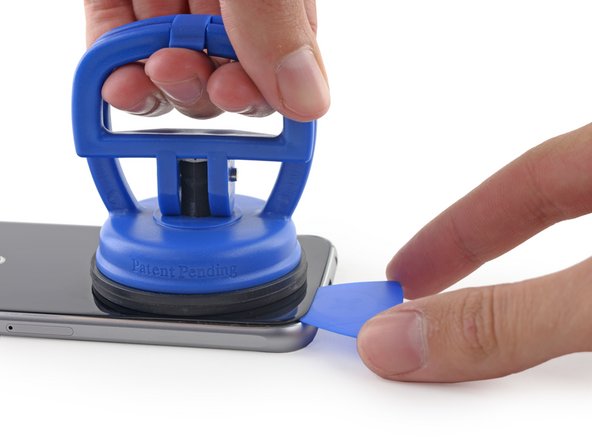
L'S6 Edge si è rivelato mostruosamente difficile da aprire e ci sono ottime probabilità che l'S6 usi lo stesso malvagio adesivo. Questo Galaxy appare sfuggente e restio, ma noi lo attacchiamo con una botta di calore, sotto forma di un iOpener.
-
Dopo una breve lotta all'insegna del déjà vu, la nostra fedele ventosa per carichi elevati e il plettro di apertura ci spianano la strada verso l'interno.
The device needs to be heated up using a hot plate or other appropriate alternative before you can follow these instructions.
The iOpener is such a heat source, is it not?
-
-
-
I pannelli posteriori sono così simili che abbiamo dovuto sottoporli a un confronto serrato: come ci aspettavamo, quello dell'S6 Edge (a destra) è lievemente più piccolo del pannello standard dell'S6 (a sinistra).
-
Questa volta l'adesivo è rimasto appiccicato al telaietto intermedio, nascondendo così le viti. C'è stato un attimo di panico, pensavamo di dover passare attraverso il display, in stile S5.
-
Ma dopo aver staccato l'adesivo, tutte le viti rispondono all'appello; e ora, fuori tutte!
-
-
-
È ora di far esplodere
la galassiail Galaxy. -
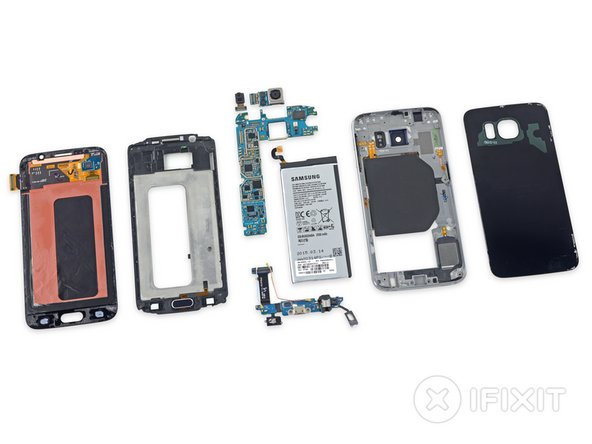
Tolto il telaio centrale, scopriamo... un S6 Edge?
-
Non è proprio così, ma ci vuole un occhio attento per notare la differenza. Oltre a un leggero aggiustamento nel posizionamento dell'imperatore, l'interno è la copia carbone dell'altro smartphone al top di gamma della Samsung che abbiamo fatto a pezzi di recente.
remember to take out the sim card holder before removing the mid frame
What is the function of the large black thing in the center of the midframe?
As in the S6 Edge link, it’s an NFC/wireless charging coil.
-
-
-
-
Chi è che manda avanti il telefono? La batteria!
-
La rimozione della batteria dall'S6 dovrebbe essere un po' più facile rispetto all'Edge. Nell'Edge, il cavo della batteria passa sotto la scheda madre prima di essere collegato in alto, quindi è necessario togliere la scheda madre per arrivare alla batteria.
-
Sembra che, grazie a quel filino di spazio in più presente nell'S6 standard, Samsung si è stata in grado di far correre il cavo sopra la scheda, saltando così un passaggio per la rimozione della batteria.
-
Inoltre, grazie al design a schermo piatto dell'S6, è più facile spingere un plettro di apertura nella fessura tra batteria e gruppo display; quindi è più semplice tagliare l'adesivo (altrettanto robusto) che blocca la batteria.
-
Con questo non si può certo parlare di batteria sostituibile dall'utente, ma l'operazione un po' più facile rispetto all'S6 Edge. In ogni caso, è un bel salto indietro rispetto ai Galaxy precedenti come l'S5, dove si può sostituire la batteria usando nient'altro che il proprio ingegno, e non ne serve nemmeno tanto.
-
-
-
Il Galaxy prevede una batteria da 3,85 V e 9,82 Wh che, secondo Samsung, offre fino a 23 ore di conversazione in 3G, 12 ore di utilizzo di Internet Wi-Fi e fino a 57 ore di riproduzione di musica.
-
Con il passaggio a materiali più pesanti per il case, forse Samsung era interessata a contenere il peso con celle un po' più piccole. Le batterie da 9,82 Wh dell'S6 e quella da 10,01 Wh dell'S6 Edge sembrano piccole rispetto all'elemento da 10,78 Wh del Galaxy S5.
-
La batteria è un bel po' più grande di quella da 6,91 Wh che abbiamo trovato nell'iPhone 6, ma probabilmente offre un tempo di conversazione minore. Sembra che quell'estensione dello schermo abbia il suo peso.
-
-
-
La scheda madre resta collegata dall'attrazione gravitazionale esercitata da un fastidioso connettore della scheda secondaria. Ci mettiamo subito al lavoro con uno spudger e la solleviamo per darle un'occhiata più ravvicinata.
two other connectors need to be removed, one twoards the top and another along the side
We don't write teardowns to be detailed disassembly instructions—they're supposed to provide a fun look inside new devices. If you're looking for step-by-step guides, we do have a complete set of repair manuals that include all the details for individual component replacements.
-
-
-
Prendiamo delle pinzette per avere una vista migliore delle fotocamere del Galaxy.
-
La fotocamera da selfie da 5 MP dell'S6 è l'immagine sputata della fotocamera frontale che abbiamo trovato nel fratello Galaxy.
-
Le somiglianze non finiscono qui. La fotocamera posteriore da 16 Mp con OIS (Stabilizzazione Ottica Immagine) sembra pressoché identica a quella dell'Edge. E anche l'hardware di questa PCB è certamente simile:
-
Memoria Serial Flash Winbond W25Q32FW
-
Giroscopio a due assi InvenSense IDG-2030 per la stabilizzazione ottica dell'immagine.
-
-
-
Iniziamo dalla parte inferiore della scheda e troviamo degli elementi di spicco piuttosto familiari:
-
Processore octa-core Samsung Exynos 7420 - 64-bit, 2.1 GHz Quad + 1.5 GHz Quad, con 3GB di RAM LPDDR4 Samsung K3RG3G30MM-DGCH sovrapposta
-
Memoria Flash NAND da 32 GB Samsung KLUBG4G1BD
-
Modulo Front-End Multimodale Multiband Ibrido (MMMB) Skyworks 78041
-
Avago AFEM-9020 PAM
-
Hub posizione GNSS Broadcom BCM4773
-
Samsung C2N8AF (probabilmente il processore di immagini)
-
Avago A7007 (già visto sul Galaxy S5)
The teardown does not mention that there is a Samsung Shannon 333 Modem Chip underneath the NAND Flash Chip (Orange).
Its stacked and soldered with the same connectors onto the board.
It Also doesn’t mention that this is the E0B1 Variety. (32GB EMMC Chip)
-
-
-
Altre facce familiari ornano il lato frontale della scheda:
-
Codec Audio Wolfson Microelectronics WM1840
-
Samsung S2MPS15 (probabilmente un IC di gestione alimentazione simile al S2MPS11)
-
Ricetrasmettitore RF Samsung Shannon 928 RF
-
PMIC Maxim MAX77843 Companion
-
Amplificatore audio classe DG Maxim MAX98505
-
Samsung Shannon 600B5D
Huh.. So that pesky little PMIC is whats burning my hands when my phone charges.
-
-
-
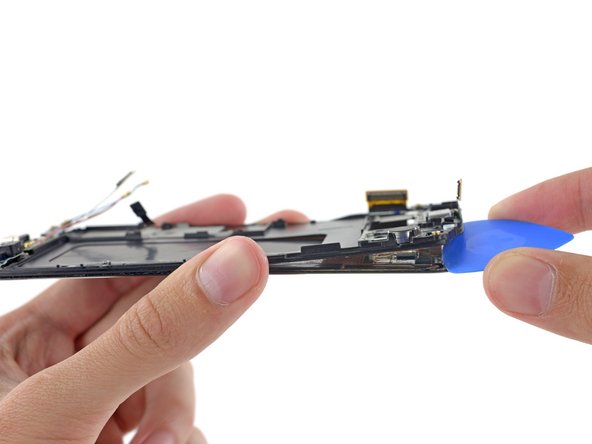
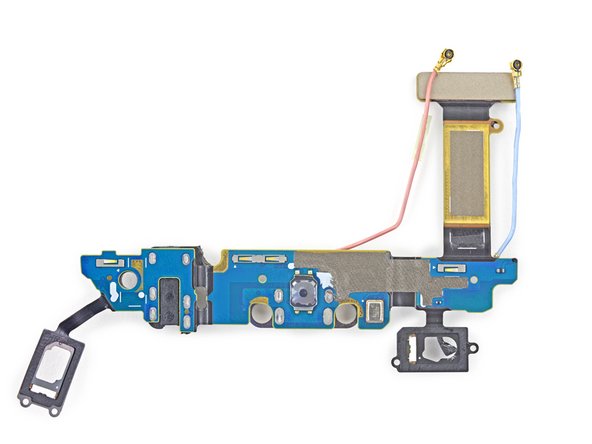
Cerchiamo di sollevare la scheda secondaria, ma i cavi dei LED del pulsante soft ci ostacolano.
-
I cavi dei LED del pulsante soft sono intrappolati tra il display e il telaio di supporto dello schermo stesso.
-
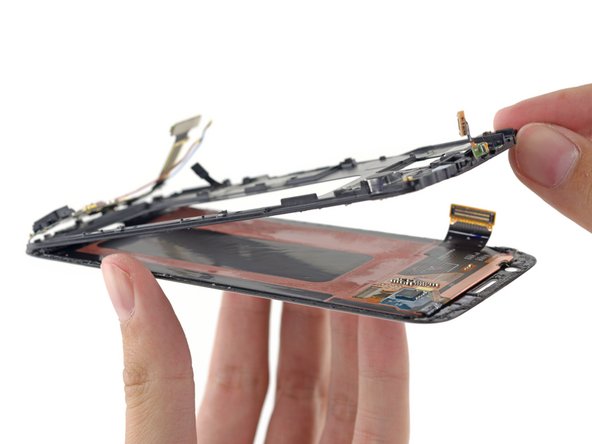
Quindi, per liberare la scheda secondaria, solleviamo l'intero telaio del display.
-
-
-
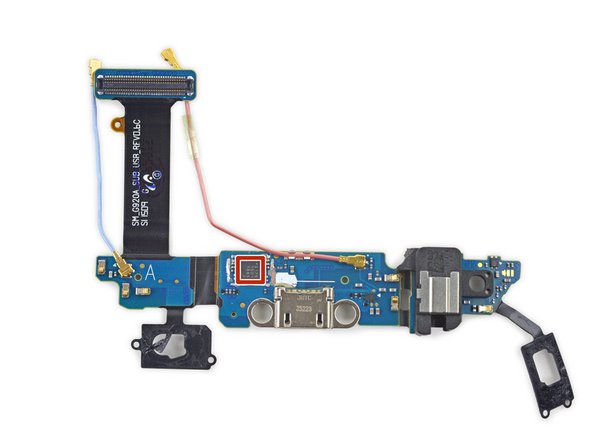
Una volta districata dal resto, la scheda figlia si offre una visione chiara della sua presa per il jack audio e dell'avveniristica (si fa per dire) porta microUSB (2.0).
-
Questo sembrerebbe un altro passo indietro rispetto all'S5, che integrava una 10 volte più veloce) porta USB 3.0.
-
Sulla scheda troviamo un singolo chip:
-
Cypress 3175 1501 1885 (probabilmente un controller sensore del touchscreen o del rilevatore di impronte digitali)
-
-
-
Rimosso il display, troviamo lo stesso controller del touchscreen STMicro FT6BH dell'S6 Edge.
-
-
-
Punteggio di Riparabilità del Samsung Galaxy S6: 4 su 10 ( 10 è il più facile da riparare)
-
Molti componenti sono modulari e possono essere sostituiti in modo indipendente tra loro.
-
L'accesso all'S6 non richiede di togliere prima di tutto il display come nell'S5, ma lo schermo deve comunque essere rimosso per poter sostituire la porta USB.
-
Diversamente dall'S6 Edge, la batteria può essere rimossa senza prima aver espulso la scheda logica, ma il tenace adesivo e il pannello posteriore incollato rendono la sostituzione molto più difficile del necessario.
-
La presenza di un vetro anteriore e posteriore raddoppia il rischio di rottura e l'adesivo tenace sul vetro posteriore rende molto difficile accedere alle parti interne del telefono.
-
Sostituire il vetro senza distruggere il display è probabilmente impossibile.
My samsung s6 dropped in water and only comes on when it is plugged in. As soon as the cord is removed it shuts off. Ive had the battery looked at and thats not the problem. Any suggestions?
Possibly the daughterboard (assuming charging circutry is on daugtherboard) may be providing power to motherboard but not battery
Samsung is a phone which is one of the best phone of the world. There is no doubt.
But at the same time …probably the most difficult phone to get opened !!!
-


Un ringraziamento speciale a questi traduttori:
94%


Questi traduttori ci stanno aiutando ad aggiustare il mondo! Vuoi partecipare?
Inizia a tradurre ›
24 Commenti
So once the rear glass is removed once the screws are removed the chassis is removed? As I want to replace my chassis on my s6 at some point and don't want to remove anything I don't need to.
Any help is appriated.
We have a full set of step-by-step replacement guides for the components in this phone!
My wife dunked hers in the Pool right after my Daughter's Wedding so we need to get the pictures off.
I tried drying it out for a week before even attempting to turn it on. However it is dead!
Any suggestions?
dissemble it first and replace the dead battery. Usually that's the first component that fails upon touching water. Once dissambled, replaced the dead battery and try again. You will be able to check the rest of component with a minimum investment. Cheers.
kavenzc -
My son put my s6 in the bath. The motherboard is blown. My data is fine to retrieve. Is there a way I can retrieve my data and how much would it cost? and also without replacing the motherboard? I just want my photos and videos. I'm not worried if my phone does not fixed afterwards.
I have the same problem. The cost of a recovery company are around 450 till 600 euro.
But the one I brought it to weren't able to retrieve the data
kirsten -
Theoretically, you can move the flash NAND to another S6 and use it that way, I'd assume. That would be pricy but it is possible to do
AdamA -
hello my Samsung s6 does not go fast charging. what is the component on the motherboard that handles the fast charging?
I am looking for the same thing I have replaced the USB port and board but still no fast charge
Hello! I had recently dropped my phone on a hard surface. My screen did not crack but my whole screen went black & now it will not read my fingerprints or anything. Is it possible to get it replaced? (Censor?) Underneath your screen? & If so what would be the price range?
Thank you!
It think you broke the digitizer (in other words, your screen is no longer useful). Although, t here is a chance your screen connector just got disconnected, you should take it to a technician, and see if there is a solution for it!
kavenzc -
4 out of 10??? 1 or 2 out of 10 I think...
If broken micro usb connector: need dissasembly lcd and battery cover. Significant risk of breakage
if broken microphone: need dissasembly lcd and battery cover. Significant risk of breakage
if broken mini jack connector: need dissasembly lcd and battery cover. Significant risk of breakage
if broken battery: need dissasembly battery cover; the paint of cover is broken in old phones. (if battery inflated lcd broken)
Samsung make this phone bad for repair; bad durability, bad for the environment...
Very bad for Earth.
0 out of 10 in practice!!!
Trying to fix a broken back button… Which part should I replace? The daughterboard, the cables? What?
Thanks.
Hi Dave! The button won’t “click” or work? Does the back button still light up? The Daughterboard button cables are just for the LEDs, the button function should be part of the digitizer in the display assembly. You can try opening the phone and reconnecting the digitizer cable, but I think it will likely be more trouble than it’s worth, I’d suggest an on-screen accessibility button. But if you want to try the connector, or fully replace your screen, check out our step-by-step display replacement guide!
My s6 finally died today. Can the SD card be put in a refurbished s6 phone or s6 casing so i can retrieve my photos and texts? My last backup was two months ago but i have important stuff post-backup which i really need. Pls advise, thx
Unfortunately no, the data is stored internally.
I’m a boat service tech, my S6 has had several baths, if im not close to my house I wrap it a towel with a knot and swing it around mh head several times, pull the sims card set it in the sun with card opening up. close to house smae thing with but i have a block of soft foam i cut a slot in. wrap in towel put it in the washing dry on the longest spin cycle. after that i use a hair dryer no heat gun few minutes put charger on it as it warms the moisture expels as steam. put in front of a fan walk away. hour or so put card in it . off and running again. it’s 2015 model.
Hi, I changed the battery in my s6 and now the touch doesn’t work anymore. How can I fix the problem?
Make sure you reconnected the screen fully..if so then replace.
Hi, I replaced my screen and lost the screws to the mid frame…Do you happen to have the thread size and length of the screw? Samsung was useless when asking.
Our guides have the screw lengths (side note: this is not a guide). Not the thread pitch though. If you’re looking to buy replacement screws, I’m not sure what to tell you. A phone repair shop might be able to help you out, as they sometimes have dead phones they can scavenge for parts. Good luck!
Hi, I dropped my S6 a while ago and it has a small hairline fracture in the upper screen. It won’t turn on anymore but clearly tries to, as the blue power LED is lit as long as it tries to turn on. (Acts like a bootloop) The screen in completely black and will not show anything. Once you try to turn it on, turning it off is nearly impossible. I have data on it that I want to recover. What needs to be fixed?
The Loud Speaker. seems to be bonded into the midframe. How is it released for replacement?