Introduzione
È passato quasi esattamente un anno da quando abbiamo smontato il Galaxy S5, ma Samsung, con il progetto del Galaxy S6 Edge, ha fatto un salto in avanti di svariati anni luce. Solo lo smontaggio ci dirà se la sua costruzione in vetro e alluminio e lo schermo a bordi curvi lo rendono tanto a prova di futuro quanto è futuristico il suo design. Seguici nel nostro viaggio agli estremi confini del (nuovo) Galaxy.
Non farti mai trovare impreparato! Resta aggiornato sulle nostre ultime notizie di riparazioni su Twitter, unisciti al nostro circolo su Facebook, verifica il nostro Instagram e troverai davvero cose fuori dal mondo.
Cosa ti serve
Panoramica Video
-
-
Questo nuovo 6 si presenta con un vero "six" appeal. Tra le novità degne di nota ci sono:
-
Display da 5.1" Super AMOLED con schermo touchscreen capacitivo (1440 x 2560, ~577 ppi, 16 milioni di colori)
-
Processore Samsung Exynos 7 Octa 7420 con GPU integrata Mali-T760 GPU e 3 GB di memoria
-
Fotocamera posteriore da 16 MP ccon funzione HDR, Flash a LED e video 4K
-
Supporto integrato per la carica wireless Qi e Powermat
-
Opzioni memoria interna da 32/64/128 GB (ma senza possibilità di microSD aggiuntiva)
-
Corpo in vetro Gorilla Glass 4
-
-
-
Ed ecco l'Edge, che ci colpisce fin da subito. Con le sue curve raccordate e il display nitidissimo, con l'S6 sembra di tenere nel palmo della mano una piccola piscina "infinity" apparentemente priva di bordi di contenimento...
-
...eccetto per il fatto che è molto meno ergonomico, ed è un'eccezionale punto di attrazione per le impronte digitali.
-
Una rapida occhiata da ciascuno dei dati mostra la particolarità della barra laterale dell'informazione, che riporta sul lato del display le notizie importanti, il meteo e le notifiche.
-
Ci facciamo una prima impressione dei sensori di prossimità e di gesture, e anche della fotocamera anteriore. Il tutto è protetto dal Gorilla Glass che ricopre l'Edge.
-
-
-
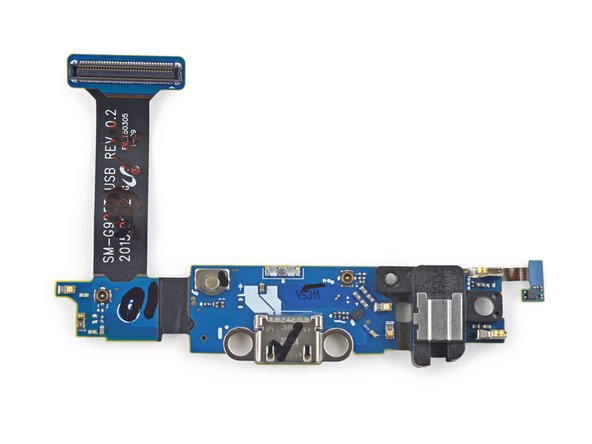
Il bordo inferiore del nuovo Galaxy accoglie il microfono e l'altoparlante, oltre al jack audio e alla porta USB 2.0.
-
Il sensore di battito cardiaco, un elemento oggi non insolito, è visibile sotto il flash a LED, vicino alla fotocamera posteriore.
-
Sfortunatamente, sembra che la gente abbia già dei problemi con questo sensore.
-
Un secondo microfono risiede sul lato superiore del telefono, insieme all'emettitore di infrarossi e al vassoio della SIM.
-
-
-
E ora un'occhiata dal lato inferiore. Prendiamo nota della sigla del modello—SM-G925T—e iniziamo da qui lo smontaggio, apprestandoci a rimuovere la cover posteriore.
-
Il pannello posteriore è tenacemente incollato e combacia perfettamente con il telaio sottostante. Perfino dopo aver avuto ragione con tanta pazienza dell'adesivo grazie all'iOpener, abbiamo dovuto ricorrere alla nostra Ventosa per Carichi Elevati per poter infilare dentro una levetta di apertura. Un'operazione tutt'altro che divertente.
-
Sono passati i tempi in cui Samsung adoperava coperture della batteria facilissime da aprire per chiunque per la sostituzione batteria. RIP.
-
-
-
Le nostre levette di apertura sono uno strumento fondamentale per scoprire cosa c'è dentro all'Edge.
-
Perfino le nostre sottili e solide levette hanno delle difficoltà ad aver ragione dei bordi di questo vetro.
-
Con un piccolo (si fa per dire) aiuto dal nostro amico iOpener—e tanta, tanta pazienza —ci apriamo la strada lungo il perimetro del telefono.
-
Il pannello posteriore ora è stato rimosso (o perlomeno lo è in buona parte). Sotto, troviamo una situazione un po' intricata, ma niente che non siamo in grado di affrontare.
-
-
-
Pronunciando un paio di parole magiche (e con un po' di forza nei punti giusti), il pannello si separa completamente dal resto del telefono.
-
Col pannello finalmente rimosso, l'adesivo si stacca facilmente dal vetro ma lascia un residuo appiccicoso sul telaio centrale.
-
Quando abbiamo sentito che l'S6/S6 Edge avrebbe avuto un pannello di vetro, siamo tornati con un flashback al 2011; ma dopo i nostri sofisticati test di rottura, ci sembra di dire che in quattro anni il vetro abbia fatto notevoli progressi.
-
-
-
In ogni precedente telefono Galaxy—compreso il poco facilmente riparabile Galaxy S5 dello scorso anno—a questo punto la batteria viene fuori usando semplicemente un'unghia.
-
I nostri vecchi amici, il cacciavite e lo strumento di apertura in plastica, entrano in gioco per aiutarci. Se non altro, sembra che abbiamo finito con l'adesivo: il telaio centrale viene via facilmente, mostrando tutto il ben di Dio che c'è sotto.
-
-
-
-
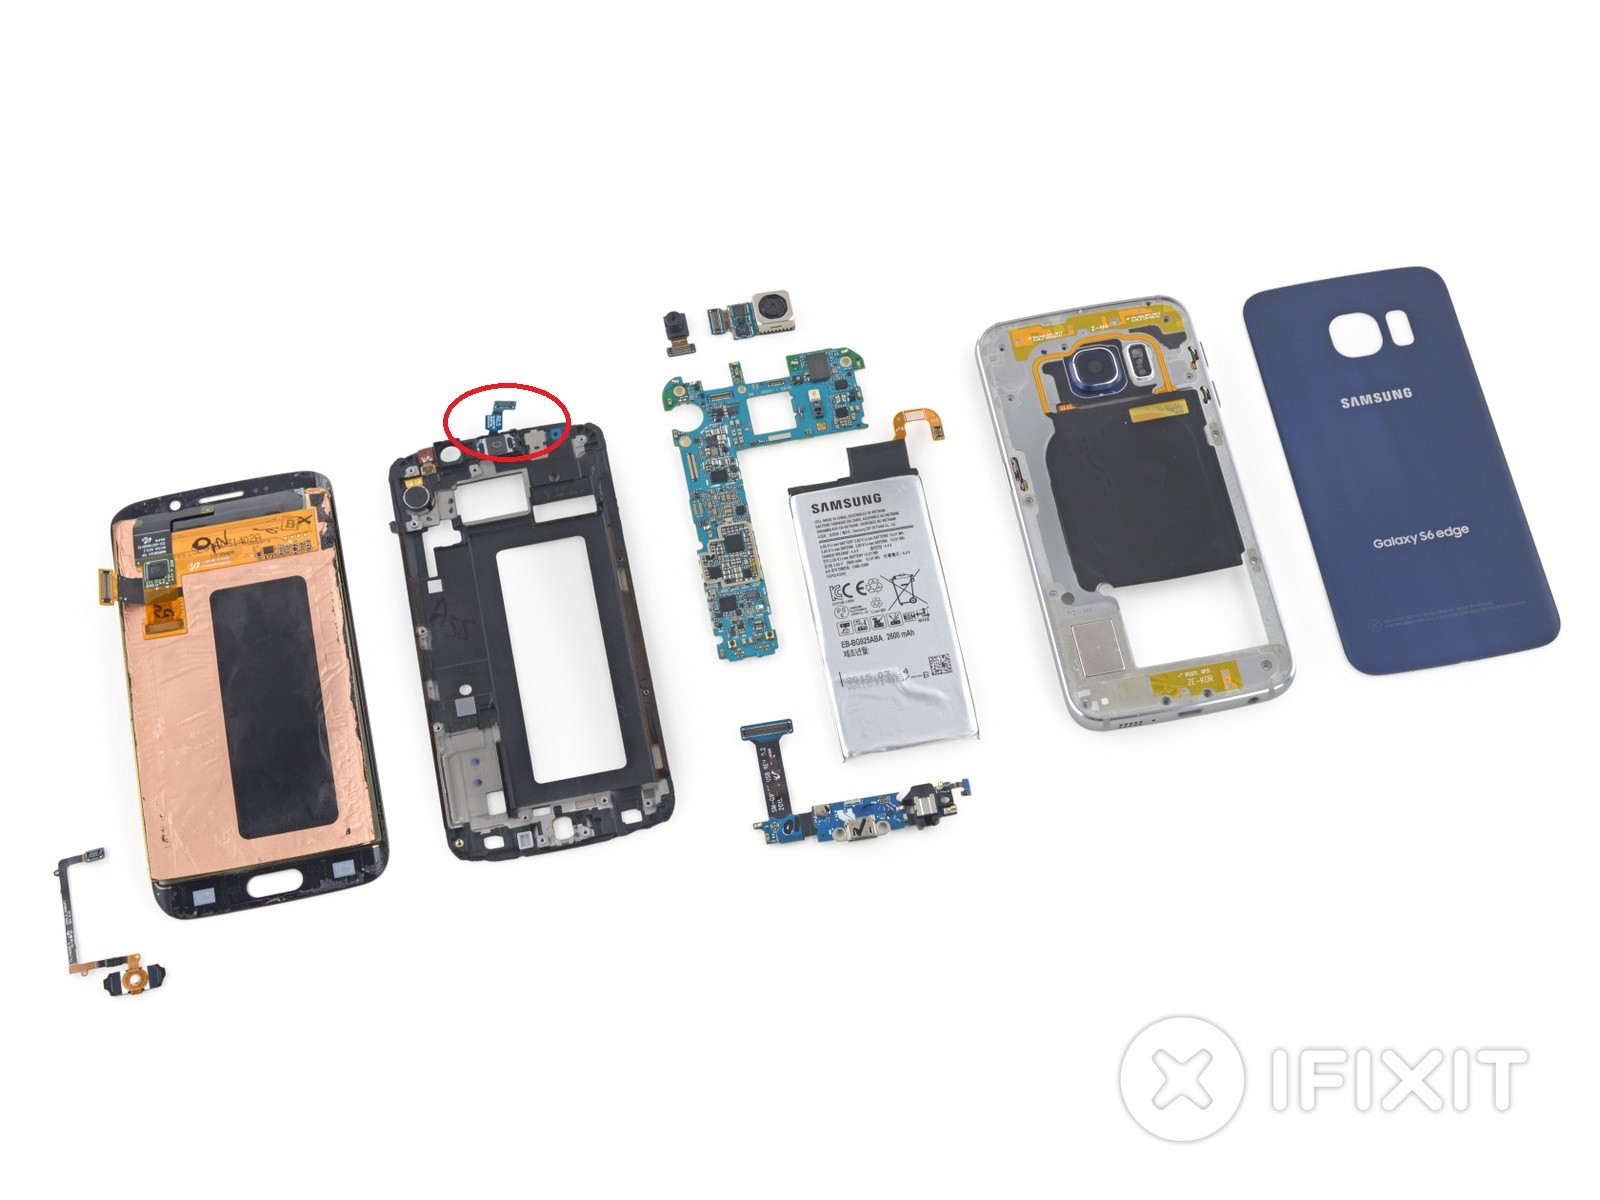
Una volta separato il telaio centrale, finalmente possiamo dare un'occhiata alla batteria e alla scheda madre.
-
A questo punto, siamo abituati a poter rimuovere la memoria espandibile, sotto forma di una scheda MicroSD. Ma dov'è? Ah già, Samsung l'ha eliminata. Se ti serve altro spazio di archiviazione, è meglio pensarci fin da subito: impossibile espanderlo successivamente.
-
Nel telaio centrale c'è tanto ben di Dio: tonnellate di contatti a molla, una bobina per la ricarica NFC/wireless e un altoparlante.
-
Ci piacerebbe tirar fuori la batteria e dare un'occhiata, ma al momento dobbiamo dedicarci alla sua disconnessione dalla scheda madre.
I fix phones for a living, and today I ran across what seems to be a later revision of this phone that has BIG PROBLEMS here. The screws on either side of the charging port are missing from this one - the antenna runs straight across and the screw holes are gone. On the inside, the plastic part of the speaker includes an extra bracket that basically has the charging port sandwiched between the housing and the speaker. There's also a screw holding the headset jack to the front housing that can't be removed until the rear housing is off.
The end result is that taking this other version apart will probably result in the charging port flex destroying itself and the need to replace the back housing and speaker.
The model number on this one was SMG925VZWA, a US Verizon version. I didn't have any other ones handy to compare the model number, but you can definitely see the difference once the back glass is off. If those screw holes are missing, be VERY careful taking it apart, and expect to need more parts.
-
-
-
Antenne con su l'etichetta sul telaio centrale, che astuzia.
-
Secondo Samsung, le antenne sono saldate al telaio centrale con saldatura a ultrasuoni per garantirne la stabilità e risparmiare spazio.
-
Abbiamo trovato anche un foro nel telaio centrale per il pulsante di accensione.
Space continuum cracked me up.
Me too! I had to do a double read it made me laugh out loud!
whats the function of the golden belt lining that touches the black cover on 2 ends and goes round the camera
-
-
-
Con tutti i suoi connettori staccati, la scheda madre è quasi libera di staccarsi dal display: anche qui c'è la stessa bizzarra connessione, disposta sul lato sbagliato, che abbiamo visto per la prima volta sul Galaxy S5.
-
Stacchiamo la fotocamera principale dalla scheda madre per avere una visione migliore dell'hardware presente sulla sua scheda stampata:
-
Memoria Flash Seriale Winbond W25Q32FW
-
Giroscopio a due assi InvenSense IDG-2030 per la stabilizzazione ottica dell'immagine
-
La fotocamera posteriore da 16 MP con stabilizzazione ottica fa sembrare minuscola la fotocamera da selfie da 5 MP.
-
-
-
Come ha fatto notare ChipWorks nella sua analisi del Galaxy S6, un numero sempre maggiore di chip nei telefoni di punta della Samsung sembra essere stato creato internamente. Sul lato frontale della scheda madre, troviamo:
-
Processore octa-core Samsung Exynos 7420 - 64-bit, 2.1 GHz Quad + 1.5 GHz Quad, con 3GB di RAM LPDDR4 Samsung K3RG3G30MM-DGCH sovrapposta
-
32 GB di memoria Flash NAND Samsung KLUBG4G1BD
-
Modulo Front-End (FEM) Ibrido Multimodalità Multibanda (MMMB) Skyworks 78041
-
PAM (Power Amplifier Module) Avago AFEM-9020
-
Codec Audio Wolfson Microelectronics WM1840 e Amplificatore Audio Classe DG Maxim MAX98505
-
Samsung N5DDPS3 - Simile allo N5DDPS2 trovato nel Galaxy S6, probabilmente è un Controller NFC
-
Accelerometro+giroscopio a 6 assi InvenSense MP65M e Samsung C2N89U (probabilmente il processore immagini)
Does the phone support MHL? I did not see the chip for MHL like S5
-
-
-
Girando la scheda madre troviamo altro hardware di controllo e diversi circuiti integrati per la gestione dell'energia:
-
Chip Ricetrasmittente RF Samsung Shannon 928
-
Chip Geolocalizzazione GNSS Broadcom BCM4773
-
PAM (Power Amplifier Module) Avago ACPM-7007
-
Companion PMIC Maxim MAX77843
-
Vari PMIC (Power Management Integrated Circuit) Samsung Shannon
-
-
-
Un vetro posteriore e una batteria tenacemente incollata? Samsung, ti vedi con Apple?
-
Ahimè, la convergenza con le tattiche Apple finisce subito. Qui non sono in vista comodi nastri per l'estrazione, il che significa che il fastidioso adesivo deve essere staccato una striscia per volta.
HAHAHAHAHAHA now THAT was hilarious :D
I loved the jokes. Thanks guys for making this article so fun
-
-
-
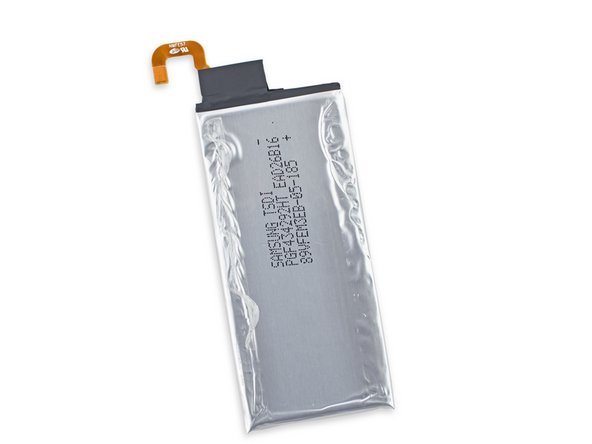
Liberata dalle mucillagini penzolanti, possiamo guardare meglio la batteria da 3,85 V e 10,01 Wh.
-
Samsung ha fatto un passo indietro rispetto alla batteria da 2800 mAh del Galaxy S5 ed è ritornata a una batteria da 2600 mAh come quella dell'S4.
-
Samsung afferma che la batteria dell'Edge consente 12 ore di navigazione LTE sul web, 26 ore di conversazione 3g WCDMA e fino a 58 ore di riproduzione musicale.
-
Ed è fresca di stampa! Diciamo sul serio, guardate la data.
-
-
-
In quello che che appare come un (altro) grande passo indietro, l'S6 Edge rinuncia alla velocissima porta USB 3.0 Micro-B in favore di una dozzinale microUSB (2.0).
-
Benvenuti nell'anno 2000.
With the very least frame modding and loss of headphone jack. If you use the s5 modular cable. If it will even plug in or work.
-
-
-
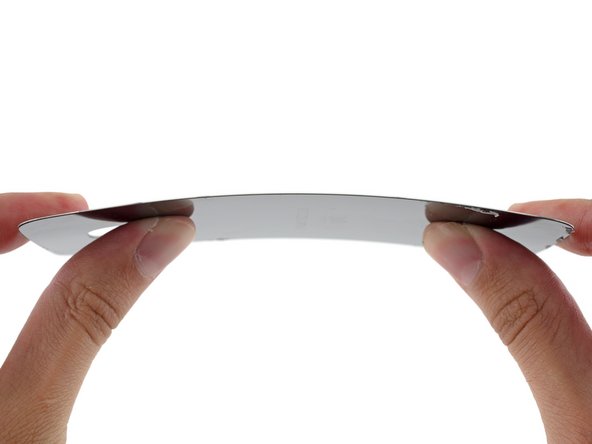
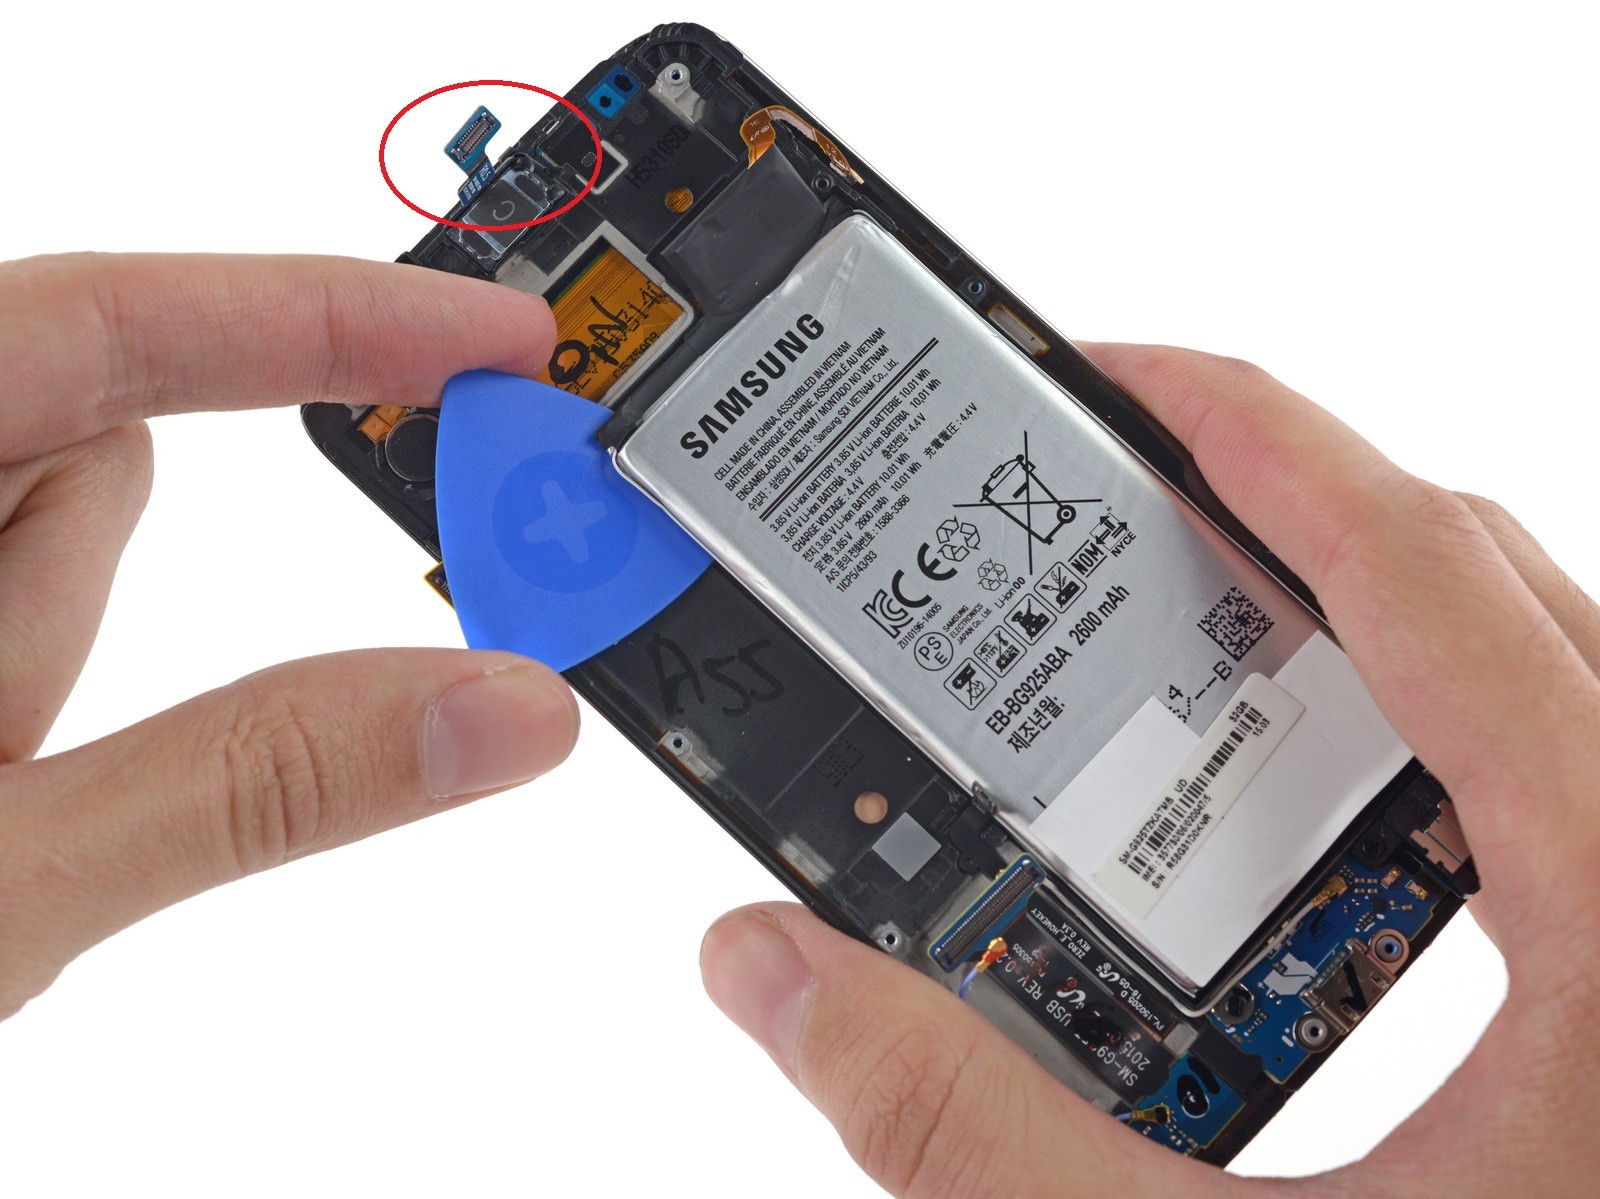
Abbiamo messo a dormire l'Edge in una culla iOpener, sperando che si risvegliasse bello fresco, con l'adesivo allentato.
-
Solleviamo il vetro e... aspettta... ma è normale?
-
Sembra che, facendo leva sul display curvo, abbiamo 'lievemente' separato il display. Ops.
Did you just break the screen? Does it still work? If it doesn't is there any way to replace the home button without breaking the display?
My screen is cracked and I really don't want to pay 200 dollars for it to be fixed. Is it really impossible to replace just the glass without breaking the digitizer?
repair-ability is a 3 when the apple watch got a 5 where the majority of the apple watch is "unrepairable". Something needs to be done with yalls scale as currently it looks like your an apple supporter and Samsung basher. Having to mod your tool with a file just to remove the screws on the apple watch trumps a glued back or glued battery in my opinion of repair-ability. Not trying to create any waves just pointing out the lack on continuity across your repair-ability ratings. Thanks for giving me a heads up look at the teardown for these devices as it's much appreciated.
Look at what you have to do to replace the screen on both devices. the edge needs to have complete disassembly the watch just pops off. the battery on the edge requires removing the back glass and a complete teardown, the watch just remove the screen and there sits the battery
wesley burson, the phone doesn't need a full disassembly. At stage 8 you can remove the LCD.
Point taken for screen and battery replacements... what about everything else tho? On the apple watch jut about everything else was "unrepairable". How is a device with multiple components "unrepairable" ranked higher then a device that is reparable regardless of the difficulty. I would think "unrepairable" would have a lower score for the simple fact that if one of those components have an issue there is no repair option where with the S6 at least it's possible to repair. We are talking repairability here on an over all scale not just screens and batteries.
I believe there should be subcategories like:
1. Openability
2. Repraceability
3. Destructibility
4. Separability/Removability
Then the average will give the Repairability score. :)
dyanro -
Is the glass able to separate from lcd?
there is a missing part you didn't mentioned on top of the phone named "Ear Speaker & RCV Sensor - GH96-08091A" which controls proximty, front led and also speaker voice. why? http://i.hizliresim.com/BPLWZQ.jpg http://i.hizliresim.com/Zk9jLo.jpg
-
-
-
Si piega! Staccando il display, si vede come lo schermo Samsung segue le curve lungo i lati del telefono.
-
Sul retro del display c'è come sempre il controller del touchscreen, in questo caso un STMicro FT6BH.
Hi
When removing the glass did you break the digitizer... from what I know the digitizer is glued to the screen glass but yet is connected to the lcd.. so when you remove the glass from the lcd you inadvertently break the digitizer in the process.. did you have any issues with this...
Many thanks
Steven Steward
Hi...I actually have a problem with the reciver of the phone and also the aux isn't working..which part should I buy to get it fixed..
Jayesh -
My phones voice reciver and the aux ain't working which paet do I need to buy to fix it...
Jayesh -
S6 egde voice reciver and the aux isnt working which part do I need to replace for it...model no g925t
Charge port handled all of those features
Wow! 50% yield. That's terrible. Very interesting reading iFixit! Thank you.
That's insane. That just gave me a reason to not buy a galaxy. They need to figure out a better way of manufacturing the screens. Which also explains why Samsung parts are so expensive compared to Apple. The yield. You are actually layig Samsung for 2 screens that's ridiculous.
-
-
-
L'ultimo componente a venire via dal gruppo display è il pulsante home modulare.
-
E, anche in questo caso diversamente dall'S5, non c'è bisogno di alcun trabocchetto segreto.
-
Grazie alla rottamazione della furbata del prima-si-toglie-il display dello scorso anno, qui abbiamo un accesso totalmente diverso al pulsante home. È meglio? Mah. Probabilmente non è peggio.
-
-
-
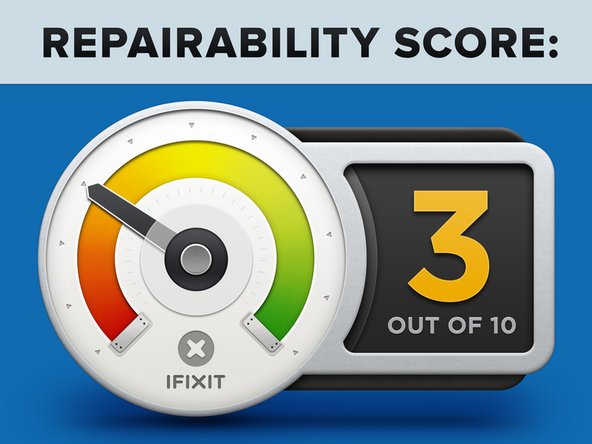
Punteggio di Riparabilità del Samsung Galaxy S6 Edge: 3 su 10 ( 10 è il più facile da riparare)
-
Molti componenti sono modulari e possono essere sostituiti in modo indipendente tra loro.
-
Una delle migliorie rispetto al progetto dell'S5 è che non serve più rimuovere il display per accedere all'interno del telefono e sostituire la scheda madre.
-
La presenza di un vetro anteriore e posteriore raddoppia il rischio di rottura e l'adesivo tenace sul vetro posteriore rende molto difficile accedere alle parti interne del telefono.
-
La batteria è tenacemente incollata al retro del display e sepolta sotto il telaio centrale e la scheda madre.
-
Sostituire il vetro senza distruggere il display si presenta come un'operazione molto difficile.
Buongiorno,
complimenti per una guida così chiara.
Il punto è che avendola seguita, ho cambiato la scheda madre del mio S6 Egde (925F).
Funziona tutto egregiamente ma la ricezione e soprattutto l’invio dati sotto copertura 3G, 4G, LTE è lentissima.
Lo Speedtest spesso dice che la velocità di upload è zero. Ho anche fatto un factory reset, ma niente…
Cosa posso aver sbagliato? Cosa devo controllare?
Grazie mille in anticipo per la risposta
-


Un ringraziamento speciale a questi traduttori:
95%

albertob ci sta aiutando ad aggiustare il mondo! Vuoi partecipare?
Inizia a tradurre ›

24 Commenti
Holy He11 you guys got the phone that says "A S S" in it. I wouldn't rate this a "3" this is more like a 5 in my book. You guys rate a m7 as a "1" which is one of the more difficult phones out there but its still easier than some of the older Motorolas.
Do I know you??????
That sure looks like a MicroSD receptacle on image "Step 11" on the bottom left corner of the board. Is that the Simm Card receptacle or a MicroSD receptacle?
That's the SIM card receptacle.
Ryan -
SD Card Yeah Nelson Bush, that is an SD card slot. Everybody in Samsung forgot they put it there. Ooops.
Hi,
I've just replaced a broken screen, everything went well, but soft keys (Back and Recent apps) not working on new screen ! Are those keys being controlled by screens digitizer of the daughter board that has the LEDs for them ?! should I send back the new screen as faulty ?! or sth happened to daughter board when I opened it (which I doubt).
Any suggestion ?!
Thanks
The soft keys are part
Of the screen on the s6 edge. The standard s6
Soft keys are on the charge port. So faulty screen
Incorrect. The touch buttons on the S6 Edge are also on the daughterboard, but are not ribbons that attach to the screen frame (as with the S6). Instead, they are on the opposite side of the daughterboard and are pressed into place by the natural pressure of the board against the screen. This makes the replacement of a charging port much easier due to not having to remove the LCD from the frame, which is tedious. Replacing the home button is the same as on the S6 - you will have to remove the screen frame from the LCD to access it.
mbrulla -
UPSM ON
UPSM OFF
Work?
would the main motherboard from a G925T work with the parts from a G925i
i dropped my phone in water. is there any way to recover the data or fix the phone?
How To Remove The Wi-Fi Adapter? (For Kid-Safe Phone)
It's much easier to root the phone and disable the wifi chip in the build.prop file. Google that.
I would be more worried about disabling cellular than disabling wifi.
Hello! Where can one get a genuine battery replacement. Samsung in my country won't replace my faulty battery saying I didn't buy the phone from the region.
I have my s6edge+ all in pc's I need digitizer LCD battery. And the main belt wire front face glass weird mine was plexiglass and I'm ready to assemble.
Hello Guys i have probleme in my phone samsung galaxy s6 edge the probleme is many stop in work and many time i restard my phone his stopped in samsung logo of depart please help me when probleme hardware or software thanks.
Hi, I replaced the sim card reader (not the tray) and now the phone does not turn on wifi. It attempts to turn on wifi for about 10 minutes and gives up. Would appreciate if you can suggest any solutions. Thanks
Why have a fake picture of the phone for this??
iliketurtuls - Replica
Yeah omg i just noticed it!
allafman5 -
Good question.
HakanEr -
Wait, what? Which picture?
Lucas Gallindo -
I am so sick of being told no by manufacturers when it comes to repairs. The argument about needing to design a device this way to make it thin is a big fat lie.
gallardo - Replica
Isn't the reversion to usb 2.0 for the rapid charging to work?
codycowgill - Replica