Introduzione
Dopo l'improvvisa comparsa dell'iPhone in numeri romani, quasi ci aspettavamo che Samsung ci regalasse un Galaxy SX. Ma eccoci qui, con i molto più prevedibili S10 e S10e. Sono davvero così semplici come suggeriscono i loro nomi? C'è solo un modo per scoprirlo: è giunta l'ora dello smontaggio!
Per altre notizie ancora più interessanti e altri smontaggi, seguici su Twitter, Instagram, e Facebook. Per restare sempre aggiornato, iscriviti alla nostra newsletter.
Cosa ti serve
-
-
Cosa identifica esattamente la "e" nell'S10e che nell'S10 non c'è? Vediamo se le specifiche ci dicono qualcosa:
-
Display Super AMOLED Infinity-O: 5.8" (2280 × 1080) per l'S10e e 6.1" (3040 × 1440) per l'S10
-
Processore Qualcomm Snapdragon 855 (o Samsung Exynos 9820 in alcune regioni)
-
Fotocamera anteriore da 10 megapixel, fotocamera posteriore con un modulo grandangolare da 12 MP a doppia apertura e un modulo ultra-wide da 16 MP; l'S10 ha anche un modulo teleobiettivo aggiuntivo da 12 MP
-
Un sensore di impronte digitali convenzionale nel pulsante laterale dell'S10e, contro il nuovo sensore di impronte digitali a ultrasuoni nascosto sotto il display dell'S10
-
Jack per cuffie e slot per schede microSD
-
Grado di resistenza all'acqua/polvere IP68
-
-
-
Le facciate monolitiche di questi telefoni non rivelano molto subito, anche se notiamo i bordi del display curvi su S10 e S10+.
-
Sul retro individuiamo due diverse linee di fotocamere: tutti i telefoni sono dotati di fotocamere grandangolari e ultra-wide, ma S10 e S10+ hanno in aggiunta teleobiettivi.
-
Mentre siamo fermi a guardare i telefoni come nel 1894, Creative Electron offre immagini a raggi X allo stato dell'arte per aiutarci a smascherare questi telefoni.
-
Una densa cover posteriore in ceramica rende S10+ molto più opaco ai raggi X rispetto ai suoi compagni con il vetro. In altre parole, è scuro.
-
-
-
Mentre questi telefoni esternamente sono simili, il più economico S10e ha un pulsante di accensione notevolmente più grande, dove è alloggiato il classico sensore di impronte digitali capacitivo.
-
L'S10 fa le cose in maniera un po' più elegante, con un sensore di impronte digitali che non puoi nemmeno vedere... senza uno smontaggio, ovviamente.
-
Nonostante le loro piccole differenze, sia S10 che S10e concordano sul fatto che i jack per le cuffie sono ancora abbastanza interessanti. E sono dotati anche di porte USB-C, microfono e altoparlanti in tinta.
-
Nella parte superiore dei telefoni, diamo il nostro primo sguardo (di persona) ad alcune "perforazioni" sui display, muniti di pellicole di protezione preinstallate.
Dear i Fix it Is it true that the c - type phone in galaxy s10 can not be changed except by changing the motherboard ?
Hi Max,
If you look at the first image in step 7, you’ll see that the USB-C connector is part of the motherboard. If it breaks, you can possibly replace it by micro-soldering a replacement part, but this is much harder than swapping and replacing a small daughterboard. The other solution would be to replace the motherboard which it is attached to.
I already broked my back panel. It was in my pocket and I don't know what happend
-
-
-
Con un telefono nuovo e migliorato arriva una procedura di apertura nuova e migliorata... o forse no! Ancora una volta dobbiamo scaldare cose e far lavorare il nostro fidato iSclack.
-
Giriamo le spalle ai nostri telefoni, aspettandoci una qualche sorta di trappola. Non questa volta, Ammiraglio Ackbar! I pannelli posteriori si tolgono subito.
-
Infine, questa volta l'adesivo è un po' meno tenace o è frutto della nostra immaginazione?
-
Proprio mentre il tutto si sta raffreddando, notiamo dei rivestimenti in grafite per la dissipazione del calore posizionati strategicamente su questi coperchi posteriori. Qualcosa qui è progettato per riscaldarsi senza bruciarti le dita.
I've used the opener per instructions, have been trying for an hour. Have left it on the phone for up to 10 min. Still cannot item the cannot open the back cover enough ti get the card in.
The adhesive for the S10 can be very stubborn—a hair dryer/heat gun would help. The adhesive is also thicker in some sections, and our actual repair guides show where the thinnest parts are.
This teardown is a first look at the device and is not meant to be used for repair procedures. You can find our S10 guides here and our S10e guides here.
-
-
-
Solo poche viti Phillips standard si frappongono tra noi e le cose belle. Il nostro Set cacciaviti Marlin ci ha aiutato, ma siamo felici che Samsung ci abbia fatto usare un solo cacciavite per ora.
-
Questi gruppi telaio con bobine integrate hanno imparato un nuovo trucco: ora possono caricare in modalità wireless altri dispositivi.
-
Questo probabilmente è il motivo per cui quest'anno le bobine sono inserite tra due strati di grafite: un caricatore wireless che trasmette e riceve è destinato a produrre molto più calore.
I personally (!) don't see the heat and inefficiency as that much of a problem. Now I by no means mean to suggest you *can’t* or *shouldn't* use the “reverse” wireless charging to charge another phone or something similarly thirsty, becuse it's in some way not meant to do so. But I think Samsung has observed the same as most other manufacturers and wireless charging users, and made their design with that in mind: Most users use it less than once a week, and mostly use it to charge earbuds/earbud case, and smartwatches. Neither of which typically (can) draw more than 100-300mA.
-
-
-
I jack per cuffie Samsung sono alti solo 12 mm e larghi 8 mm e sono modulari al 100%, il che ci piace molto. È un vero peccato che per loro non ci sia abbastanza spazio in un iPhone o addirittura in un iPad.
-
Parleremo di fotocamere fra un attimo, ma per ora abbandoniamo le selfie cam per far posto all'estrazione della scheda madre.
-
Il nostro ingegnere esegue un sollevamento della scheda madre perfettamente sincronizzato...
-
-
-
-
Diamo una sbirciatina sotto la scheda madre e facciamo un paio di osservazioni interessanti.
-
Quel grosso dissipatore di calore in rame sotto la scheda è molto più massiccio di quello dell'S9; assomiglia di più a quello che abbiamo trovato nel Note9.
-
Nel frattempo, togliamo una protezione termica multi-strato dalla scheda. Tutto questo rame crea una grande superficie piatta per un miglior trasferimento di calore. È un metallo morbido, ma la morbidezza dell'interfaccia evita eventuali interruzioni di contatto che altrimenti potrebbero abbattere le prestazioni o surriscaldare il telefono.
-
Questo adesivo sottile sembra anche fornire una schermatura RF, poiché c'è un grosso buco nella struttura di metallo sottostante, dove troviamo un PMIC e un grande pad termico rosa.
-
TL; DR: Riteniamo che la ricarica rapida unita alla ricarica wireless inversa causi un serio stress termico sull'elettronica di questo sistema. Samsung ha usato tutti i metodi possibili per tenerla al fresco.
*Vapor chamber cooling system only available on Galaxy S10+. Galaxy S10 and Galaxy S10e have an advanced heatpipe cooling system.
Right you are. Good catch! They are hard to tell apart from the outside.
-
-
-
Quindi togliamo la matrice principale della fotocamera dalla scheda: è incassata in una cornice di plastica gialla, probabilmente in ABS o nylon nel suo colore naturale. (Sembra un po' anni '80, ma non importa.)
-
Affianchiamo la schiera di fotocamere vicino alle loro rispettive selfie cam (rispettivamente all'estrema sinistra e all'estrema destra).
-
La schiera dell'S10 (a sinistra) ha una telecamera in più rispetto al teleobiettivo S10e, da 12 MP, ƒ/2.4 con OIS e collegato sullo stesso connettore della videocamera grandangolare standard.
-
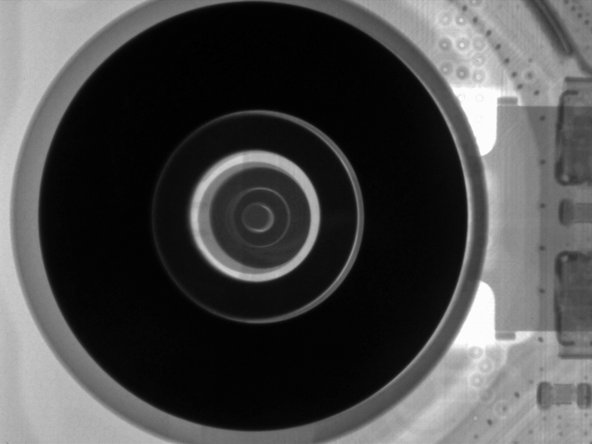
Un ulteriore smontaggio sarebbe un'operazione piuttosto distruttiva, ma ecco una radiografia che mostra il sensore del teleobiettivo e gli elettromagneti della stabilizzazione ottica OIS.
-
Le telecamere grandangolari da 12 MP si guadagnano anche loro l'OIS, così come la la trovata della configurazione a doppia apertura dell'S9+.
-
Infine, i moduli ultra grandangolari da 16 MP ƒ/2.2 hanno telai in plastica leggermente più spessi.
-
-
-
Pad termici e fotocamere a parte, eccoci a arrivati ai chip! Sul lato anteriore di queste schede madri (in alto: S10e, in basso: S10), individuiamo:
-
S10e: memoria flash NAND Toshiba UFS da 128 GB
-
S10: memoria flash NAND Samsung eUFS da 512 GB
-
Samsung K3UH7H70AM LPDDR4X stratificato su SoC Qualcomm Snapdragon 855
-
Codec audio Qualcomm WCD9341
-
Qorvo 78062, probabilmente un modulo front-end RF Fusion
-
PMIC Maxim MAX77705C
-
Skyworks 78160-5
-
-
-
Samsung non è tipo da tirarsi indietro e infatti ha disposto dell'altro silicio sulle facce opposte:
-
Murata KM8D03042 (probabilmente un modulo Wi-Fi/Bluetooth)
-
Qualcomm SDR8150 (probabilmente un ricetrasmettitore RF)
-
Qualcomm PM8150 (probabilmente un PMIC)
-
Ricevitore di potenza wireless IDT P93205
-
Qorvo 78042
-
Controller NFC NXP 80T17
-
Modulo front-end RF Qualcomm QDM3870
No Broadcom chips at all this time?
Isn't the BCM4375 suppose to run wifi and bluetooth this time?
https://globenewswire.com/news-release/2...
It is BCM4375 from Broadcom. But, it should be in the WiFi/BT module made by Murata KM8D03042.
JJ Wu -
The color coding helps for what is what. Good job on that.
-
-
-
È l'ora della batteria! Con sorpresa di nessuno, queste due batterie sono fortemente incollate ai loro telai in metallo, senza nessuna amichevole linguetta di estrazione in vista.
-
Non ti preoccupare però: tiriamo fuori il nostro prodotto antiadesivo e impostiamo una bellissima funzione "acqua" mentre aspettiamo che l'adesivo abbassi le sue difese.
-
Queste centrali elettriche portatili spaziano dagli 11,94 Wh dell'S10e a sinistra ai 13,09 Wh dell'S10 a destra (un aumento del 13% rispetto alle 11,55 dell'anno scorso).
-
Per fare un paragone, i nuovi iPhone sfoggiano rispettivamente 11,16 Wh (XR) e 10,13 Wh (XS).
Ifixit is the OLED panel have a chance of getting damage by dropping these adhesive remover on the battery removal process?
Probably Not. OLED panel is insulated with copper foil.
-
-
-
Con nient'altro intorno da smontare, prendiamo il coraggio a due mani e proviamo a rimuovere questo delicato display.
-
All'interno dell'S10 individuiamo il nuovo sensore ultrasonico per il rilevamento delle impronte digitali.
-
La tecnologia potrà anche essere nuova, ma la nostra lode finisce lì. Abbiamo provato quasi tutto quello che potevamo con quesdto benedetto ragazzo e non ne è uscito intatto.
-
Se Samsung ha suggerimenti per la riparazione che vorrebbe condividere, siamo tutto orecchie. Per ora, supponiamo che dovrai pagare un braccio e una gamba per un nuovo schermo in caso di malfunzionamento del sensore.
-
-
-
Il display piatto sull'S10e è un filo meno spaventoso da rimuovere rispetto allo schermo curvo dell'S10. Sfortunatamente, dubitiamo che uno di questi schermi vivrà abbastanza per partecipare a un altro gioco di Fortnite.
-
L'S10e non ha una tecnologia ultrasonica innovativa incollata sul retro del display, ma ha una faccia familiare:
-
Il controller touch S6SY761X di Samsung, lo stesso IC del display dell'S9 sfoggiato lo scorso anno, e negli S8 prima di loro.
-
Ecco uno sguardo ravvicinato a quel sensore tattile capacitivo che abbiamo menzionato in precedenza, integrato nel pulsante di accensione.
-
Sfortunatamente questa procedura di riparazione lascia molto a desiderare, richiedendo la rimozione dell'intero schermo per accedere al pulsante.
-
-
-
Questi display ultrasottili realizzati da Samsung funzionano come un ulteriore strumento per gestire il calore, supportati con strati di rame e grafite per dissipare il calore generato da altri componenti all'interno del telefono.
-
Il foro per la fotocamera inserito in questi strati è, ovviamente, intenzionale e scavato "pixel per pixel" da un laser. Il foro prosegue attraverso il telaio centrale e la scheda madre fino alla fotocamera stessa.
-
A differenza della fotocamera, i sensori di prossimità e di impronte digitali nascosti possono "vedere" direttamente attraverso la matrice OLED, consentendo la schermata più "edge-to-edge" che abbiamo mai visto in uno smontaggio. Probabilmente non li vedrai mai durante il normale utilizzo, ma qui, con i display smontati, è facile individuarli.
-
-
-
Abbiamo smontato due interi telefoni per il tuo piacere di visione, ma ecco il TL; DR nel caso tu abbia fretta:
-
Grandi batterie, ancora incollate e non facilmente sostituibili.
-
La ricarica wireless di altri dispositivi da questi telefoni produce molto calore e, probabilmente, non è ottimale per la durata della batteria a lungo termine.
-
I display sono davvero carini, ma cambiarli sarà costoso e difficile e il nuovo posizionamento del sensore di impronte digitali non è di grande aiuto.
-
Ma aspetta, c'è dell'altro! Agisci ora e potrai assistere a un terzo teardown GRATUITO: abbiamo un video dello Smontaggio di S10+!
-
Con questo, è il momento di prendere il toro per le corna e dare a questi telefoni un punteggio.
-
- Un singolo cacciavite a croce Phillips si prende cura di tutte le viti.
- Molti componenti sono modulari e possono essere sostituiti in modo indipendente, ma la porta di ricarica è ora saldata alla scheda madre.
- La sostituzione della batteria è possibile, ma ancora inutilmente difficile.
- Il vetro incollato sia davanti sia dietro comporta maggiori rischi di rottura e rende difficile la fase iniziale delle riparazioni.
- Le riparazioni dello schermo richiedono una lunga serie di operazioni di smontaggio mentre si lotta contro il tenace adesivo.


Considerazioni Finali
Punteggio Riparabilità


(10 è il più facile da riparare)
Un ringraziamento speciale a questi traduttori:
66%


Questi traduttori ci stanno aiutando ad aggiustare il mondo! Vuoi partecipare?
Inizia a tradurre ›

33 Commenti
Guess I'll take a pass on the S10 this time.
Just curious, no Broadcom chips at all in this Galaxy iteration? No BCM4375?
There is a Broadcom present in the SM-G973F/DS model. A BCM4775 GNSS receiver. Have a look here https://www.chiprebel.com/galaxy-s10-tea...
How about proximity sensor in the S10+ and S10? Since every component need to be under screen.
Is this possible to have more cleared or close picture about that, thanks!
I would also love to get a better understanding on who is supplying the S10 with the under display proximity sensor
It’s going to be almost near impossible for handyman individuals to replace phone batteries in the upcoming years. Companies are implementing methods to further complicate repairing/replacing procedures. I don’t see an incentive in buying a $900- $1,100 smartphone that will only last 3 years (if battery use is moderated to a minimum). To make matters worse, third-party vendors like iFixit aren’t improving their tools necessary in making it easier to repair/replace. As repairing/replacing prices climb higher and higher every year by $20, it is becoming more unlikely in even considering repairing or replacing something simple like a phone battery for the upcoming years.
As a repair tech, I get to disassemble a lot of different models, and get to work on models still pretty new on the market (so my reasoning is not outdated). And while disassembly have gotten a bit more difficult since the era of pop-off rear covers and rigid-housing batteries, in regards to battery replacement, for the most part it hasn't changed much the last 5+ years. And it it likely won't change much anytime soon. Because this is a job the manufacturers and partners need to do themselves, A LOT.
The tools haven't changed significantly, nor have the procedure. Just need to check the ifixit guides to make sure you're aware where any flex cables and other protruding parts are, so you don't break any while opening. General rule of thumb (but always check ifixit to verify): With iphones you go in from the front, bottom to top, and there are flex cables along 1 long-side. (Almost) everyone else, go in from the back, top to bottom to not accidentally get under the Qi or NFC coils and cut them.
Just wondering what use are the other 2 holes are that are the same as the sim tray removal hole. One on top and one on the bottom, next to the speaker.
Don't worry, I'm sure they're mic holes, the plastic around the frame made it look like there were removable parts.
Sadly I think Samsung have made a perfect tool for those who wish to harm others. A Ceramic back that is opaque to Xray…now where might that be useful? Perhaps going through an airport checkin.
So ok…
On my wife’s brand new S10e I poked the SIM removal tool into the top mic hole instead of the SIM removal hole.
(Thanks Samsung for putting them close together and making them look the same…)
What did I break by doing this?
Nothing. The mic hole makes a 90º turn to the mic. Samsung purposely made it that way for this exact reason. And don’t blame Samsung for not watching what you were doing, or reading the instructions. You can clearly see two pin holes, and if you look, you can also see the outline of the sim tray. And if you look in the quick start manual, you can clearly see which hole to punch.
RobertB -
I guess we all have the choice. Better water resistance and more difficult screen repair, or no water resistance and easier screen repair. How does one expect water resistance without the thing being sealed?
To Samsung’s credit, the batteries seem robust. After all, Samsung is a top quality lithium ion battery manufacturer. I bought the S6 when they first came out, and my Son has it now. It still works perfect and the battery is still in very good shape after 4 years of heavy usage. Can’t say the same for my Wife & Daughter’s iPhone 6.
Hey guys , i put the sim eject tool in the hole in the under side of the phone. Is this mic angeld to? .. i hope the best
Yes, the mic hole is angled for both models! You don’t have to worry about damaging the mic.
Please advise.
I purchased S10, but inserted pin for SIM tray in hole of microphone for call by mistake.
It seems that there is no problem with making calls and recordings.
I did not know what the internal structure around the microphone was like, so I commented. Thank you.
Don’t worry—you did not damage the microphone! It has an L-bend. For more details, see this page.
Dear Arthur,
Thank you for your helpful comments and information! I was anxious, but I was relieved.
bony555 -
Is there a risk of damaging the IP certification by inserting a pin into the microphone hole on top? Accidentally put it in the wrong hole and now I am just wondering. Couldn’t find a trustworthy answer regarding this topic. One user claimed that the gaskets cannot be reached through the hole, so nothing to worry…?
Hi Ginger,
That is correct! Here is the post for more details.
my galaxy s10 have problem with the sim detection, it can detect the number but cant be use
there is circle logo beside the battery percentage and the airplane mod is in faded blue color.
im no professional , may i know what cause this ? if it can be repair , what should i replace? which chip do i need to change ?
What is the black senser looking thing next to flash on s10e ?
I couldn't find any information about it.
Hello, GPS module component have a antenna ? how is connected ? My S10 have a GPS problem. not GPS signal receiving. In CPU-Z app, GPS sensor is present (green V). How can be fixed ?
I did the infamous drop my s10 in the tub while watching samsung tv . To make matters worse my back camera glass was cracked. Now to my surprise the phone stayed on, well, for about 30 minutes then shut off and wont turn back on. My question is what gets most corrupted in a water logged s10 before I attempt buying batteries, etc, to repair myself. If u can offer any insight I appreciate it
I need help. I have a Verizon Samsung galaxy s10e and literally everything is on my SD card (every app, picture, document, EVERYTHING). I had to move all of it because my 128gb internal memory is completely full and there's nothing I can do to fix it.
I can't update or download anything, my camera won't open anymore and my gallery rarely opens, it's affecting my texting and calling ability now. I can't open most apps and it's getting worse the longer I wait to update everything (I can't even use one drive or drive let alone updating).
There's nothing on my internal storage, and definitely nothing close to being enough to fill it completely and have no option to fix it). Would a replacement phone that's the same as mine, fix it?
Please help
Is it hard to replace the front speaker?