Introduzione
Panic, la compagnia dietro a questo non-un-GameBoy giallo, dice di aver creato questo dispositivo particolare "giusto per divertimento", e si vede. A partire dallo schermo da 1 bit, fino alla sua distintiva manovella, il Playdate porta un'aria di novità.
Speriamo solo che smontarlo sarà divertente quanto lo è giocarci!
Informativa completa: il nostro pezzo da smontaggio ci è arrivato direttamente da Panic, che, rifiutando ogni mazzetta, ci ha inviato gratuitamente un pezzo da smontare. Sfortunatamente non è arrivato con nessun gioco, quindi andava bene solo per uno smontaggio. Non sapevano però che lo smontaggio è il nostro gioco preferito (okay, forse sì, lo sapevano).
Assicurati di seguire il canale YouTube di iFixit, il nostro Instagram, il nostro Twittere iscriviti alla nostra newsletter per essere il primo a sapere quale novità della tecnologia di consumo capiterà sul tavolo dello smontaggio.
Cosa ti serve
Panoramica Video
-
-
Alcune specifiche per te mentre tiriamo fuori il divertimento dalla scatola:
-
Schermo a risoluzione estremamente alta (400x240) da 2,7 pollici e 173 ppi
-
CPU ARM Cortex-M7F da 180 MHz
-
16 MB di memoria integrata
-
4 GB di memoria flash
-
Wi-Fi (b/g/n) da 2,4 GHz, Bluetooth 4.2, USB-C, jack cuffie
-
Manovella meccanica perché perché no
-
È chiaro che le specifiche non sono state falsate per questo dispositivo, ma in ogni caso se fossi stato ossessionato da queste specifiche, ti sarebbe già sfuggito il punto.
-
-
-
Come al solito, diamo il via allo smontaggio con dei fantastici raggi X esplorativi da Creative Electron.
-
Tecnicamente questo mostra tutto quello che c'è dentro, quindi... il nostro lavoro è fatto?
-
-
-
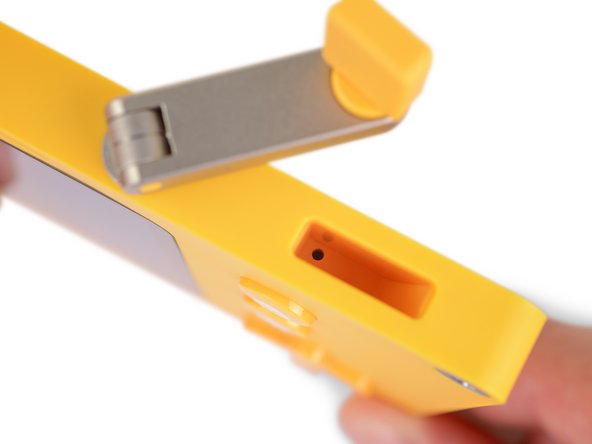
All'interno della cavità della manovella: informazioni top secret.
-
Il nostro numero seriale è 1255. Chi ha avuto le prime 1254 unità? Chi lo sa.
-
Si spera che non abbiano pensato di smontarlo per poi metterlo su internet. Seriamente, chi farebbe una cosa del genere?
-
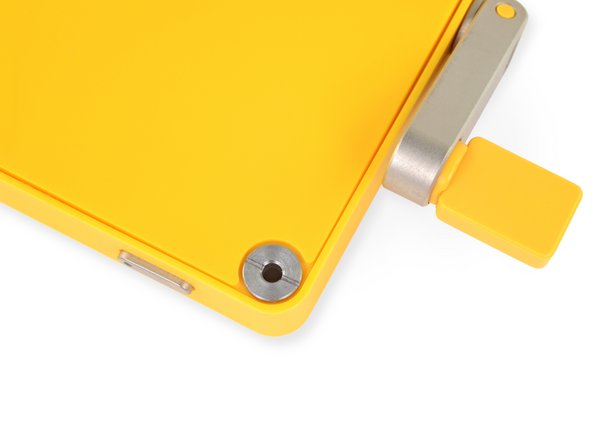
Risposta': qualcuno che non si lascia intimidire da queste viti a testa piatta a forma di ciambella. Mmm... ciambelle.
-
Tieniti forte mentre noi pensiamo a una strategia per aprire questa cosa. Se dobbiamo mangiare una dozzina di ciambelle durante il processo, è un sacrificio che siamo pronti a compiere. Sarà d'aiuto? In qualche modo sì.
-
-
-
Quella sfumatura di giallo... sembra in qualche modo familiare.
-
Cose che non sono una corrispondenza:
-
Volume fisico: il Playdate vince senza sforzo qui. È forse 1/4 delle dimensioni? ... seriamente, lo è? Non siamo qui per misurare le cose per te.
-
Qualità dello schermo: un'altra vittoria per il Playdate, a meno che il tuo colore preferito sia spinacio.
-
Stravaganza: di nuovo, questa va al Playdate.
-
Cominciate a smontarlo, ti sentiamo dire. appena finiamo i nostri spinaci, ci senti rispondere. E poi aspetti pazientemente per il resto dello smontaggio. Vero? Ci sei?
-
-
-
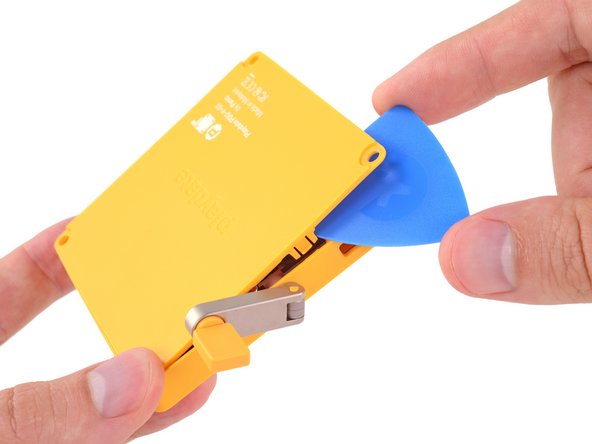
Entriamo! Prendiamo il nostro grande cacciavite a testa piatta per la minuscola console e svitiamo qualche vite.
-
In seguito, dei ganci in plastica fanno la guardia all'entrata. Stiamo attenti a non fare fuoriuscire della preziosa nostalgia mentre brandiamo il nostro plettro di apertura.
-
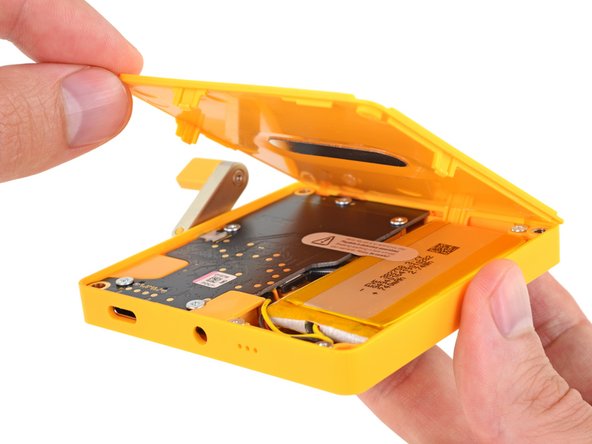
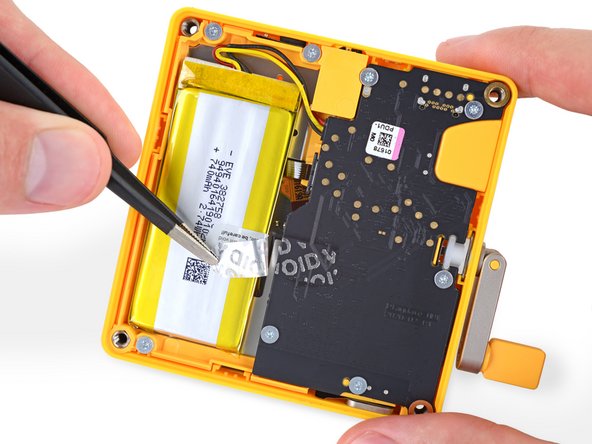
Il primo sguardo all'interno rivela: ordine. Giallezza. E una batteria facilmente accessibile, ovvero la felicità della riparazione.
-
-
-
-
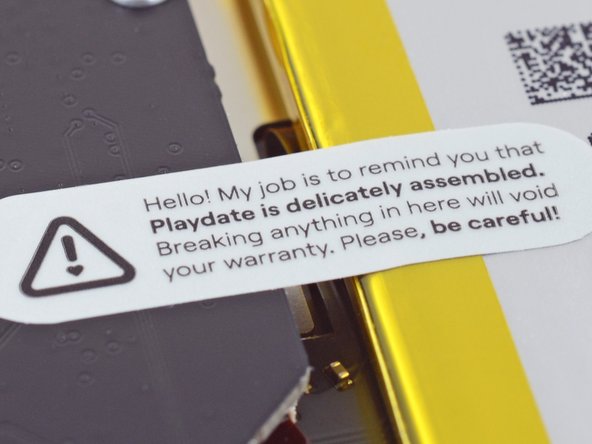
Fermi tutti! C'è un qualche tipo di adesivo di garanzia che fa la guardia a questa batteria.
-
Zoom e miglioramento dell'immagine?
-
Oh aspetta: rompere i sigilli annulla la garanzia, non semplicemente aprirli. Ci inchiniamo ai signori Magnuson and Moss e proseguiamo, con attenzione.
-
-
-
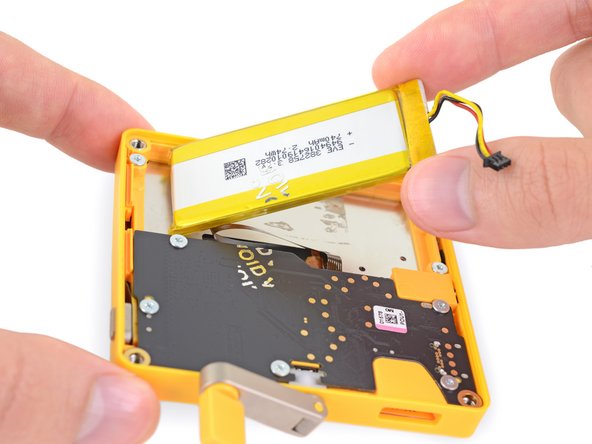
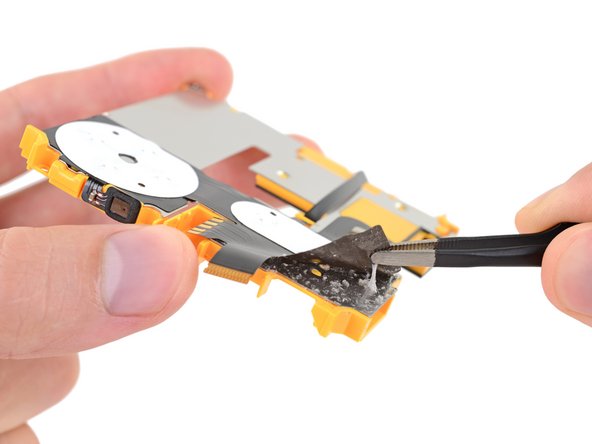
Scollegabilità della batteria: 8,5/10, per la maggior parte facile. Assicurati solo di non forare nulla di infiammabile con le pinzette.
-
La batteria stessa è leggermente incollata. Sii convincente, ma non farla arrabbiare.
-
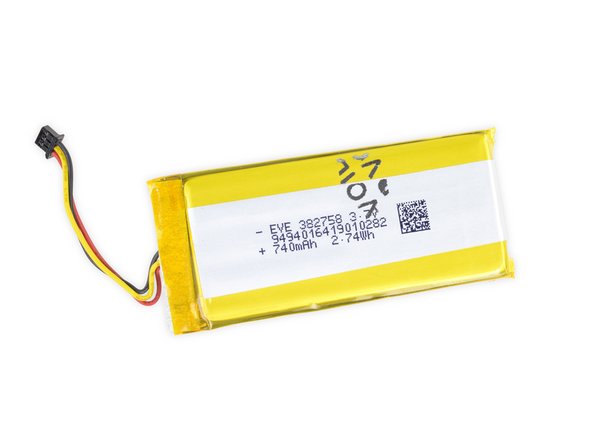
Le specifiche della batteria? Funziona a 2,74 Wh (740 mAh a 3,7 V).
-
Questo è circa il 25% della capacità di un iPhone 12 o:
-
L'1,9% della batteria di un'utilitaria (circa)
-
Nella gamma delle batterie AA ad uso generale che i Game Boy si mangiavano per sport
-
Vicina come performance a una batteria a patate da 225 kg che una volta è stata guidata a Portland, Oregon.
-
-
-
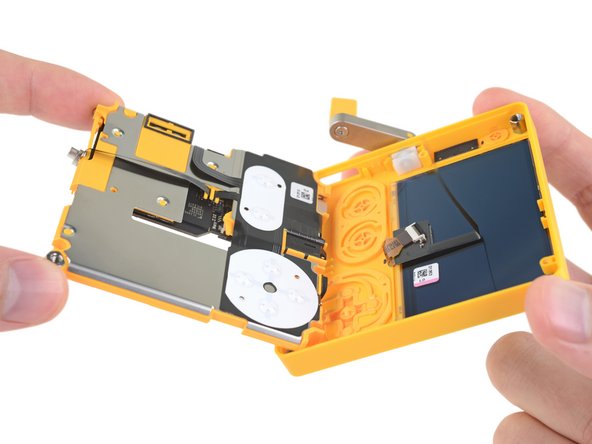
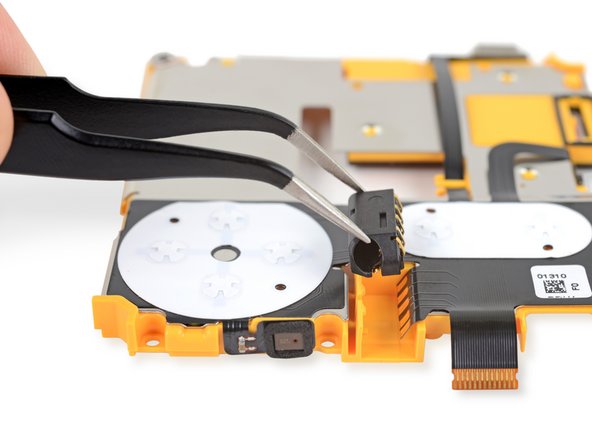
Con il nostro minimalista set di punte Minnow, applicato su un dispositivo minimalista, separiamo praticamente tutto da praticamente tutto il resto.
-
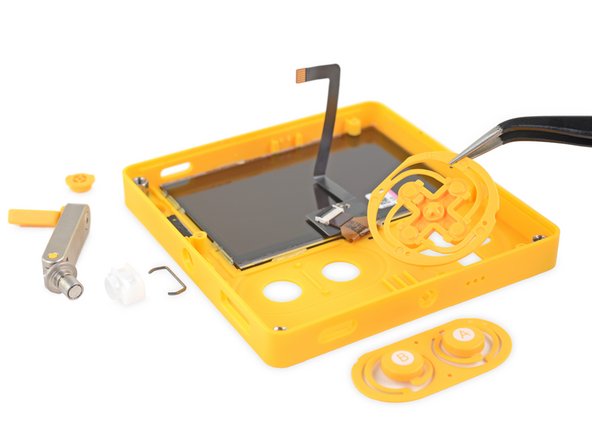
Sia lo schermo che la manopola rimangono comodamente rifugiati nell'alloggio di fronte, insieme ad alcune coperture dei pulsanti
-
Tutto il resto salta via, se sei abile con lo spudger e sai convincere qualche piccolo cavo a nastro a spostarsi.
-
E qui abbiamo un primo sguardo su come funziona la manovella. Nessun ingranaggio! Niente scherzi! Solo un semplice sensore dell'effetto Hall e una... cosa... avvolta in plastica bianca. Importante? Vedremo.
-
-
-
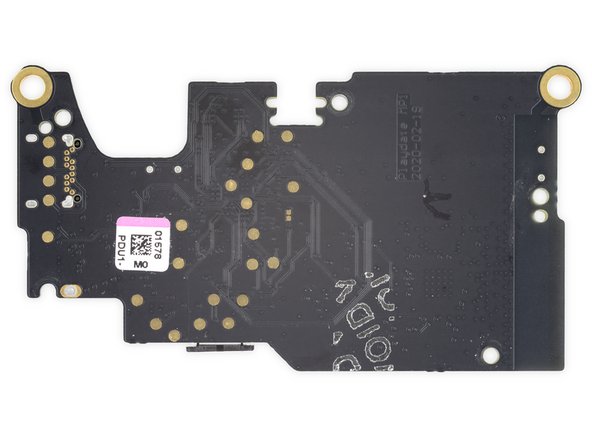
Più azione con la manovella in un attimo, ma prima vediamo che poteri ha questa bontà da gaming tascabile. Il lato nascosto della scheda contiene:
-
STM32F746IGK6 STMicroelectronics, un SoC basato su ARM Cortex-M7
-
4 GB di memoria flash NAND eMMC THGBMDG5D1LBAIT Kioxia (ex Toshiba)
-
128 Mb di SRAM low-power Winbond W967D6HBG
-
32 Mb di memoria flash NOR seriale Winbond W25Q32JV
-
IC gestione dell'alimentazione Analog Devices (ex Linear Technology) LTC3576
-
Audio codec con amplificatore cuffie/altoparlanti Cirrus Logic CS42l52
-
SoC WiFi e Bluetooth Espressif Systems ESP32-D0WDQ6
-
-
-
Questa scheda è piccola ma piena, continuiamo!
-
Accelerometro MEMS a tre assi STMicroelectronics LIS3DH
-
Interruttore effetto Hall Allegro Microelectronics A1266
-
Controller USB-C ON Semiconductor FUSB301TMX
-
Rilevatore di tensione Rohm da 1,6 V BU4216FVE e 2,7 V BU4227FVE
-
Pompa di carica buck-boost da 60 mA Texas Instruments REG710NA-5
-
Regolatore LDO Microchip (ex Micrel) da 150 mA/3,3 V MIC5365-3.3YC5
-
Traduttore livello di tensione NXP Semiconductor NTB0104
-
-
-
È giunto il momento di togliere la sicura da questa manovella.
-
Ecco che esce. C'è un magnete cilindrico incorporato nell'asta. Quando gira, il campo magnetico rotante colpisce il sensore dell'effetto Hall menzionato sopra, che attiva... qualcosa nel gioco.
-
Una cosa che questa manovella non fa? driftare. Non c'è nessuna spazzola o molla o superficie di un sensore da consumare. Il design è la semplicità stessa.
-
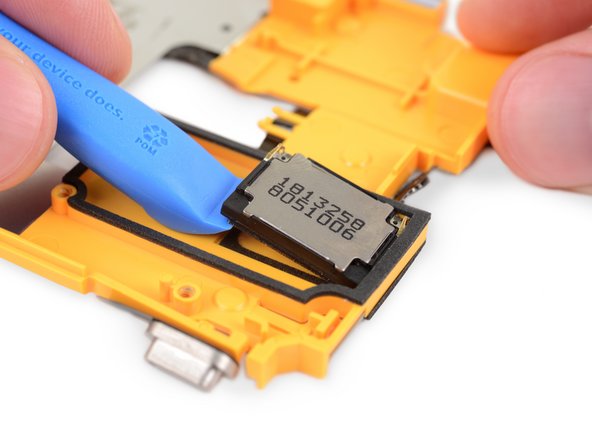
Da altre parti sul davanti, il piccolo altoparlante mono è attaccato al suo posto. È abbastanza facile da rimuovere, ma sarebbe complicato da rielaborare e sostituire.
My crank broke. I have the yellow turner and the yellow disc that sits under it but I don't see how it goes back together in the metal arm. It doesn't seem to screw in. It should snap in?
-
-
-
Ecco dove i nostri sforzi di smontaggio si riempiono di sporco.
-
Lo schermo, che si dice sia uno Sharp Memory LCD, sembra saldamente incollato alla metà frontale del case in plastica. Se devi sostituire lo schermo, probabilmente ti servirà una nuova facciata in plastica, non eravamo sicuri di poter separare lo schermo senza distruggerlo. Probabilmente non costoso, ma non ideale.
-
Allo stesso tempo, i pulsanti e altri diversi interruttori vivono su questo vasto circuito stampato flessibile, che è incollato al telaio intermedio. Abbiamo iniziato a scollare prima di realizzare che non era una buona, o reversibile, idea.
-
Un grande punto a favore, però, è il jack cuffie 100% modulare. Adesso è considerato retro? In ogni caso, siamo grandi fan.
The Sharp Memory LCD link here now goes to a dodgy website.
-
-
-
Torna insieme e funziona ancora? Sì, lo fa. È un buon segno. Resta sintonizzato per un video con le prove di vita e poi lo smonteremo tutto di nuovo.
-
Come puoi probabilmente dire, comunque, entrarci e togliere qualche componente non è troppo doloroso.
-
Parlando di componenti: Panic ha sviluppato questo piccolo apparecchio in collaborazione con Teenage Engineering. Hey, ma li conosciamo!
-
- Un grande cacciavite a taglio e un plettro di apertura ti faranno entrare dentro.
- Puoi far volare via tutte le viti (Pozidriv) interne con un normale cacciavite a croce Phillips.
- La batteria è immediatamente accessibile e solo leggermente incollata al suo posto.
- Il jack cuffie è completamente modulare e il design della manovella è semplice e funzionale.
- Puoi sostituire lo schermo, ma solo se sostituisci tutto il case anteriore.
- Tutti i controlli sono aggregati a un solo FPC, facile da sostituire ma un po' uno spreco se se ne rompe solo uno.
- La porta USB-C è saldata alla scheda principale.


Considerazioni Finali
Punteggio Riparabilità


(10 è il più facile da riparare)
Un ringraziamento speciale a questi traduttori:
88%

Sara Balestra ci sta aiutando ad aggiustare il mondo! Vuoi partecipare?
Inizia a tradurre ›
30 Commenti
Wonderful teardown! I think the modding community is going to have a great time with this one!
The Screen (which by the way it may be Sharp LS027B7DH01 or LS027B7DH01A) looks very identical to Adafruit 4694 (SHARP Memory Display Breakout https://www.adafruit.com/product/4694) so aside from being glued, Screen replacement may be possible
I am pretty curious whether if the display is already cracked (from a drop), that it would be acceptable to just put the front part in hot water to soften the glue, and just rip out the cracked display. The only reason I’d swap out is if the display was already broken.
I can re-glue a new display, perhaps?
It would be pretty hard to crack the display since the bezels on these devices are immense, compared to modern cellphones.
Also, the outside screen with round edges are probably plastic (maybe glass) and are separate from the actual display, so the actual display is even less likely to break.
However, the outside screen, if glass, may be stubbornly glued in place. But again, I didn’t buy and took apart one of these yet.
But yes, if your display is cracked then I’m sure you can replace one yourself.
I managed to damage my display but it did not crack. The device slipped right out of my hand and slammed face down on hard tile floor. The display has a flicker and discoloring issue now. Panic Support has not reached back to me so I am going to attempt to take matters into my own hands.
I am going to attempt to remove the defective display and replace it with the display linked here https://www.adafruit.com/product/4694
Anyone had any luck with this? I’m only worried about removing the defective screen from the plastic case since it is apparently glued down. Any recommendations would be appreciated!
Seems like the connector on the display is mostly identical, and so perhaps a display swap is a doable process.
Any luck with the screen replacement? I had the same problem after one whole day of having it. I'm now Shame-Googling options.
MMcMen -
The display is unfortunately quite easily cracked if you drop something else on it. I'm also interested if anyone has managed a self-repair of the LCD.
Well, I decided to give it a shot and attempted to replace my cracked screen by myself. This teardown worked well as a disassembly guide, and the Sharp LS027B7DH01 was the right display. I got it for $30 from DigiKey. They say the LS027B7DH01A is the same model, just the units that had 1 or 2 bad pixels so they sell them a bit cheaper.
Unfortunately I failed at separating the LCD from the front glass. I tried heating them up, applying alcohol and slicing them apart with a blade, but I broke the front glass. I'm not experienced with this stuff, so there's probably something I should have done differently and I definitely should have researched more when I realized it wasn't easy.
I reassembled it with the new LCD and no front glass, and it almost works, but the enclosure doesn't quite keep the LCD in properly so it kind of pops out at the top. It looks janky and obviously is less protected. So, yeah, I would recommend trying this until there's a way to get a replacement front glass.
I’m at a loss to understand how the USB-C connector could be better by not being soldered.
Soldering is easy to repair, right ?
What do you want, a screw-terminal connector ?
For it to be on a separate board, so you can replace the damage prone connector without rework on the mainboard
If a USB-C port gets really damaged, damage to the main board can also occur. This may not be repairable.
These small things are almost impossible to repair with a generic soldering iron (station, temperature controlled or alike) and is more than a challenge with hot air guns (which may overheat the board) especially if it is half-smt and half thru-hole “hybrid” mounting kind.
But given the 4GB of storage, it’s unlikely one need to frequently plug and unplug the device to flash software. But again, charging will be frequent, and the USB-C, while being stronger than both USB-Micro-B and USB-Mini-B, is still far from being indestructible.
A row of pin headers, especially male ones, are practically indestructible (aside from being bent), and allows freedom of connections.
@cdr_xavier in what world is USB-C “stronger” than USB-Micro-B and USB-Mini-B?
logically: USB-C packs far more and far smaller pins into a smaller surface than older USB variants. These simply cannot be made as robust as a result.
empirically: over many years of use I never saw a USB-B connector fail, not once. USB-C? I’ve blown through dozens of cables due to failed connectors over the the covid period alone. so has my wife. so have my co-workers. there are reasons to like USB-C but robustness simply is not one of them - it’s the first significantly fragile USB connector since USB was first deployed.
The reason USB-C is more "stronger” is not because it have more pins. It is because the external “metal housing” is made larger, more thick, and more strong than either micro USB A/B or mini USB A/B.
Yes, good micro USB ports are very tough, but a good C is even tougher. At least, on the PCB side.
Realistically, a stress test probably end up with both connectors snapping the cables right away. But that’s okay, because cables are replaceable. Ports are not.
I can't say the USB-C connector is more sturdy than micro-USB, they fair equally in the near hundred devices we have in IT class like microcontroller boards and such. On the cable side reliability is best for micro-USB.
What is a big pain-in-the-ass is that soldering a new USB-C connector needs reflow soldering. Where you can do a USB-micro port swap with a regular soldering station. The pin spacing is way tighter.
Blanka -
In step 11 you mention that the crank stimulates the aforementioned hall-effect sensor from step 10, however the hall-effect switch from step 10 appears to be a different part? It seems like the hall-effect switch circled in orange might be for detecting stowage of the crank in the body, whereas there is a separate 3D hall-effect sensor for actual crank rotation. I wonder where that is on the PCB? Anyways, phenomenal tear down, it was very entertaining!
Hall effect sensor for the crank is located right here!
So, not a repair question, but one asking about the capabilities of the Hall sensor. I'm noodling with some game ideas.
Do people here expect it to provide a reliable position reading? No need to calibrate it occasionally, etc.
I'm wondering if it will be precise enough for something like using the four cardinal directions for settings.
Also, does the Playdate know if the crank is furled or not?
Fretting about a USB connector being soldered to a board shows that iFixit doesn't know anything about mechanical engineering or PCB design. They always make these pronouncements about what they'd like to see in a perfect world, but that are never grounded in reality.
In fairness, modular connectors beat non-modular connectors (in terms of repairability, at least)
Even though the connectors last really long
The problem is more with modern connectors like USB-C, MicroUSB/miniUSB or even USB-A where the socket contain parts that can easily wear out (compared to, say, VGA, RS232 or Parallel, or even RJ45 where the sockets are much more robust)
Which is fair, since USB is never a industrial standard (compared to the ones mentioned). They never require a locking mechanism, and are built to be more convenient. Broken HDMI and DisplayPort due to cable sag comes to mind.
what is the voltage rating for charging through the screws?
My playdate screen has broken, I wonder if I can replace it by buying the recommended screen https://www.adafruit.com/product/4694. Does anyone know if there would be any issues with to screen not functioning correctly if I'm able to get the original broken screen unglued and replace it with the adafruit sharp memory display?
You can get the LCD here: https://www.digikey.com/en/products/deta...
But read my comment above about the difficulty of repairing the screen.
I should have also mentioned that there's a reasonably priced Playdate repair (replacement) program: https://shop.play.date/products/playdate...
Love this!
Does it look as if the disk space can be increased by changing components?
I opened up my Group #5 Playdate, serial in the 40k range, and my battery says 2.812Wh, 760mAh https://imgur.com/a/pAVwC2t
Panic should really improve warranty handling and spare part buying options.
The yellow handle on the crank has a serious design failure, making it break very easily. For now Panic only allows complete returning the device, which makes us wait for over 3 months now not being able to use it.
Sending out replacement handles through for example Digikey would mean a 2€ part with next day delivery for another 5€, not worth the mess of filling customs forms and waiting crap as a return would demand. Not to mention the returned device will probably become e-waste. If you have such big troubles with processing pre-orders and stock, why mess up your time with full returns for a single piece of plastic, less than 1 gram.