Introduzione
Ho deciso di imparare come riparare i Nintendo DS Lite poiché su eBay si trovano delle unità rotte a poco prezzo nel 2017. Dopo aver lavorato su qualche dozzina, Ho raccolto gli errori più comuni che ho trovato e ho scritto questa guida per fare in modo che tu non danneggi il dispositivo che stai riparando (specialmente se è la tua console). Tutti i problemi che ho trovato sui DS Lite si possono sistemare partendo da 2€ se ti serve solo il digitizer fino a 10€ se devi prendere una scheda madre da un'altra unità da buttare (prezzo nel 2017). I prezzi sono aumentati dal 2017, ma riparare i DS Lite è ancora vantaggioso economicamente.
Dopo aver imparato come smontare il DS Lite, dovresti poter smontare qualsiasi altra console portatile della Nintendo, inclusi i GameBoy, GameBoy Color, GameBoy Advance, DS, DSi, DSi XL, 3DS, 3DS XL, New 3DS XL, Switch, e Switch Lite. Personalmente, ho usato queste tecniche di smontaggio su tutte queste console con grande successo, e, di tanto in tanto, gestito un negozio su eBay dove ho venduto le console che riparavo.
ATTENZIONE: on cercare di smontare qualsiasi dispositivo elettronico mentre la batteria o il cavo di alimentazione sono collegati (dovrebbe essere impossibile per il DS Lite).
Cosa ti serve
-
-
Il problema più comune con i Nintendo DS Lite è una cerniera rotta. Puoi acquistarne una nuova per meno di 10€ direttamente dalla Cina (prezzo nel 2017).
-
-
-
Svita la copertura della batteria con una punta PH000. Dovrai probabilmente fare leva sulla copertura poiché diventa appiccicosa nel tempo. L'alloggio della batteria è spesso abbastanza stretto quindi potresti dover usare uno spudger in plastica per fare leva delicatamente sulla batteria per rimuoverla.
-
-
-
Molto spesso trovo queste parti del DS Lite danneggiate. Fai come nelle immagini per rimuovere i piedini senza danneggiarli.
-
-
-
Ora svita le due viti dorate sotto i piedini in gomma e le due argentate nell'alloggio della batteria con una punta PH000. Quindi svita le tre viti argentate e la piccola vite nera con una punta Y00. Metti da parte la punta Y00 una volta che hai finito di usarla.
If you get an essential starter tool kit then the Y000 bit is to small for the Y00 however if you plan on getting more bits you can file down the Y000 bit and it works perfect.
-
-
-
Ho visto molti danni causati dalla rimozione forzata della scocca inferiore, quindi prendi tutto il tempo necessario e fai scorrere lo spudger in plastica tutto attorno al suo perimetro. Se la scocca sembra incollata, rimuovila con il dispositivo chiuso. Ciò aiuta ad evitare di danneggiare il digitizer.
-
-
-
Prendi e rimuovi attentamente i tasti dorsali. Cerca di tenere il gruppo con la molla insieme per evitare di perderne dei pezzi. Le estremità della molla possono pungerti, quindi stai attento. Indossa degli occhiali protettivi per evitare le molle ribelli!
It's recommended to hold the springs with tweezers to protect your hands, because the springs have really sharps edges that can easily puncture your fingers.
-
-
-
Devi rimuovere la scheda figlia del WiFi a questo punto o rischi di danneggiare il digitizer. Io l'ho imparato a mie spese. Dovrai tirare con forza la scheda: l'adesivo che la tiene ferma è molto resistente. Puoi provare a scaldarlo o ad usare dell'alcool per liberare la scheda figlia, ma potresti danneggiare le parti ed io non ho mai dovuto farlo.
What do you mean by "Damage the digitizer"? Is it required to be removed first electrically somehow? Could you please be more specific?
Based on the next step, they probably mean pulling it out too harshly could cause damage to the connector right above it (and the digitizer's ribbon cable)
elwood -
No matter what I do or use, the doughterboard is not coming off. It can be detached from its slot, but its glued extremely hard to the board
-
-
-
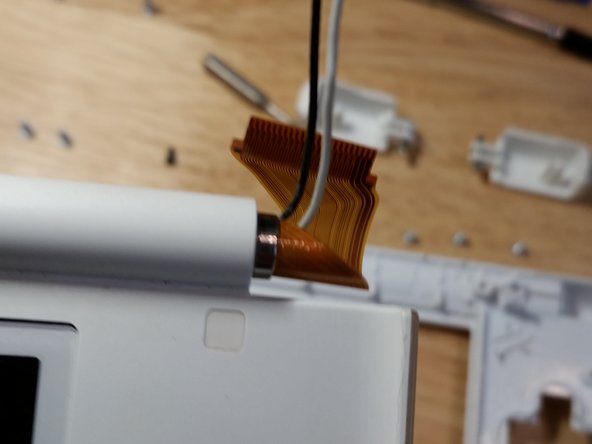
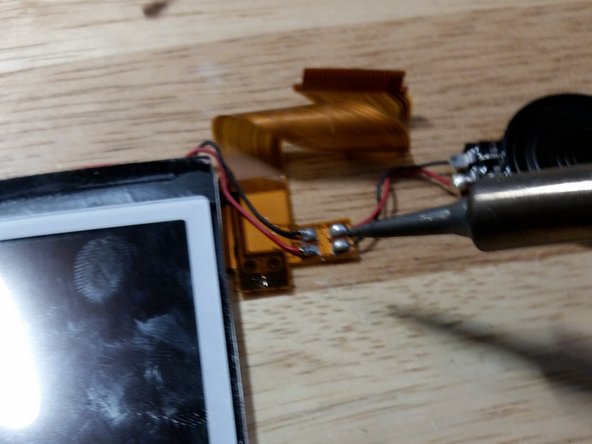
Gira delicatamente l'aletta del connettore del cavo del digitizer con un piccolo cacciavite a testa piatta. Prenditi tutto il tempo necessario e sii delicato, in quanto questo connettore si rompe facilmente. La sostituzione del digitizer è una riparazione molto comune per questa console, quindi ti consiglio vivamente di imparare come eseguirla.
How do you safely get the cord back in on reassembly
RE: I answered my own question. It’s easiest when the motherboard is screwed back in. Use a plastic needle nose tool to lift the cord out from under the motherboard if it gets trapped. Then face the gameboy end of the device away from you. Make sure the plastic tab is perpendicular to the board. I used the same tool from earlier to adjust the cords height while I nudged it back into the slot. Hope this helps someone that got stuck in the same way.
Step 17 below has the routing of the white wire.
you said you broke 3 of these tabs for the flex, where could I get a replacement?
I found the connector. Look for "NDSL touch screen ribbon port socket" on Ali Express. At the time of this writing,10 pieces for $4.01 with $2 shipping to the US. Make sure you buy at least a handful, and it helps to use a digital microscope.
What is actually being removed here? Is it the small black piece? That seems too be soldered in, though.
I'm gently lifting the small black or dark colored plastic clip. Not removing the lower display module---yet!
-
-
-
Gira la scheda madre come mostrato. Sii delicato in quanto il cavo a nastro è delicato. Fai caso alla scritta in cinese sulla console fatta alla fabbrica Nintendo.
-
-
-
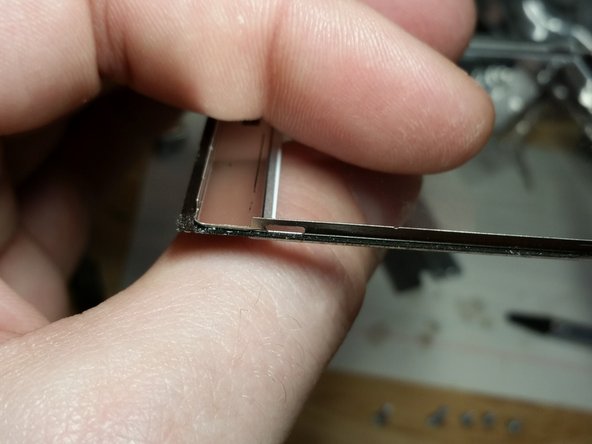
Usa le unghie per scollegare il cavo a nastro. Non usare una punta piatta, poiché potresti danneggiare il connettore. Scusami per l'immagine sfuocata, ma questo passaggio sarà ovvio se hai seguito la procedura con una console. Guarda il passaggio precedente per un'immagine più chiara.
The flat end of the Halberd Spudger is good for this.
For such a critical step this is quite an awful picture… I have no idea what you’re lifting up/sliding
Hi, Marcus, you're no doubt looking at this picture in isolation. If you had a console in front of you it would be more obvious: Use your fingernail to lift the ZIF locking tab. I recommend that you don't use a metal tool for this, but a high quality plastic spudger might work. The iFixit spudger is too thick for this.
Well this was akward. I managed to pull the entire connector from the motherboard. I won't even try to solder this. Where can I get a replacement? EBay?
Before buying a new connector, i'm worried about your motherboard because if you have ripped out the entire connector of it, there is a very high chance that you had ripped out some soldering pads with it, making repair the console much more complicated.
Nothing -
-
-
-
-
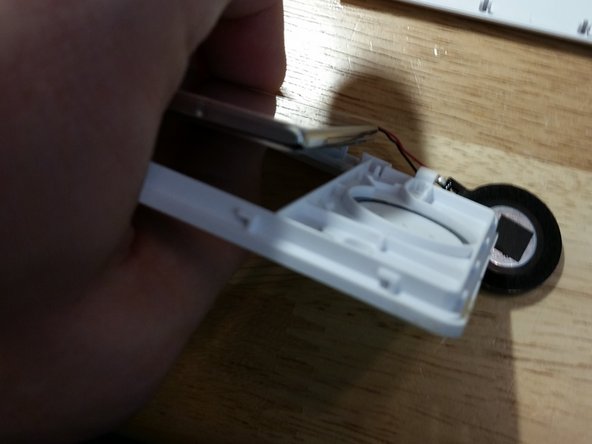
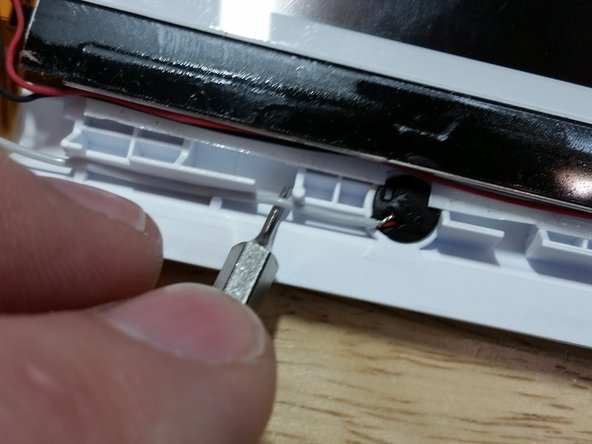
Scollega il cavo nero. Dovrai farlo ondeggiare per liberarlo dal connettore. Dopo il design della cerniera, il fatto che il cavo è molto difficile da ricollegare è la decisione peggiore di Nintendo su questo dispositivo. Non toccare il lettore delle cartucce in alcun modo. Con tenacia, il cavo nero si sfilerà e reinfilerà, quando sarà il momento.
I tied a piece of small ribbon around the black wire and pulled it through when I removed it so that I could pull it back when I’m done
Hey, I’m 14 and have been doing this for around two years and I’ve fixed and resold around 15 Nintendo ds lites but I keep forgetting what the black wire is called and the purpose of it is, could you tell me?
Hi, this cable connects the Wi-Fi module of the console to its antenna and it is called "Wi-Fi antenna", because the other part of the cable is soldered directly to the antenna
Nothing -
-
-
-
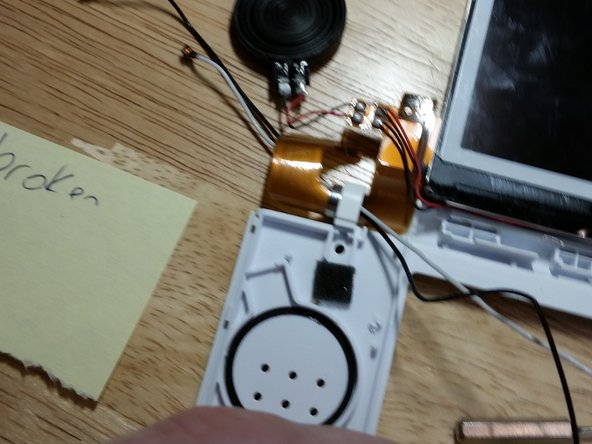
Segnati dove passa il cavo bianco. Dovrai replicare questo passaggio per il rimontaggio. Ora rimuovi il cavo bianco. Assicurati che il cavo a nastro del digitizer sia già stato scollegato. Altrimenti, torna indietro ed esegui questo passaggio.
Do not remove the digitizer cable. Its a &&^&^$^ nightmare to reinstall and is completely unnecessary when doing a case swap. I’m basically having to replace the console due to following this step'.
Definitely do be careful. The digitizer is almost always worn out on the DS Lite, though, and it is a common repair. See step 8 for the recommended way to lift the locking tab using a small flathead bit.
-
-
-
Scollega il cavo a nastro dello schermo inferiore. gira verso l'alto l'aletta con un'unghia, come hai fatto per il cavo dello schermo superiore.
-
-
-
Rimuovi i gruppi in plastica e gomma dei tasti. Questo passaggio è abbastanza semplice, ma non perdere alcun pezzo. Puoi lavare ogni pezzo in plastica o gomma con dell'acqua calda e sapone. Sostituisci ogni pezzo in gomma che si è strappato o che è danneggiato eccessivamente.
-
-
-
Questo è il peggior difetto di progettazione del Nintendo DS Lite. Il gruppo della cerniera è troppo delicato. Metti da parte le viti e i pezzi in metallo e plastica se stai sostituendo la scocca.
-
-
-
Il motivo più diffuso per cui non si riesce a rimontare il DS Lite è poiché il cavo bianco non è posizionato correttamente. Durante il rimontaggio segui il percorso nell'immagine per posizionarlo correttamente.
Wire routing is definitely something I tend to forget to note during disassemblies. Great write up.
Side note, the white wire in mine is slightly pinched and it was definitely not routed exactly this way. Must have been a Monday or a Friday at the factory, because I bought it new and this is the first time I have opened it.
-
-
-
Assicurati che entrambi i cavi siano avvolti dal cavo a nastro, quindi fai scorrere il cavo a nastro attraverso l'apposita fessura. Il cavo a nastro è molto fragile ed è stato rinforzato nei modelli successivi. Prenditi tutto il tempo necessario, anche se ti servono diversi minuti per evitare di danneggiare il cavo.
In case anyone else struggles with this, i found it easiest to pull the lower face piece just so you could see a space between it and the metal piece. I gently pulled the wires out, being very careful to not let them pull against the flex cable, before sliding the flex cable through the small slit in the plastic piece to separate them.
-
-
-
Con la punta a testa piatta più piccola che trovi, Svita la vite sotto all'adesivo per evitare di danneggiare il dispositivo meglio che puoi. danneggiare leggermente la plastica ABS è quasi impossibile. Ho avuto più fortuna di recente usando un rasoio di plastica.
-
-
-
Con lo spudger in plastica, fai leva sulla scocca superiore per liberarla. Non rimuovere o toccare i pezzi in gomma sui lati. Non ti serve rimuoverli e li ho visti spesso danneggiati o mancanti. Come detto nei commenti, lo schermo scivolerà in basso di uno o due millimetri, permettendo ai pezzi di separarsi facilmente.
This part is extremely delicate! I Snapped small chips off the top of my unit 3 times. Thankfully I’m only stripping it to put it in a brand new case. I suggest running an opening pick along the edge. They’re so thin and plastic they work quite well here.
I found a simple trick to make the disassembly of the top much much easier. After you took out the 4 Screws holding the part in you can just slide the top part (the part with the DS Logo) upwards a few millimeters and the part will be coming right off. So theres no strain on the little clips.
This is how it needs to be disassembled/reassembled. These are not tapered clips, they are "L" shaped.
-
-
-
Inizia a premere sullo schermo come mostrato nell'immagine e continua lungo i bordi. Sii abbastanza delicato ma sappi che il pannello LCD è protetto da una copertura in plastica sul fronte e una in metallo sul retro.
-
-
-
Segnandoti il percorso dei cavi bianco e nero per il rimontaggio, rimuovi il microfono e l'antenna WiFi, facendoli scorrere attentamente nel centro del cavo a nastro in modo da non danneggiare nulla.
-
-
-
Queste parti dovrebbero essere rimosse e sostituite con la parte lucida rivolta verso l'alto. Le puoi trovare come indicato nell'immagine o sugli speaker stessi.
-
-
-
Se il cavo a nastro viene danneggiato, dovrai spendere circa 8€ al momento in cui scrivo. Sii molto delicato con questa fragile cavo, arrotolandolo dentro allo stretto cilindro.se il cavo viene danneggiato, non c'è modo di riparare il pannello LCD e dovrai cambiare l'intero modulo. Rimuovi e metti da parte il pezzo in metallo.
-
-
-
Svita le tre viti dorate dall'alloggio della penna e le due viti dorate dalla protezione in metallo. Smonta il tutto. Dovrai fare una leggera leva per liberare i cursori dell'accensione e del volume. Lava tutti i pezzi in plastica della scocca mostrati con dell'acqua calda e sapone. Potresti dover usare dell'alcool lo sporco più ostinato.
-
-
-
Se stai sostituendo la scocca con una di colore diverso, dovrai rimuovere gli adesivi. Con lo spudger in metallo di iFixit questo passaggio è molto facile.
-
-
-
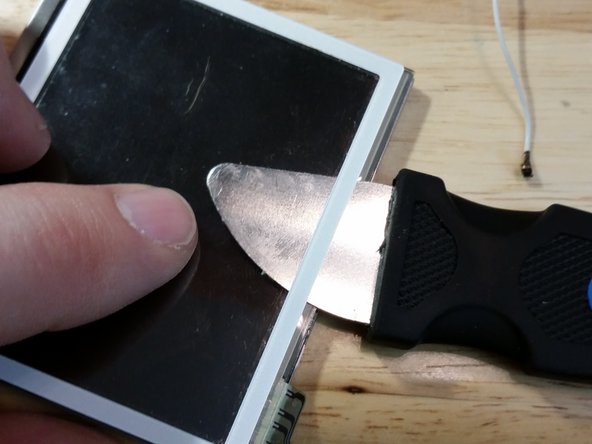
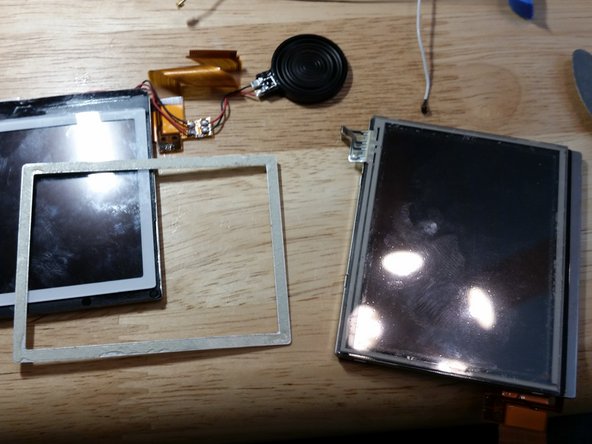
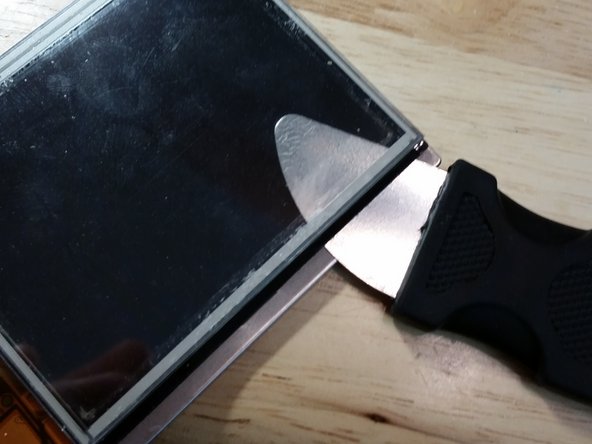
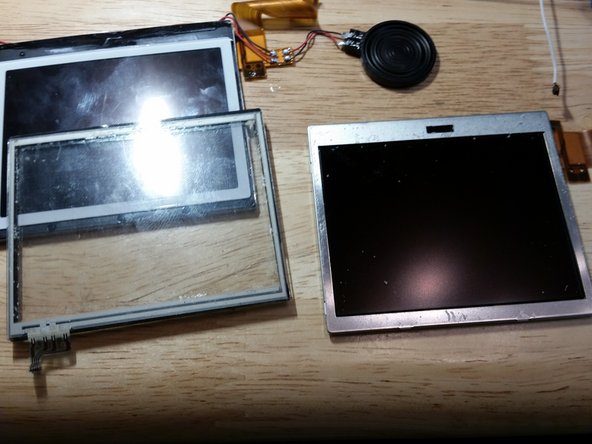
Fai scorrere attentamente lo spudger in metallo sotto l'adesivo nero tutto attorno il gruppo, evitando i cavi a nastro. Questo passaggio è più semplice di quel che sembra, ma eseguilo solo se lo schermo o oil digitizer vanno sostituiti. Se entrambi funzionano, non è necessario. Pulisci entrambe le parti con dell'alcool una volta separate.
-
-
-
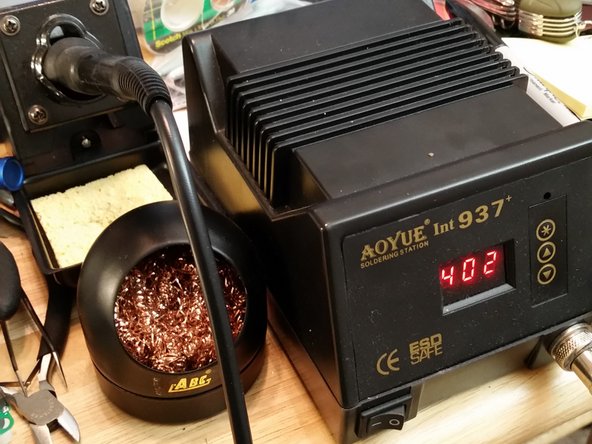
Questo passaggio servo solo se il pannello LCD è rotto. Sfortunatamente è un problema comune. Per prima cosa, applica del gel flux sui contatti. Ora Dissalda i contatti per scollegare i 4 cavi, segnandoti le rispettive posizioni per. Può essere utile usare della saldatura con piombo, ma assicurati di rispettare le leggi locali.
-
-
-
Pulisci i contatti come preferisci. Io uso uno stoppino per saldature dopo aver aggiunto della saldatura con piombo.
-
-
-
La copertura in plastica è infilata sotto alla protezione in metallo ed è tenuta ferma solo da pochi ganci, a seconda di quanto è vecchio il DS Lite. Ci sono due ganci su ogni lato. Libera delicatamente i ganci senza rimuovere la protezione in metallo nera. Questo passaggio non serve a meno che non stia cambiando il colore della scocca.
-
-
-
Opzionale: prova il dispositivo smontato. Inizia collegando la scheda figlia del WiFi. Collega i due schermi, escludendo il digitizer. Mentre tieni in posizione la batteria, accendi il dispositivo. Stai attento se hai rimosso del materiale isolante e c'è del metallo esposto: è possibile bruciare un fusibile o causare danni peggiori.
NOTE: If you’re replacing the lower LCD screen, BE SURE TO COVER THE BACK OF THE SCREEN WITH ELECTRICAL TAPE. Otherwise, you will blow one of the fuses when you attempt to test/reconnect the DS.
I have added a note based upon your comment.
-


Per rimontare il dispositivo:
1) Assicurati che il cavo bianco sia posizionato correttamente prima di reinstallare la scheda madre.
2) Rimonta attentamente i tasti dorsali. Serve pratica.
3) Assicurati che i cursori per l'accensione e del volume siano allineati correttamente prima di sostituire la scocca inferiore. Se non lo sono danneggeranno la scheda madre e non potrai più accendere la console.
Annulla: non ho completato questa guida.
Altre 55 persone hanno completato questa guida.
Un ringraziamento speciale a questi traduttori:
100%
Daniele Carminati ci sta aiutando ad aggiustare il mondo! Vuoi partecipare?
Inizia a tradurre ›

14 Commenti
Great work pal! Congratulations.
I find this very specific and helpful! I will favorite this guide, once i have every materials required… especially the soldering part in this guide. Far from what i know… The guide deserved the best credits as the author included the soldering heat meter! However, i do not understand why the 2nd/middle picture (from right to left) at Step 28…
Step 28; Removing the Speaker things.
Pictures: links, the picture on the machine says… 402, not 400. - Picture is from step 28.
This step is only necessary if your upper LCD is bad. Unfortunately, this is a common problem. First, wet the contacts with flux. Then, with your iron at 400 degrees C, melt the solder and remove all four wires. It might help to add fresh solder with lead. The lead-free solder used by Nintendo sucks.
I usually do my soldering between 300 and 350C. If you do a fair amount of soldering, pick up a knockoff Hakko FG-100 tip thermometer and then get the official sensors. This will set you back around $50 total on Amazon, but considering that the official FG-100 is over $200, it’s a steal. Anyway…check your iron for accuracy. The key here is heat transfer. Use the largest tip that fits in/on the pad. A larger tip will retain heat better and will heat a larger area at once. Now as posted above, add some fresh leaded solder to the joint. This will help to lower the melting temperature of the rest of the solder. Final tip is: Don’t forget the flux. Flux is your friend. You can never have too much flux. Flux will save you from bad joints, burned parts, and a lot of swearing. Get yourself some flux in liquid and paste form. Clean up the excess when you’re done with the highest concentration isopropyl alcohol you can find.
I am new to soldering, so i can’t say i am fair to soldering, but i am going to give it a try especially since my Nintendo DS Lite is way old and in need of fixs and therefore cant spend alot for the time being… but ill still buy it either way! Thanks for the help! reasons i am in need of it is good materials and parts is because i want it to be completely like new for myself.
I removed the solder temperature. What settings you should use will vary depending upon your situation. Desoldering the speakers is not very difficult at all, provided that you use flux, and many different techniques should work.
Quick tip for putting the shoulder buttons back in place. Don’t try to flex the spring and maneuver it into place. You will just wind up with a missing spring and a scratched cornea. Push the pivot pin down so most of it is hanging out of the bottom of the button. Now you can get the pivot pin in the hole of the case while the spring is straight and not loaded. Your shoulder button will be sticking straight up at this point. Now swing the button down into place and it will flex/load the spring. Problem solved…no missing spring and no eyepatches.
Always wear safety glasses when working on electronics.
Anyone know if the plastic screen covers are interchangeable between the top and bottom screens?
Not interchangeable. The bottom "cover" is the digitizer while the top cover is just simply a clear plastic cover.
Thanks for all of the likes and feedback!
Remember that this guide is a complete teardown of the Nintendo DS Lite. Depending upon what you’re up to, you can get by with following only a portion of the steps outlined. This teardown covers everything I’ve done to repair somewhere around 100-200 DS Lites in terms of disassembly. I do not cover mainboard component removal, but you can learn about this by searching for user john_gotts on Instagram. You can see how I fix DS Lite mainboards, and how I fix other consoles such as the DSi and 3DS lines.
It is true that you can remove the mainboard, lower screen, digitizer, and screen cover as one assembly. If there is nothing wrong with this assembly, then I recommend doing that. However, you should be comfortable with removing the flex cables on the DS Lite. As illustrated, use the smallest flat head bit you can find and be very gentle and you will have no problems. This is a good skill to acquire if you want to tackle other Nintendo handheld consoles.
I have updated the guide thanks to all of your feedback. If you've mastered these steps, then you can graduate to disassembling almost any Nintendo handheld. The one that I've had the most trouble with is the new 3DS XL. Newer and older models, including the Switch, are not much more difficult than the DS Lite, except the ribbon cables. They can be a real challenge.
I’m pretty sure I messed up my DS’s reassembly. What exactly goes wrong with the DS’s motherboard if you misalign the power and volume switches? Does it cause general physical damage to the board? Or are there specific board-level components that can be replaced?
Can i check commonly another problem is a big spreading bubble from the middle of the screen, is this a digitizer or lcd problem? Not sure if its due to humidity in Asia. Just need to verify what i need to buy and change..