Salta al contenuto principale

Siemens coffee machine Water Tank Seal Replacement

Cosa ti serve

  1. Siemens coffee machine Water Tank Seal Replacement, Opening the Siemens Surpresso Compact: passo 1, immagine 1 di 1
    • Unplug your coffee maker!

    • Remove the water container, the brew group and the drip tray with pomace container.

    • Using a spoon, remove as much of the coffee beans as possible from the coffee bean container.

    • Depending on the model, additional sensors with cables may be installed on the top and side panels. You have to remove these before you can completely remove the housing parts.

  2. Siemens coffee machine Water Tank Seal Replacement: passo 2, immagine 1 di 1
    • Remove the two Torx T10 screws on the top.

  3. Siemens coffee machine Water Tank Seal Replacement: passo 3, immagine 1 di 2 Siemens coffee machine Water Tank Seal Replacement: passo 3, immagine 2 di 2
    • Remove seven T10 Torx screws on the back.

    • The two screws at the bottom of the front can remain.

  4. Siemens coffee machine Water Tank Seal Replacement: passo 4, immagine 1 di 2 Siemens coffee machine Water Tank Seal Replacement: passo 4, immagine 2 di 2
    • Press with a flat-head screwdriver into the openings on the side with the water tank. This releases the latches on the top.

    • Press the flat-head screwdriver into the opening on the side with the brew group. This will release the last notch on the top.

    • Lift the top off.

    • On some models, a cable leads to the sensor on the powder tray. Unplug the connector on this cable first.

  5. Siemens coffee machine Water Tank Seal Replacement: passo 5, immagine 1 di 2 Siemens coffee machine Water Tank Seal Replacement: passo 5, immagine 2 di 2
    • Slide the side section of the brewing unit about 2 cm to the rear. This sometimes gets stuck and may require some force to remove.

    • Remove the two tabs from the power switch.

    • Take off the side panel with the brew group.

  6. Siemens coffee machine Water Tank Seal Replacement: passo 6, immagine 1 di 1
    • Do the same with the panel on the other side.

    • To remove the water tank hose simply pull it of the pump.

    • Remove the side panel.

  7. Siemens coffee machine Water Tank Seal Replacement, Water tank seal: passo 7, immagine 1 di 2 Siemens coffee machine Water Tank Seal Replacement, Water tank seal: passo 7, immagine 2 di 2
    • Turn the coffee maker so the side panel faces you.

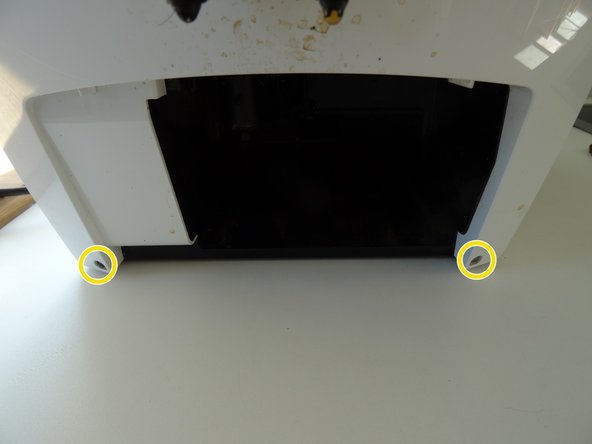
    • Press the two plastic expansion rivets together with pliers and push them out.

    • Turn the side panel over again

    • Lift the cap over the gasket.

    • Remove the seal.

Conclusione

To reassemble your device, follow the steps in reverse order.

Un'altra persona ha completato questa guida.

Un ringraziamento speciale a questi traduttori:

de en

100%

Questi traduttori ci stanno aiutando ad aggiustare il mondo! Vuoi partecipare?
Inizia a tradurre ›

VauWeh

Membro da: 10/19/15

201.734 Reputazione

246 Guide realizzate

Team

Repair is War on Entropy Membro di Repair is War on Entropy

Community

25 Membri

1.097 Guide realizzate

2 Commenti

Where can I find a part-list for the seals etc? I am worried im am missing a seal. I also saw a video of usage of food grade grease I am willing to try.

Kjetil Solvang Carlsen - Replica

In germany for example https://www.juraprofi.de/ or www.komtra.de. Ask them, if they ship to your country.

VauWeh -

Aggiungi Commento

Visualizza Statistiche:

Ultime 24 Ore: 3

Ultimi 7 Giorni: 8

Ultimi 30 Giorni: 101

Tutti i Tempi: 4,859