Salta al contenuto principale

Questa guida ha delle modifiche più recenti. Passa all'ultima versione non verificata.

Shark Flex DuoClean Motherboard Replacement

Cosa ti serve

  1. Shark Flex DuoClean Motherboard Replacement, Garage Door: passo 1, immagine 1 di 2 Shark Flex DuoClean Motherboard Replacement, Garage Door: passo 1, immagine 2 di 2
    • Open the garage door by sliding both of the release buttons away from you.

    • Lift off the garage door.

  2. Shark Flex DuoClean Motherboard Replacement, Side Component: passo 2, immagine 1 di 2 Shark Flex DuoClean Motherboard Replacement, Side Component: passo 2, immagine 2 di 2
    • Remove the plastic screw covering using a metal spudger by pushing the sharp side into the crevice and prying the cover out.

  3. Shark Flex DuoClean Motherboard Replacement: passo 3, immagine 1 di 2 Shark Flex DuoClean Motherboard Replacement: passo 3, immagine 2 di 2
    • Turn the T10 Security Torx screwdriver counterclockwise to remove the 15mm screw.

  4. Shark Flex DuoClean Motherboard Replacement: passo 4, immagine 1 di 1
    • Use the iFixit Opening Tool to pry the side of the vacuum open.

  5. Shark Flex DuoClean Motherboard Replacement: passo 5, immagine 1 di 1
    • Remove the side component with your hands.

  6. Shark Flex DuoClean Motherboard Replacement, Top Component: passo 6, immagine 1 di 1
    • Remove the four 15 mm T10 screws on the underside of the vacuum.

  7. Shark Flex DuoClean Motherboard Replacement: passo 7, immagine 1 di 2 Shark Flex DuoClean Motherboard Replacement: passo 7, immagine 2 di 2
    • Using the plastic spudger, pry the back seam of the top component to pop it off the vacuum.

  8. Shark Flex DuoClean Motherboard Replacement, Motherboard: passo 8, immagine 1 di 1
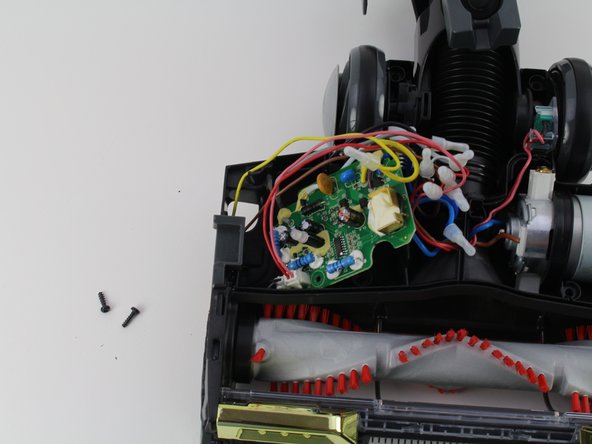
    • Remove one 15mm T10 screw from the inside left of the base of the vacuum to access the motherboard.

  9. Shark Flex DuoClean Motherboard Replacement: passo 9, immagine 1 di 1
    • Using the nylon spudger, place the curved side under the motherboard.

    • Gently pry the motherboard out of the base of the vacuum.

    • Do not use your fingers to take out the motherboard, as the bottom can be sharp.

    • The motherboard will still be connected to the base with wires.

  10. Shark Flex DuoClean Motherboard Replacement: passo 10, immagine 1 di 1
    • Desolder the motherboard wires using wire cutters.

Conclusione

To reassemble your device, follow these instructions in reverse order.

Team

Cal Poly, Team S17-G5, White Fall 2018 Membro di Cal Poly, Team S17-G5, White Fall 2018

CPSU-WHITE-F18S17G5

4 Membri

14 Guide realizzate

0 Commenti

Aggiungi Commento

Visualizza Statistiche:

Ultime 24 Ore: 0

Ultimi 7 Giorni: 1

Ultimi 30 Giorni: 11

Tutti i Tempi: 1,387