Salta al contenuto principale
Unisciti alla Community delle riparazioni - Crea un account

Sanyo VPC-X1200 Button Plate Replacement

Cosa ti serve

    1. Sanyo VPC-X1200 Button Plate Replacement, Back Case: passo 1, immagine 1 di 3 Sanyo VPC-X1200 Button Plate Replacement, Back Case: passo 1, immagine 2 di 3 Sanyo VPC-X1200 Button Plate Replacement, Back Case: passo 1, immagine 3 di 3
      • Remove the five case screws with a Phillips #00 Screwdriver.

      • Five 3.5mm Phillips Screws

      Chiedi a FixBot

      Aggiungi Commento

    2. Sanyo VPC-X1200 Button Plate Replacement: passo 2, immagine 1 di 1
      • Gently lift up the back cover and set aside.

      Chiedi a FixBot

      Aggiungi Commento

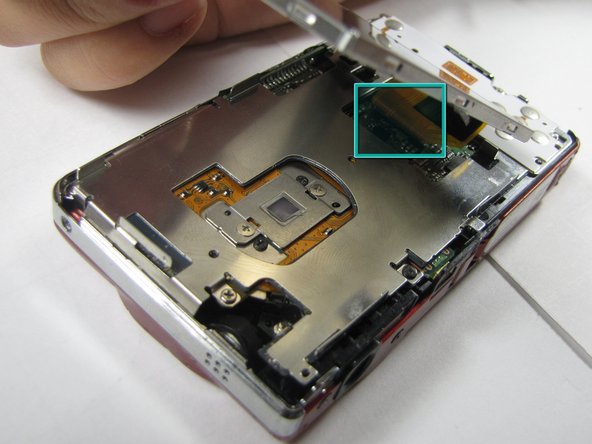
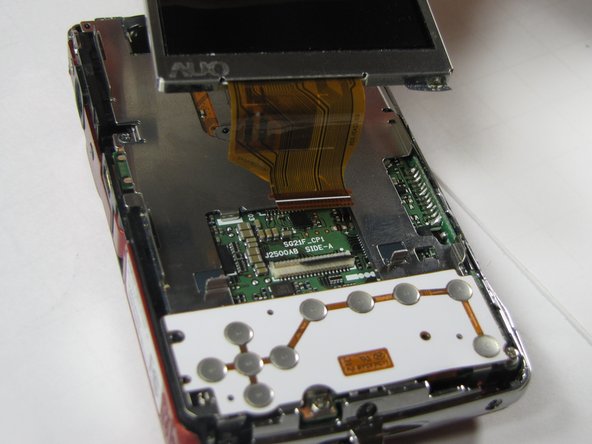
    1. Sanyo VPC-X1200 Button Plate Replacement, LCD Screen: passo 3, immagine 1 di 2 Sanyo VPC-X1200 Button Plate Replacement, LCD Screen: passo 3, immagine 2 di 2
      • Gently lift up on the left side of the LCD and slowly pull it to the left side of the camera but do not remove entirely, there is a ribbon connector.

      • Be careful not to rip out the ribbon connector.

      Chiedi a FixBot

      Aggiungi Commento

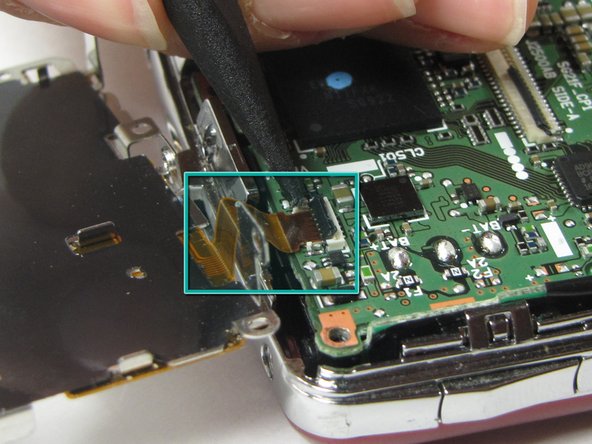
    2. Sanyo VPC-X1200 Button Plate Replacement: passo 4, immagine 1 di 2 Sanyo VPC-X1200 Button Plate Replacement: passo 4, immagine 2 di 2
      • To clear the ribbon connection underneath the screen, lift up the black ribbon gate with the spudger.

      • Gently lift ribbon out of the gate and set screen aside.

      Chiedi a FixBot

      Aggiungi Commento

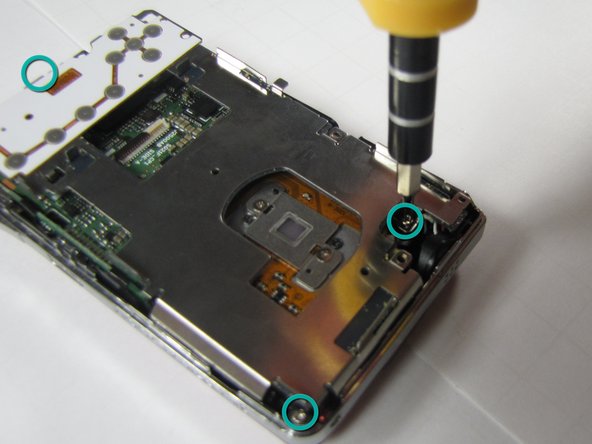
    1. Sanyo VPC-X1200 Button Plate Replacement, Button Plate: passo 5, immagine 1 di 2 Sanyo VPC-X1200 Button Plate Replacement, Button Plate: passo 5, immagine 2 di 2
      • There are five screws of three different sizes which need removal.

      • One 4.5mm screw

      • Four 3.5mm screws, one on the button side

      • One 5.5mm screws

      Chiedi a FixBot

      Aggiungi Commento

    2. Sanyo VPC-X1200 Button Plate Replacement: passo 6, immagine 1 di 2 Sanyo VPC-X1200 Button Plate Replacement: passo 6, immagine 2 di 2
      • Slowly lift metal tray to the right.

      • Be careful not to bend the screw tabs or rip out the ribbon cable.

      • Remove ribbon cable by using the spudger to lift up the black ribbon gate to release the ribbon

      Chiedi a FixBot

      Aggiungi Commento

Conclusione

To reassemble your device, follow these instructions in reverse order.

Annulla: non ho completato questa guida.

Un'altra persona ha completato questa guida.

Team

Cal Poly, Team 7-10, Maness Spring 2010 Membro di Cal Poly, Team 7-10, Maness Spring 2010

CPSU-MANESS-S10S7G10

4 Membri

23 guide realizzate

0Commenti sulla guida

Aggiungi Commento

Visualizza statistiche:

Ultime 24 ore: 0

Ultimi 7 giorni: 3

Ultimi 30 giorni: 27

Tutti i Tempi: 2,653