Salta al contenuto principale
Unisciti alla Community delle riparazioni - Crea un account
Samsung PL20 LCD Replacement

Samsung PL20 LCD Replacement

oldturkey03

oldturkey03 e 4 altri collaboratori

Ultimo aggiornamento il November 12, 2020

Nessuna stima
Moderato
Foto Azione
Fallo a Fettine
Guida fornita dalla comunità

Introduzione

Vai al passo 1

Here is a PL20 that has a broken LCD, as well as some other issues. The repair is straight forward. The only tools used were a Phillips screwdriver and a plastic opening tool, which is optional. This camera was actually fun to work on; it was easy and took no time at all.

Cosa ti serve

Ricambi

Strumenti

Mostra di più…

  1. Samsung PL20 LCD Replacement, LCD: passo 1, immagine 1 di 3 Samsung PL20 LCD Replacement, LCD: passo 1, immagine 2 di 3 Samsung PL20 LCD Replacement, LCD: passo 1, immagine 3 di 3
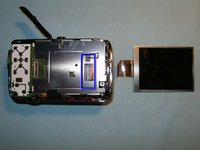
    • Here is the broken LCD. The spider crack in the glass, as well as the discoloration of the screen, is clearly visible.

    • Remove the battery and the memory card from the device, if so equipped.

    • Remove the two screws on the left side.

  2. Samsung PL20 LCD Replacement: passo 2, immagine 1 di 3 Samsung PL20 LCD Replacement: passo 2, immagine 2 di 3 Samsung PL20 LCD Replacement: passo 2, immagine 3 di 3
    • Remove one screw from the bottom

    • Remove the two screws on the right side.

    • Use a plastic opening tool, or your fingernails, to split the casing apart. Start from the battery compartment and work your way around the case. The case should split easily.

  3. Samsung PL20 LCD Replacement: passo 3, immagine 1 di 3 Samsung PL20 LCD Replacement: passo 3, immagine 2 di 3 Samsung PL20 LCD Replacement: passo 3, immagine 3 di 3
    • Once the back of the case is removed, the LCD becomes immediately visible.

    • Remove the LCD from its holder to gain access to the connector.

    • Open the connector, and flip the black clip upwards, freeing the LCD. It can now be removed and the new one installed.

Conclusione

To reassemble your device, follow these instructions in reverse order.

Altre 6 persone hanno completato questa guida.

oldturkey03

Membro da: 09/29/10

818.357 Reputazione

119 Guide realizzate

1Commento della guida

Great help! Screen replaced no problem. Thank you

EE61 - Replica

Aggiungi Commento

Visualizza Statistiche:

Ultime 24 Ore: 1

Ultimi 7 Giorni: 5

Ultimi 30 Giorni: 20

Tutti i Tempi: 3,771