Salta al contenuto principale

Samsung NX Mini Disassembly

Cosa ti serve

  1. Samsung NX Mini Disassembly, Battery: passo 1, immagine 1 di 3 Samsung NX Mini Disassembly, Battery: passo 1, immagine 2 di 3 Samsung NX Mini Disassembly, Battery: passo 1, immagine 3 di 3
    • Orient the camera so the button panel and LCD are facing you.

    • Use a spudger or fingernail to open the battery compartment on the right side of the camera.

  2. Samsung NX Mini Disassembly: passo 2, immagine 1 di 2 Samsung NX Mini Disassembly: passo 2, immagine 2 di 2
    • Push the blue trapdoor to the left to release the battery, and remove the battery.

    • There is no battery shown in this photo.

    my battery is stuck, is there a manual release button or a way to remove the battery safely?

    beat70 - Replica

  3. Samsung NX Mini Disassembly, Front Case: passo 3, immagine 1 di 1
    • Use a Phillips #00 screwdriver to remove the 4 mm screw inside the battery compartment.

  4. Samsung NX Mini Disassembly: passo 4, immagine 1 di 1
    • Remove the 4 mm Phillips #00 screw hiding in the external flash port.

    You don't show us how to remove the top plate

    Bev Curran - Replica

  5. Samsung NX Mini Disassembly: passo 5, immagine 1 di 1
    • Remove the four 5 mm Phillips #00 screws from the lens assembly.

  6. Samsung NX Mini Disassembly: passo 6, immagine 1 di 1
    • Remove the metal lens mount by hand or with tweezers.

    • Be careful not to touch the sensor in the center of the lens assembly.

  7. Samsung NX Mini Disassembly: passo 7, immagine 1 di 1
    • Use tweezers to remove the inner metal ring.

  8. Samsung NX Mini Disassembly: passo 8, immagine 1 di 1
    • Use a Phillips #00 screwdriver to remove the three 4 mm screws from the bottom of the case.

  9. Samsung NX Mini Disassembly: passo 9, immagine 1 di 2 Samsung NX Mini Disassembly: passo 9, immagine 2 di 2
    • Use your hands to slowly pull the front casing away from the camera.

    • The case is attached with multiple clips that may make a cracking noise as you pull it away from the camera.

  10. Samsung NX Mini Disassembly, Sensor: passo 10, immagine 1 di 3 Samsung NX Mini Disassembly, Sensor: passo 10, immagine 2 di 3 Samsung NX Mini Disassembly, Sensor: passo 10, immagine 3 di 3
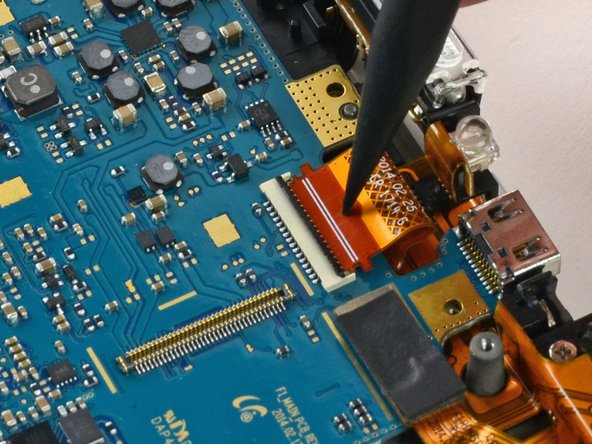
    • Gently flip the sensor cover back to expose the screw attaching the sensor cover to the ribbon cable.

    • Use a Phillips #00 screwdriver to remove the 3 mm screw from the sensor cover.

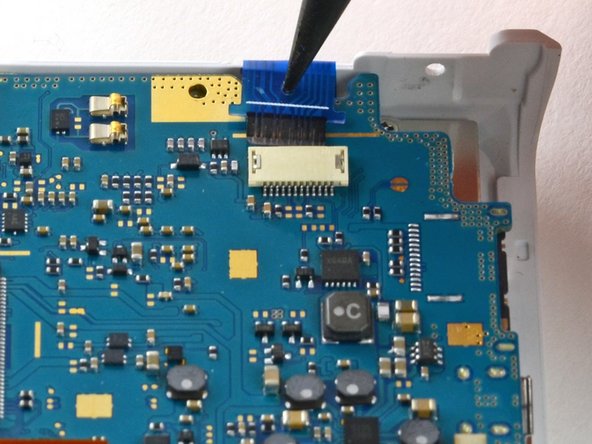
    • Use tweezers to remove the metal contact cover. Be sure to carefully remove the cover so the gold contacts remain in place.

    • The gold lens contacts lying beneath the ribbon cable become loose when the screw and contact cover are removed.

  11. Samsung NX Mini Disassembly: passo 11, immagine 1 di 2 Samsung NX Mini Disassembly: passo 11, immagine 2 di 2
    • Remove the four 4 mm Phillips #00 screws holding the sensor mount in place.

  12. Samsung NX Mini Disassembly: passo 12, immagine 1 di 3 Samsung NX Mini Disassembly: passo 12, immagine 2 di 3 Samsung NX Mini Disassembly: passo 12, immagine 3 di 3
    • Remove the four 4 mm Phillips #00 screws securing the battery compartment to the mother board.

    • Remove the battery compartment.

  13. Samsung NX Mini Disassembly: passo 13, immagine 1 di 2 Samsung NX Mini Disassembly: passo 13, immagine 2 di 2
    • Use a spudger to disconnect the ribbon cable connecting the image sensor to the motherboard.

  14. Samsung NX Mini Disassembly: passo 14, immagine 1 di 1
    • Gently remove the sensor mount from the camera case.

  15. Samsung NX Mini Disassembly, Motherboard: passo 15, immagine 1 di 2 Samsung NX Mini Disassembly, Motherboard: passo 15, immagine 2 di 2
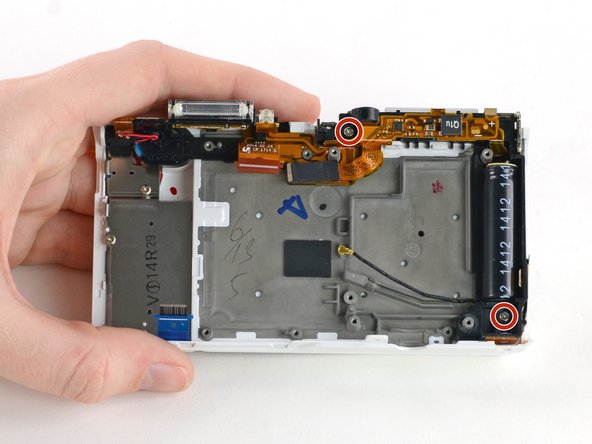
    • Use a Phillips #00 screwdriver to remove the 3 mm screw located below the wifi antenna.

  16. Samsung NX Mini Disassembly: passo 16, immagine 1 di 2 Samsung NX Mini Disassembly: passo 16, immagine 2 di 2
    • Use tweezers to disconnect the wifi antenna from the motherboard.

  17. Samsung NX Mini Disassembly: passo 17, immagine 1 di 3 Samsung NX Mini Disassembly: passo 17, immagine 2 di 3 Samsung NX Mini Disassembly: passo 17, immagine 3 di 3
    • Use a spudger to disconnect the LCD ribbon cable by prying it straight up from the motherboard.

  18. Samsung NX Mini Disassembly: passo 18, immagine 1 di 3 Samsung NX Mini Disassembly: passo 18, immagine 2 di 3 Samsung NX Mini Disassembly: passo 18, immagine 3 di 3
    • Use a spudger to unlock the topmost ZIF connector by flipping open the black flap.

  19. Samsung NX Mini Disassembly: passo 19, immagine 1 di 2 Samsung NX Mini Disassembly: passo 19, immagine 2 di 2
    • Insert the pointed end of a spudger into the hole in the middle of the ribbon cable.

    • Gently pull the spudger back to slide the ribbon cable out of its connector.

  20. Samsung NX Mini Disassembly: passo 20, immagine 1 di 3 Samsung NX Mini Disassembly: passo 20, immagine 2 di 3 Samsung NX Mini Disassembly: passo 20, immagine 3 di 3
    • Disconnect the blue ribbon cable from the motherboard.

    • Insert the pointed end of a spudger into the hole in the top of the ribbon.

    • Gently pull the ribbon from the connector.

  21. Samsung NX Mini Disassembly: passo 21, immagine 1 di 1
    • Remove the motherboard from the camera.

  22. Samsung NX Mini Disassembly, Flash Assembly: passo 22, immagine 1 di 3 Samsung NX Mini Disassembly, Flash Assembly: passo 22, immagine 2 di 3 Samsung NX Mini Disassembly, Flash Assembly: passo 22, immagine 3 di 3
    • Use a Phillips #00 screwdriver to remove the two 5 mm screws holding the flash assembly to the camera case.

  23. Samsung NX Mini Disassembly: passo 23, immagine 1 di 2 Samsung NX Mini Disassembly: passo 23, immagine 2 di 2
    • Remove the flash assembly by gently pulling it away from the case.

    • You may need to use a spudger to release some of the clips holding the assembly in place.

    • Avoid touching the ends of the capacitor (the large black cylinder on the right). Capacitors that haven't been discharged may cause electric shock. Learn how to discharge a capacitor here.

  24. Samsung NX Mini Disassembly, Button Panel: passo 24, immagine 1 di 1
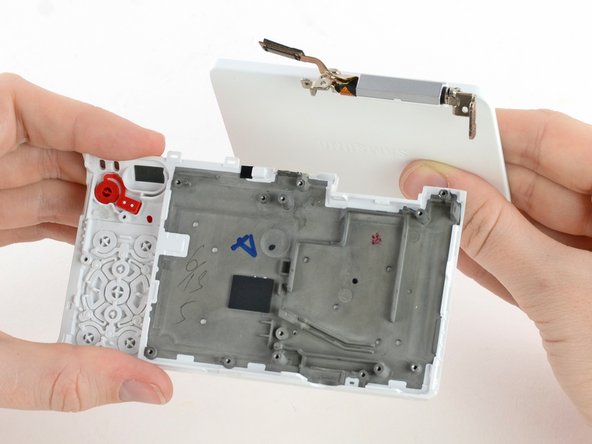
    • Remove the three 4 mm Phillips #00 screws securing the button panel to the camera case.

  25. Samsung NX Mini Disassembly: passo 25, immagine 1 di 1
    • Use tweezers to lift the button panel cover away from the case.

  26. Samsung NX Mini Disassembly, LCD: passo 26, immagine 1 di 1
    • Remove the 5 mm Phillips #00 screw in the top right corner of the LCD assembly.

  27. Samsung NX Mini Disassembly: passo 27, immagine 1 di 2 Samsung NX Mini Disassembly: passo 27, immagine 2 di 2
    • Tilt and wiggle the LCD to remove it from the case.

  28. Samsung NX Mini Disassembly, Samsung NX Mini Disassembly: passo 28, immagine 1 di 1
    • You have disassembled the Samsung NX Mini!

    • The capacitor can be removed from the flash assembly by desoldering. Learn about soldering techniques here.

Conclusione

To reassemble your device, follow these instructions in reverse order.

Altre 3 persone hanno completato questa guida.

Kelsea Weber

Membro da: 11/12/15

19.857 Reputazione

32 Guide realizzate

Team

iFixit Membro di iFixit

Staff

135 Membri

16.732 Guide realizzate

4 Commenti

Great! Do you have any experiences or suggestions to fix its 9-27 lens that will not auto focus?

Wang Duan - Replica

do you have any nx mini device software tricks or hacks? (Video time limit or no lens error or anything)

Teknoloji-Haber-Net - - Replica

Any experiences to change the LCD ?

Finti Utami - Replica

This camera could be so much better if Samsung adds flash with manual mode when using vintage lenses. Is there any way to get camera to fire flash?

If Samsung just added a toggle option on/off that would be great. If there was a way to control intensity of the flash then even better. It is standard on Nikon 1 camera.

Leo - Replica

Aggiungi Commento

Visualizza Statistiche:

Ultime 24 Ore: 0

Ultimi 7 Giorni: 5

Ultimi 30 Giorni: 35

Tutti i Tempi: 3,655