Salta al contenuto principale

Questa guida ha delle modifiche più recenti. Passa all'ultima versione non verificata.

Samsung Juke Click Wheel Replacement

Cosa ti serve

  1. Samsung Juke Click Wheel Replacement, Battery: passo 1, immagine 1 di 1
    • Press and hold down the button on the bottom side of the phone with your finger.

  2. Samsung Juke Click Wheel Replacement: passo 2, immagine 1 di 2 Samsung Juke Click Wheel Replacement: passo 2, immagine 2 di 2
    • While holding the button down, remove the back cover of the phone.

  3. Samsung Juke Click Wheel Replacement, Camera/Speaker: passo 3, immagine 1 di 1
    • Remove the four screws from the back of the phone using a Phillips #00 screwdriver.

  4. Samsung Juke Click Wheel Replacement: passo 4, immagine 1 di 1
    • Remove the two 7.3 mm screws from the camera and the speaker at the bottom back plate of the phone using a Phillips #00 screwdriver.

  5. Samsung Juke Click Wheel Replacement: passo 5, immagine 1 di 3 Samsung Juke Click Wheel Replacement: passo 5, immagine 2 di 3 Samsung Juke Click Wheel Replacement: passo 5, immagine 3 di 3
    • Locate the USB port (where the charger can be plugged in). Using the iFixit opening tool, open the phone cover.

    • Failure to open USB port cover at this stage may result in damaging the device.

  6. Samsung Juke Click Wheel Replacement: passo 6, immagine 1 di 1
    • Remove the 5.5 mm screws from both sides of the camera/speaker with a Phillips #00 screwdriver.

  7. Samsung Juke Click Wheel Replacement: passo 7, immagine 1 di 2 Samsung Juke Click Wheel Replacement: passo 7, immagine 2 di 2
    • Use the iFixit opening tool to remove the camera/speaker from the motherboard.

    • Practice caution to prevent damage to the attaching ribbon.

  8. Samsung Juke Click Wheel Replacement: passo 8, immagine 1 di 2 Samsung Juke Click Wheel Replacement: passo 8, immagine 2 di 2
    • Use the iFixit opening tool to gently pry the camera/speaker off.

  9. Samsung Juke Click Wheel Replacement, Motherboard: passo 9, immagine 1 di 2 Samsung Juke Click Wheel Replacement, Motherboard: passo 9, immagine 2 di 2
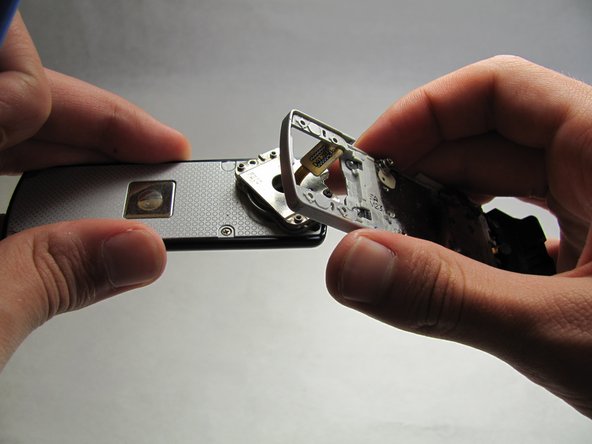
    • Use the iFixit opening tool to remove the yellow tab on the motherboard.

  10. Samsung Juke Click Wheel Replacement: passo 10, immagine 1 di 2 Samsung Juke Click Wheel Replacement: passo 10, immagine 2 di 2
    • Use the iFixit opening tool to remove the other orange tab to free the motherboard.

  11. Samsung Juke Click Wheel Replacement: passo 11, immagine 1 di 3 Samsung Juke Click Wheel Replacement: passo 11, immagine 2 di 3 Samsung Juke Click Wheel Replacement: passo 11, immagine 3 di 3
    • To completely remove the motherboard, use the iFixit opening tool to leverage it up, then use your fingers to pull it out.

    • Do not be alarmed if the volume and hold buttons are removed from the motherboard.

  12. Samsung Juke Click Wheel Replacement, Keyboard: passo 12, immagine 1 di 3 Samsung Juke Click Wheel Replacement, Keyboard: passo 12, immagine 2 di 3 Samsung Juke Click Wheel Replacement, Keyboard: passo 12, immagine 3 di 3
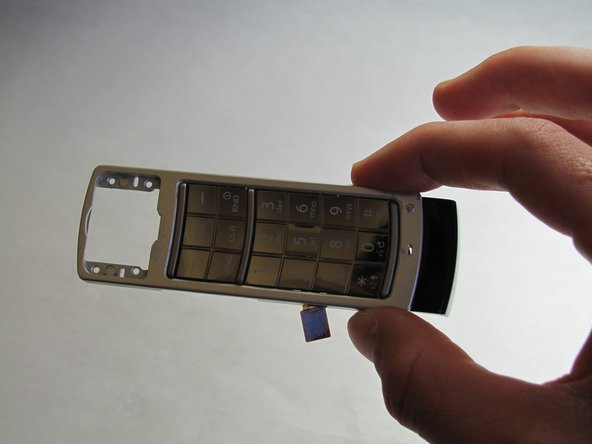
    • Open/swivel the phone so the back of the LCD panel is visible.

    • Use the iFixit opening tool to pry the keypad from the hinge on the back of the device.

    • A moderate amount of force may need to be applied.

  13. Samsung Juke Click Wheel Replacement, Click Wheel: passo 13, immagine 1 di 2 Samsung Juke Click Wheel Replacement, Click Wheel: passo 13, immagine 2 di 2
    • Using your fingernail, remove the stickers covering the screws on the back of the LCD casing.

    • Using a phillips 00 screwdriver, remove all six screws on the back of the device.

    • These screws will be 3.45 mm long.

  14. Samsung Juke Click Wheel Replacement: passo 14, immagine 1 di 3 Samsung Juke Click Wheel Replacement: passo 14, immagine 2 di 3 Samsung Juke Click Wheel Replacement: passo 14, immagine 3 di 3
    • Using a generous amount of force, use your hands to pry loose the casing from the LCD panel.

    • If necessary, use the iPod opening tool to completely free the casing.

    • Be careful not to sever the wire connecting the outer casing to the display board.

  15. Samsung Juke Click Wheel Replacement: passo 15, immagine 1 di 3 Samsung Juke Click Wheel Replacement: passo 15, immagine 2 di 3 Samsung Juke Click Wheel Replacement: passo 15, immagine 3 di 3
    • Using the iPod opening tool, remove the click wheel from the board.

    • After you have freed the edges, use the spudger to release the clip holding it flush to the board.

  16. Samsung Juke Click Wheel Replacement: passo 16, immagine 1 di 3 Samsung Juke Click Wheel Replacement: passo 16, immagine 2 di 3 Samsung Juke Click Wheel Replacement: passo 16, immagine 3 di 3
    • Unlock the ribbon connection by pressing down on the black clip.

    • Carefully pull the click wheel away from the device.

Conclusione

To reassemble your device, follow these instructions in reverse order.

Un'altra persona ha completato questa guida.

Ryan Turner

Membro da: 04/15/10

104 Reputazione

2 Guide realizzate

Team

Cal Poly, Team 6-18, Maness Spring 2010 Membro di Cal Poly, Team 6-18, Maness Spring 2010

CPSU-MANESS-S10S6G18

3 Membri

12 Guide realizzate

Un commento

All I have to say is: THANK YOU!

My juke's click wheel got stuck, which was draining my battery. I followed the incredibly easy to understand instructions and pictures and was able to free my click wheel. I cleaned the wheel and put my phone back together by going backward though the instructions, turned on my phone, and IT WORKED PERFECTLY. This saved my from having to buy a new, large and extremely expensive phone.

Thank You so much for these great, step-by-step instructions!

Rachel Krebs - Replica

Aggiungi Commento

Visualizza Statistiche:

Ultime 24 Ore: 1

Ultimi 7 Giorni: 2

Ultimi 30 Giorni: 4

Tutti i Tempi: 3,368