Salta al contenuto principale

Samsung Galaxy Tab S3 Micro SD Card Reader Replacement

Cosa ti serve

  1. Samsung Galaxy Tab S3 Micro SD Card Reader Replacement, Display: passo 1, immagine 1 di 1
    • To soften the adhesive holding the tablet together, heat up the edges of the glass panel using a heated iOpener on the edge of the device. Alternatively you can use a heat gun to loosen the adhesive.

    • Leave the iOpener on edge for two minutes.

    • Be careful not to burn yourself while handling the hot iOpener. For more information on the iOpener, use the iOpener Instructions Guide.

  2. Samsung Galaxy Tab S3 Micro SD Card Reader Replacement: passo 2, immagine 1 di 1
    • Place a suction cup near edge that you heated up with the iOpener.

    • Press down on the suction cup to create a seal, and pull up with force to create a separation between the display and the midframe.

    • Use an opening tool to split apart the glass panel from the midframe.

    • Be careful to not break the glass when prying from the frame.

  3. Samsung Galaxy Tab S3 Micro SD Card Reader Replacement: passo 3, immagine 1 di 1
    Attrezzo utilizzato in questo passaggio:
    Plastic Cards
    $2.99
    Compra
    • As you continue along the edge using the opening tool, use a plastic card to keep the glass separate from the midframe.

    • You can also use multiple opening picks instead of a plastic card.

  4. Samsung Galaxy Tab S3 Micro SD Card Reader Replacement: passo 4, immagine 1 di 3 Samsung Galaxy Tab S3 Micro SD Card Reader Replacement: passo 4, immagine 2 di 3 Samsung Galaxy Tab S3 Micro SD Card Reader Replacement: passo 4, immagine 3 di 3
    • Pull off the glass panel using the suction cup.

    • As you remove the glass panel, be careful not to tear the ribbon connecting the motherboard to the display.

    • Carefully disconnect the ribbon cable connecting the display assembly to the motherboard. You can disconnect this ribbon from either end.

  5. Samsung Galaxy Tab S3 Micro SD Card Reader Replacement, Rear glass panel: passo 5, immagine 1 di 2 Samsung Galaxy Tab S3 Micro SD Card Reader Replacement, Rear glass panel: passo 5, immagine 2 di 2
    • Repeat steps 3 through 7 to remove the rear glass panel on the opposite side of the device.

  6. Samsung Galaxy Tab S3 Micro SD Card Reader Replacement, Battery: passo 6, immagine 1 di 2 Samsung Galaxy Tab S3 Micro SD Card Reader Replacement, Battery: passo 6, immagine 2 di 2
    • Use a Phillips #000 screwdriver to unscrew the five screws securing the battery, and the twenty-two screws surrounding the midframe.

  7. Samsung Galaxy Tab S3 Micro SD Card Reader Replacement: passo 7, immagine 1 di 1
    • The midframe should snap off from the device’s motherboard.

  8. Samsung Galaxy Tab S3 Micro SD Card Reader Replacement: passo 8, immagine 1 di 3 Samsung Galaxy Tab S3 Micro SD Card Reader Replacement: passo 8, immagine 2 di 3 Samsung Galaxy Tab S3 Micro SD Card Reader Replacement: passo 8, immagine 3 di 3
    • Locate the ribbon running from the midframe and disconnect it from the motherboard with the flat end of a spudger.

  9. Samsung Galaxy Tab S3 Micro SD Card Reader Replacement: passo 9, immagine 1 di 2 Samsung Galaxy Tab S3 Micro SD Card Reader Replacement: passo 9, immagine 2 di 2
    • Use the flat end of the spudger to pop off the connector between the battery and the motherboard.

  10. Samsung Galaxy Tab S3 Micro SD Card Reader Replacement: passo 10, immagine 1 di 2 Samsung Galaxy Tab S3 Micro SD Card Reader Replacement: passo 10, immagine 2 di 2
    • Flip the midframe over and pop the battery out, making sure to slide it out from underneath the ribbon cables.

  11. Samsung Galaxy Tab S3 Micro SD Card Reader Replacement: passo 11, immagine 1 di 1
    • The battery should now be removed and detached from the device.

  12. Samsung Galaxy Tab S3 Micro SD Card Reader Replacement, Micro SD Card Reader: passo 12, immagine 1 di 3 Samsung Galaxy Tab S3 Micro SD Card Reader Replacement, Micro SD Card Reader: passo 12, immagine 2 di 3 Samsung Galaxy Tab S3 Micro SD Card Reader Replacement, Micro SD Card Reader: passo 12, immagine 3 di 3
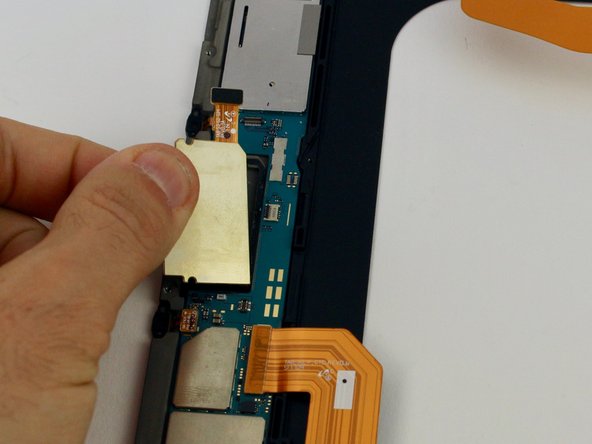
    • Disconnect the single press fit connector located just above the Micro SD card tray on the left midframe.

  13. Samsung Galaxy Tab S3 Micro SD Card Reader Replacement: passo 13, immagine 1 di 3 Samsung Galaxy Tab S3 Micro SD Card Reader Replacement: passo 13, immagine 2 di 3 Samsung Galaxy Tab S3 Micro SD Card Reader Replacement: passo 13, immagine 3 di 3
    • Next pry the Micro SD card tray up from the midframe on the left with your finger.

    • There is a layer of glue around the perimeter, so prying from the left, then downward should free the card reader from its sticky spot.

    • Remove the Micro SD card reader.

Conclusione

To reassemble your device, follow these instructions in reverse order.

Altre 2 persone hanno completato questa guida.

Austin Blakely

Membro da: 03/11/19

19.476 Reputazione

53 Guide realizzate

Team

iFixit Membro di iFixit

Staff

135 Membri

16.731 Guide realizzate

0 Commenti

Aggiungi Commento

Visualizza Statistiche:

Ultime 24 Ore: 0

Ultimi 7 Giorni: 3

Ultimi 30 Giorni: 8

Tutti i Tempi: 994