Salta al contenuto principale

Samsung Galaxy Tab E 8.0 Charging Port Replacement

Cosa ti serve

  1. Samsung Galaxy Tab E 8.0 Charging Port Replacement, Back Panel: passo 1, immagine 1 di 2 Samsung Galaxy Tab E 8.0 Charging Port Replacement, Back Panel: passo 1, immagine 2 di 2
    • Use the iFixit Opening Tool to pry off the back case, moving the tool around the screen.

    • Make sure the device is off and the SD card is removed before taking off the back casing.

  2. Samsung Galaxy Tab E 8.0 Charging Port Replacement, Back Camera: passo 2, immagine 1 di 2 Samsung Galaxy Tab E 8.0 Charging Port Replacement, Back Camera: passo 2, immagine 2 di 2
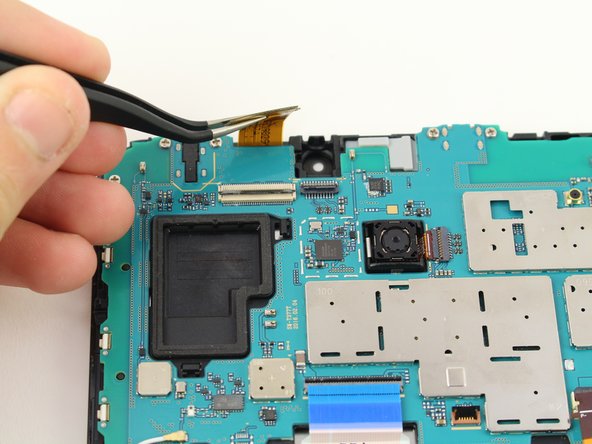
    • Use the tweezers to lift the switch connecting the back camera to the motherboard.

    • Use your hand to remove the back camera from the motherboard.

  3. Samsung Galaxy Tab E 8.0 Charging Port Replacement, Front Camera: passo 3, immagine 1 di 3 Samsung Galaxy Tab E 8.0 Charging Port Replacement, Front Camera: passo 3, immagine 2 di 3 Samsung Galaxy Tab E 8.0 Charging Port Replacement, Front Camera: passo 3, immagine 3 di 3
    • Use the tweezers to lift the switch connecting the front camera to the motherboard.

    • Remove the front camera from the motherboard by lifting with the tweezers.

  4. Samsung Galaxy Tab E 8.0 Charging Port Replacement, Motherboard: passo 4, immagine 1 di 2 Samsung Galaxy Tab E 8.0 Charging Port Replacement, Motherboard: passo 4, immagine 2 di 2
    • Use the tweezers to flip the switch on the bottom of the strap that goes over the battery.

    • Release the strap from the switch by lifting the strap with your hand.

  5. Samsung Galaxy Tab E 8.0 Charging Port Replacement: passo 5, immagine 1 di 2 Samsung Galaxy Tab E 8.0 Charging Port Replacement: passo 5, immagine 2 di 2
    • Use the tweezers to flip the switch that connects the top of the strap to the motherboard.

    • Lift the top end of the strap with your hand and remove the strap completely from the device.

  6. Samsung Galaxy Tab E 8.0 Charging Port Replacement: passo 6, immagine 1 di 2 Samsung Galaxy Tab E 8.0 Charging Port Replacement: passo 6, immagine 2 di 2
    • Use the tweezers to flip the switch of the connector.

    • Lift the connector from the motherboard.

    • This connector does not come completely off, but disconnects from the motherboard.

  7. Samsung Galaxy Tab E 8.0 Charging Port Replacement: passo 7, immagine 1 di 2 Samsung Galaxy Tab E 8.0 Charging Port Replacement: passo 7, immagine 2 di 2
    • Use the tweezers to flip the switch of the blue connector on the motherboard.

    • Lift the connector from the motherboard.

    • This switch can detach from the device, but just needs to disconnect from the motherboard.

    • Ensure the blue ribbon cable is not under the motherboard upon reassembly.

  8. Samsung Galaxy Tab E 8.0 Charging Port Replacement: passo 8, immagine 1 di 2 Samsung Galaxy Tab E 8.0 Charging Port Replacement: passo 8, immagine 2 di 2
    • Use the tweezers to flip the switch of the connector that runs from the battery to the motherboard.

    • Lift the connector from the motherboard.

    • This switch can detach from the device, but just needs to disconnect from the motherboard.

  9. Samsung Galaxy Tab E 8.0 Charging Port Replacement: passo 9, immagine 1 di 2 Samsung Galaxy Tab E 8.0 Charging Port Replacement: passo 9, immagine 2 di 2
    • Use a JIS #00 screwdriver to remove the six 4.5mm screws at the top of the motherboard.

    • Lift the motherboard with your hand to detach the motherboard from the device.

  10. Samsung Galaxy Tab E 8.0 Charging Port Replacement, Charging Port: passo 10, immagine 1 di 1
    • Use the soldering tool to remove the charging port.

Conclusione

To reassemble your device, follow these instructions in reverse order.

Altre 6 persone hanno completato questa guida.

Team

Cal Poly, Team S13-G4, White Fall 2018 Membro di Cal Poly, Team S13-G4, White Fall 2018

CPSU-WHITE-F18S13G4

4 Membri

8 Guide realizzate

4 Commenti

My tablet fell into a sink full of water. I may eventually have to replace the charging port. I appreciate your instructions. I think I can do it. I haven’t shopped yet for one. May I ask where one may find a replacement for the charging port? Also, is that the only part I would need? I am getting the message (approx. I can’t remember completely) “battery temperature too low, charging will take place when temperature…”. Thank you for any reply.

George Sand - Replica

It’s definitely not this simple. You’ll need a precision hot air gun, flux, solder braid to help remove the old solder from the anchor holes, heat protection tape, solder, and a soldering iron. You’ll need to use the hot air gun with tape down to protect nearby components to remove the old port. Then use flux and braid to remove solder from the 4 holes. You’ll need to flux and apply new solder evenly and put then new port on. Make sure it is completely flat and then solder the anchors using a solder gun. Use the hot air gun again until all connections are good. Clean off the flux with some alcohol.

Weston Horne -

What is the micro usb replacement part number?

Jay Bee - Replica

Do you know the part number/ the name of the part so I can order it for my tablet?

wolfshannon05 - Replica

Aggiungi Commento

Visualizza Statistiche:

Ultime 24 Ore: 1

Ultimi 7 Giorni: 9

Ultimi 30 Giorni: 31

Tutti i Tempi: 7,147