Salta al contenuto principale
Unisciti alla Community delle riparazioni - Crea un account

Samsung Galaxy Tab A 8.0 Display Assembly Replacement

Cosa ti serve

  1. Samsung Galaxy Tab A 8.0 Display Assembly Replacement, Battery: passo 1, immagine 1 di 1
    • Make sure the device is turned off before attempting to disassemble it.

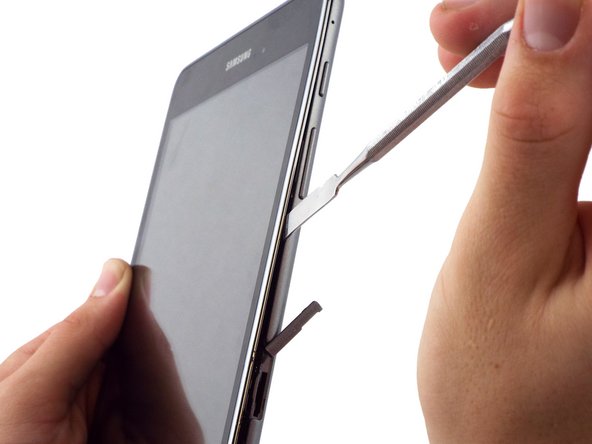
    • At the top portion of the memory card slot, use the small metal spudger to create separation between the back cover and the rest of the device.

    • The small metal spudger is only used to create separation between the back cover and the rest of the device, not to remove the back cover.

    • If possible, try to use a normal nylon spudger to separate the back cover, as it is much softer and less likely to mar/scratch the device.

    Chiedi a FixBot

    Aggiungi Commento

  2. Samsung Galaxy Tab A 8.0 Display Assembly Replacement: passo 2, immagine 1 di 2 Samsung Galaxy Tab A 8.0 Display Assembly Replacement: passo 2, immagine 2 di 2
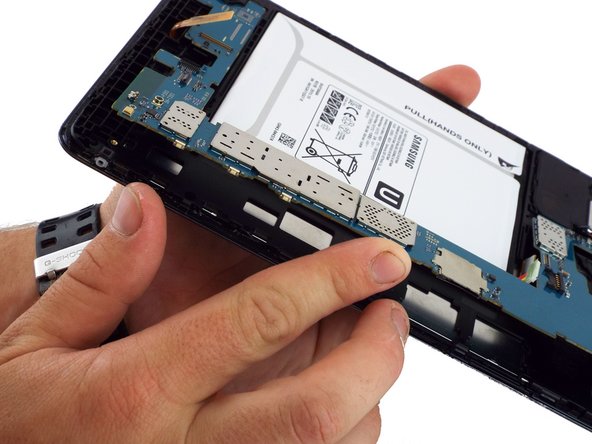
    • Use the intermediate metal spudger in place of the small metal spudger to remove the back cover. This is done by sliding the intermediate metal spudger around the perimeter of the device, beginning at the top portion of the memory card slot.

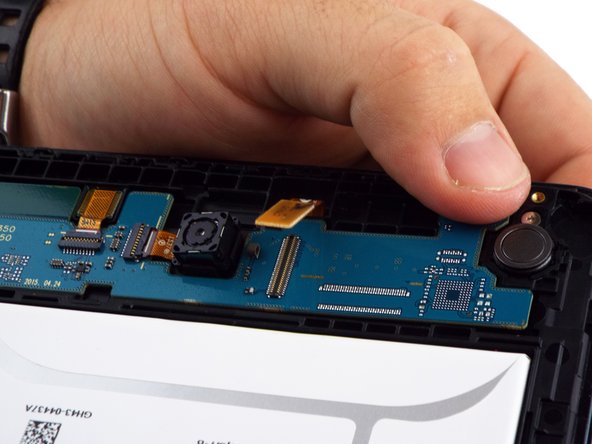
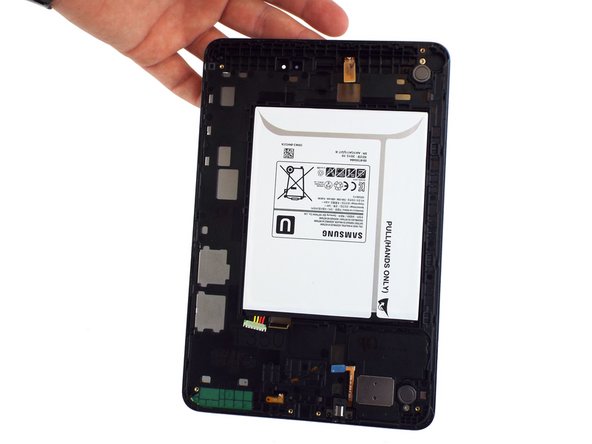
    • The second picture shows the internal portion of the device once the back cover is removed.

    Chiedi a FixBot

    Aggiungi Commento

  3. Samsung Galaxy Tab A 8.0 Display Assembly Replacement: passo 3, immagine 1 di 1
    Strumento utilizzato in questo passaggio:
    Tweezers
    $3.99
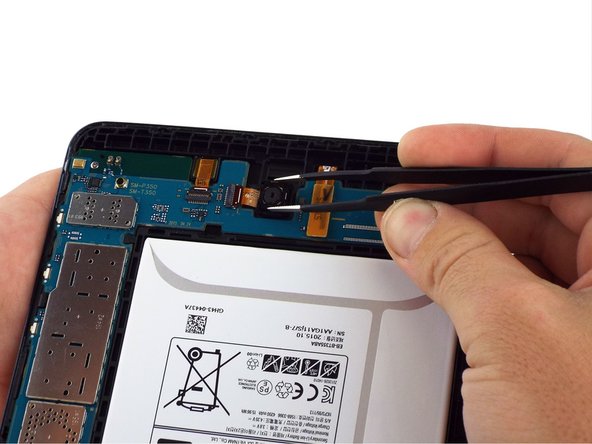
    • Disconnect the electrical connector from the motherboard using the bent precision tweezers.

    • Avoid touching the motherboard with the tweezers. Metal tools such as the tweezers can scratch the motherboard and potentially cause damage.

    Chiedi a FixBot

    Aggiungi Commento

  4. Samsung Galaxy Tab A 8.0 Display Assembly Replacement: passo 4, immagine 1 di 3 Samsung Galaxy Tab A 8.0 Display Assembly Replacement: passo 4, immagine 2 di 3 Samsung Galaxy Tab A 8.0 Display Assembly Replacement: passo 4, immagine 3 di 3
    • Use the flat end of the plastic spudger to pry the battery apart from the rest of the device.

    • An alternative method is to loosen the battery using the plastic spudger, and then to remove the battery by pulling on the paper tab that says "Pull (Hands Only)."

    • Once the back cover and battery are removed, the device should look like as illustrated in the second picture.

    Chiedi a FixBot

    Aggiungi Commento

  5. Samsung Galaxy Tab A 8.0 Display Assembly Replacement, Display Assembly: passo 5, immagine 1 di 2 Samsung Galaxy Tab A 8.0 Display Assembly Replacement, Display Assembly: passo 5, immagine 2 di 2
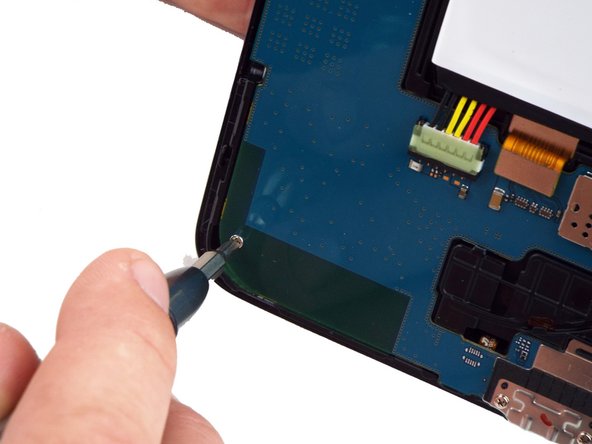
    • Use a spudger to lift up and release the press-fit display cable connector from the motherboard.

    Chiedi a FixBot

    Aggiungi Commento

  6. Samsung Galaxy Tab A 8.0 Display Assembly Replacement: passo 6, immagine 1 di 2 Samsung Galaxy Tab A 8.0 Display Assembly Replacement: passo 6, immagine 2 di 2
    Strumento utilizzato in questo passaggio:
    Tweezers
    $4.99
    • Use a spudger to lift up and release the ZIF connector; gently pull the rear facing camera ribbon cable free.

    • Use a pair of tweezers to gently secure the camera and lift it out of the frame.

    • If you're unable to secure the camera with tweezers, slide an opening pick between the frame and the camera and lift the camera out.

    Chiedi a FixBot

    Aggiungi Commento

  7. Samsung Galaxy Tab A 8.0 Display Assembly Replacement: passo 7, immagine 1 di 1
    • Use a spudger to flip the front-facing camera ZIF connector up; gently pull the ribbon cable free.

    • Use tweezers to gently remove the front facing camera from the frame.

    Chiedi a FixBot

    Aggiungi Commento

  8. Samsung Galaxy Tab A 8.0 Display Assembly Replacement: passo 8, immagine 1 di 1
    • Use the flat end of a spudger to lift up and disconnect the LCD screen press-fit connector.

    Chiedi a FixBot

    Aggiungi Commento

  9. Samsung Galaxy Tab A 8.0 Display Assembly Replacement: passo 9, immagine 1 di 1
    • Use the flat end of a spudger to lift up and disconnect the 3.5mm headset jack press-fit connector.

    Chiedi a FixBot

    Aggiungi Commento

  10. Samsung Galaxy Tab A 8.0 Display Assembly Replacement: passo 10, immagine 1 di 1
    • Use a PH000 screwdriver to remove the two 3 mm screws that connect the USB port shield to the midframe.

    Chiedi a FixBot

    Aggiungi Commento

  11. Samsung Galaxy Tab A 8.0 Display Assembly Replacement: passo 11, immagine 1 di 2 Samsung Galaxy Tab A 8.0 Display Assembly Replacement: passo 11, immagine 2 di 2
    • Use a PH000 screwdriver to remove the two 3 mm screws on the left side of the motherboard.

    Chiedi a FixBot

    Aggiungi Commento

  12. Samsung Galaxy Tab A 8.0 Display Assembly Replacement: passo 12, immagine 1 di 3 Samsung Galaxy Tab A 8.0 Display Assembly Replacement: passo 12, immagine 2 di 3 Samsung Galaxy Tab A 8.0 Display Assembly Replacement: passo 12, immagine 3 di 3
    • Lift the motherboard free from the power and volume button side.

    • You may use a spudger to assist in gently lifting the motherboard up from the button side.

    • A small plastic bracket secures the motherboard to the frame; lift the motherboard from the power and volume button side first, and slide away from the bracket.

    Chiedi a FixBot

    Aggiungi Commento

Conclusione

To reassemble your device, follow these instructions in reverse order.

Annulla: non ho completato questa guida.

Altre 15 persone hanno completato questa guida.

Richard

Membro da: 02/07/17

35.654 Reputazione

11 guide realizzate

3Commenti sulla guida

Where is the rest of this guide? Just stops after removing motherboard :[

chrischevrier - Rispondi Condividi

It appears that it is intended to remove all parts from the case (battery and motherboard) and install them in a new body with a good screen attached.

Ben D - Rispondi Condividi

After removing the motherboard, I continued with disassembly by following the iFixit guide for the Digitizer removal.

( Samsung Galaxy Tab A Digitizer Replacement )

After removing the glass/digitizer, I was able to remove the LCD relatively easy by pushing it through the gaps on the back end of the frame. It appeared to not have any adhesive holding it in place. I was replacing the LCD and the digitizer in my case so I was I bit more careless with the removal of those components. I did place a bit of adhesive on the new LCD replacement and everything fit back snuggly.

Uriel Garcia - Rispondi Condividi

Aggiungi Commento

Visualizza statistiche:

Ultime 24 ore: 8

Ultimi 7 giorni: 31

Ultimi 30 giorni: 140

Tutti i Tempi: 20,206