Questa versione può contenere modifiche errate. Passa all'ultima istantanea verificata.
Cosa ti serve
-
Questo passaggio è privo di traduzione. Aiuta a tradurlo
-
Insert the plastic opening tool between the glass screen and the back cover so the curved end of the plastic opening tool is under the glass. Gently pry the back cover away from the glass screen.
-
Be sure to lift the entire display from the body and that you are not are lifting the glass from the display. You will need to reach down a little further for the correct removal.
-
Continue inserting the plastic opening tool around the whole device screen to completely separate the back cover from the glass screen.
-
-
Questo passaggio è privo di traduzione. Aiuta a tradurlo
-
Gently lift the screen up with your finger.
-
-
-
Usando le dita, rimuovi il nastro verde che copre il connettore della batteria.
-
-
-
Questo passaggio è privo di traduzione. Aiuta a tradurlo
-
Unscrew the two 3mm screws with the Phillips 000 screwdriver.
-
-
Questo passaggio è privo di traduzione. Aiuta a tradurlo
-
Lift the black cable connector with the plastic opening tool to disconnect the cable from the device.
-
-
Questo passaggio è privo di traduzione. Aiuta a tradurlo
-
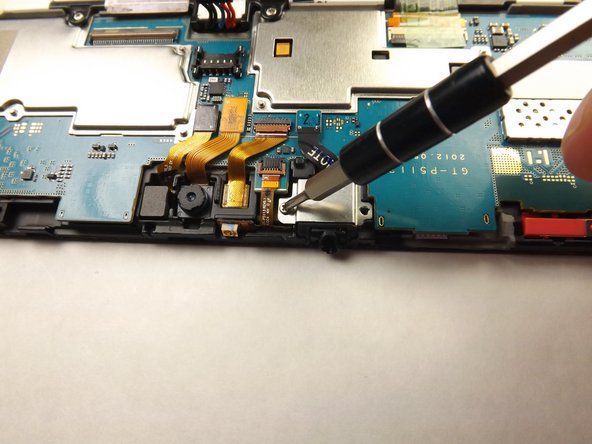
Slide the flat end of heavy-duty spudger under the audio jack cover and lift up to remove the metal cover from the device.
-
-
Questo passaggio è privo di traduzione. Aiuta a tradurlo
-
Insert the flat end of the heavy-duty spudger under the headphone jack and gently lift up to remove the headphone jack from the device.
-


Annulla: non ho completato questa guida.
Altre 6 persone hanno completato questa guida.

Team

Cal Poly, Team 6-26, Amido Winter 2015 Membro di Cal Poly, Team 6-26, Amido Winter 2015
CPSU-AMIDO-W15S6G26
5 Membri
14 Guide realizzate