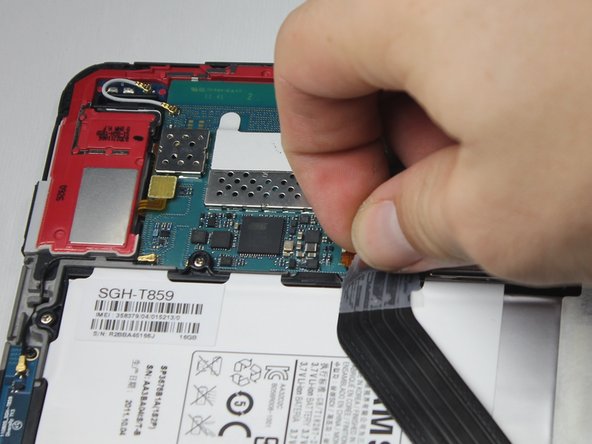
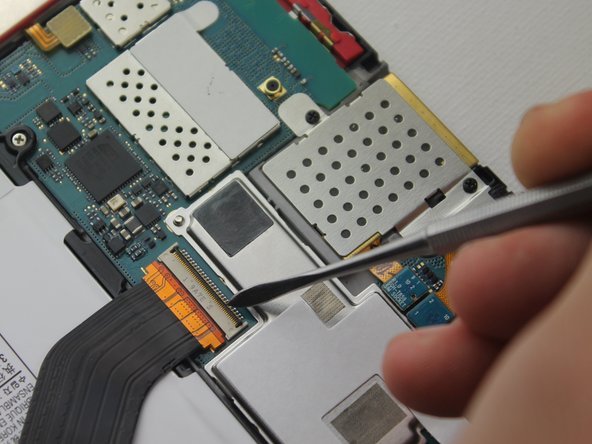
Salta al contenuto principale

Samsung Galaxy Tab 10.1 4G Charge Port Replacement

Cosa ti serve

  1. Samsung Galaxy Tab 10.1 4G Charge Port Replacement, Back Panel: passo 1, immagine 1 di 1
    • Power off your tablet before you begin disassembly.

    • Screen side facing you, rotate device 180 degrees so the "SAMSUNG" logo is upside down.

  2. Samsung Galaxy Tab 10.1 4G Charge Port Replacement: passo 2, immagine 1 di 2 Samsung Galaxy Tab 10.1 4G Charge Port Replacement: passo 2, immagine 2 di 2
    • Using the plastic opening tool, start in the center near the charge port and wedge the angled tip between the plastic back and the glass screen.

    • Create a wedge and apply pressure. Use the tool to separate the screen from the back until you hear an audible “pop."

    • Continue to wedge the tool about every inch along the current edge.

  3. Samsung Galaxy Tab 10.1 4G Charge Port Replacement: passo 3, immagine 1 di 2 Samsung Galaxy Tab 10.1 4G Charge Port Replacement: passo 3, immagine 2 di 2
    • Once the bottom edge has been loosened, work towards a bottom corner from the other edge and continue to wedge gently until you can “pop” the corner out.

    • Continue this process on the other bottom corner until it can be popped out as well.

  4. Samsung Galaxy Tab 10.1 4G Charge Port Replacement: passo 4, immagine 1 di 1
    • Place your hand between the device and the back panel. Then continue the wedging motion along the top edge of the device until the back panel comes loose.

    • Do not wedge the tool directly on top of the power buttons and headphone jack. Wedge nearby so that you don’t damage internal hardware.

  5. Samsung Galaxy Tab 10.1 4G Charge Port Replacement: passo 5, immagine 1 di 1
    • Remove the back from the device.

    • Excessive force shouldn't be necessary here. If the back panel is sticking, find the area of the edge closest to the sticking point and wedge the opening tool there until the back panel pops free.

  6. Samsung Galaxy Tab 10.1 4G Charge Port Replacement: passo 6, immagine 1 di 2 Samsung Galaxy Tab 10.1 4G Charge Port Replacement: passo 6, immagine 2 di 2
    • When working with electronics, it's important to choose a tool that's ESD-safe to avoid accidental damage to the device. The regular black nylon spudger or a plastic opening tool should be used whenever possible.

    • The connection between the battery and motherboard is a group of four wires in black housing that can be found near the top middle of the device. Using a plastic spudger or a flat, slim tool, lift the black connector housing upwards to disconnect it.

  7. Samsung Galaxy Tab 10.1 4G Charge Port Replacement, Charge Port: passo 7, immagine 1 di 2 Samsung Galaxy Tab 10.1 4G Charge Port Replacement, Charge Port: passo 7, immagine 2 di 2
    • Remove the tape covering the charge port ribbon cable.

    • Keeping the tape is not necessary.

  8. Samsung Galaxy Tab 10.1 4G Charge Port Replacement: passo 8, immagine 1 di 3 Samsung Galaxy Tab 10.1 4G Charge Port Replacement: passo 8, immagine 2 di 3 Samsung Galaxy Tab 10.1 4G Charge Port Replacement: passo 8, immagine 3 di 3
    • Slide a plastic spudger tool under the strip of black plastic on the back of the ribbon connector.

    • Metal spudgers can puncture an unprotected battery, potentially causing a fire. When working with electronics, it's important to choose a tool that's ESD-safe to avoid accidental damage to the device. The regular black nylon spudger or a plastic opening tool should be used whenever possible.

    • Gently lift with the spudger to flip the connector up. This will release the ribbon from its connection.

    • Slide the ribbon out of the connector.

  9. Samsung Galaxy Tab 10.1 4G Charge Port Replacement: passo 9, immagine 1 di 2 Samsung Galaxy Tab 10.1 4G Charge Port Replacement: passo 9, immagine 2 di 2
    • Use the Phillips #00 screwdriver to remove both of the 3-mm screws.

  10. Samsung Galaxy Tab 10.1 4G Charge Port Replacement: passo 10, immagine 1 di 3 Samsung Galaxy Tab 10.1 4G Charge Port Replacement: passo 10, immagine 2 di 3 Samsung Galaxy Tab 10.1 4G Charge Port Replacement: passo 10, immagine 3 di 3
    • Slide the plastic spudger under the charge port to lift it from it's housing.

    • Pull up on the charge port to remove it and its ribbon cable.

    • You may have to pull fairly hard; the adhesive holds the bottom section of cable to the tablet tightly.

Conclusione

To reassemble your device, follow these instructions in reverse order.

Altre 7 persone hanno completato questa guida.

Ashley Stark

Membro da: 09/23/15

1.220 Reputazione

6 Guide realizzate

Team

Baylor, Team 10-11, Williams Fall 2015 Membro di Baylor, Team 10-11, Williams Fall 2015

BU-WILLIAMS-F15S10G11

3 Membri

16 Guide realizzate

0 Commenti

Aggiungi Commento

Visualizza Statistiche:

Ultime 24 Ore: 0

Ultimi 7 Giorni: 5

Ultimi 30 Giorni: 15

Tutti i Tempi: 1,634