Questa versione può contenere modifiche errate. Passa all'ultima istantanea verificata.
Cosa ti serve
-
-
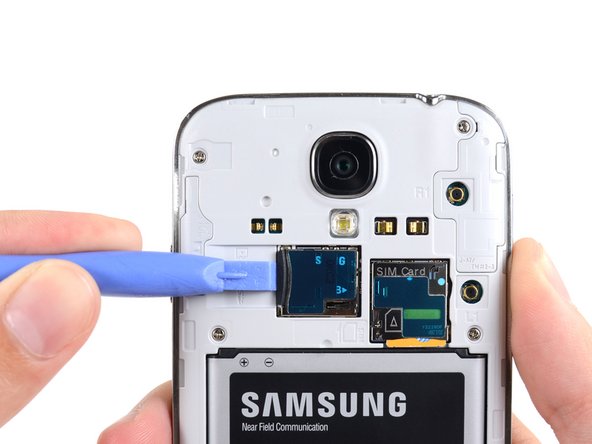
Fai leva, con uno strumento di apertura in plastica o con un'unghia, nella fessura a sinistra della fotocamera posteriore, vicino al pulsante di accensione.
-
-
-
Usa l'estremità piatta di uno spudger o un'unghia per spingere la scheda microSD lievemente più in profondità nel suo alloggiamento, finché non senti un clic.
-
Dopo il clic, lascia andare la scheda, che a questo punto uscirà dal suo alloggiamento.
-
Rimuovi la scheda MicroSD.
-
-
-
Inserisci uno strumento di apertura in plastica o un'unghia nella rientranza del vano della batteria e solleva la batteria stessa.
-
Rimuovi la batteria dal telefono.
-
-
-
Usa l'estremità piatta di uno spudger o un'unghia per spingere la scheda SIM lievemente più in profondità nel suo alloggiamento, finché non senti un clic.
-
Dopo il clic, lascia andare la scheda, che a questo punto uscirà dal suo alloggiamento.
-
Rimuovi la scheda SIM.
-
-
-
Rimuovi le nove viti Phillips #00 da 4,0 mm che fissano il telaio intermedio al gruppo display.
-
-
-
-
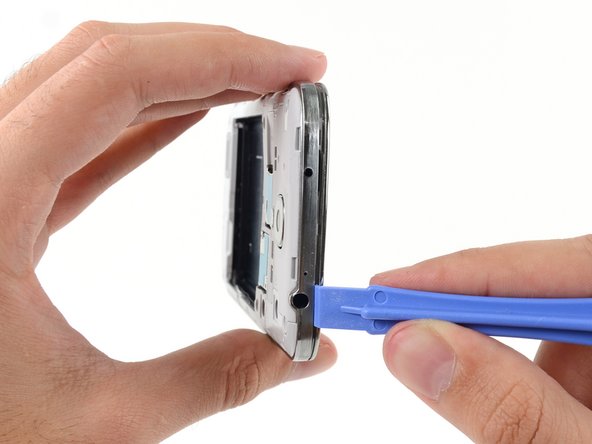
Iniziando dal lato del telefono con i pulsanti del volume, inserisci il tuo strumento di apertura in plastica tra la cornice cromata attorno al vetro del display e il bordo laterale cromato più grande. Cerca la fessura tra le due parti.
-
Fai scorrere lo strumento di apertura lungo la giunzione, separando le clip in plastica mentre procedi.
-
-
Questo passaggio è privo di traduzione. Aiuta a tradurlo
-
Use the flat end of a spudger to disconnect the USB board cable connector from the motherboard.
-
-
Questo passaggio è privo di traduzione. Aiuta a tradurlo
-
Gently insert the point of a spudger between the USB port and the USB port bracket to pry one side of the bracket off of its post.
-
-
Questo passaggio è privo di traduzione. Aiuta a tradurlo
-
Remove the USB port bracket from the USB port.
-
-
Questo passaggio è privo di traduzione. Aiuta a tradurlo
-
Disconnect the soft button cable from the USB board cable.
-
Disconnect the antenna cable connector from the USB board.
-
-
Questo passaggio è privo di traduzione. Aiuta a tradurlo
-
Gently insert the flat end of a spudger beneath the USB board to free it from the adhesive holding it in place.
-
-
Questo passaggio è privo di traduzione. Aiuta a tradurlo
-
Remove the USB board from the display assembly.
-
Annulla: non ho completato questa guida.
Altre 206 persone hanno completato questa guida.
24 Commenti
I found this guide excellent and it is very easy to do. I didnt have the plastic opening tool but I do have a long thumbnail. It worked very well.
Too bad the replacement board I got has a defective soft button connector. I had to disassemble the phone 3 times. I thought I did It wrong the 1st time. Opened the phone a 2nd time to check.... closed the phone... nada.... USB changer works but no soft keys... put my old board back in to check the soft buttons and they work. Sent an email to the company that I bought the board from... still no answer after 24hrs. If I still have no answer by the end of the week I will post which company sold me the defect board so no one else gets burned from them. I will then try to unsolder the USB from the new board to replace the USB on my old one.
This guide needs an update as it does not include the 4G antenna on the left side of the device that is under the USB cable and hooks up at the bottom left on the USB board up to just beside the USB connector above the battery. Pictures 12, 15, & 16 will need updated to show this cable.
To follow rnbhays' comment about the antenna connector on the left, it is specifically for i545 Verizon models.
I strongly suggest people to disconnect both left and right cables from the USB board prior to removing it. While doing so, my tool slipped and I accidentally broke the left cable. Thankfully I was able to crimp the connector back on the cable with tweezers and a magnifying glass 'til I get another cable ordered.
It also applies to the Sprint version as well. I have an LTE cable on the left side, and had to be very careful purchasing a replacement part to make sure it was the right one.
After replacement my microphone element isn't working. Possible reasons?


