Questa versione può contenere modifiche errate. Passa all'ultima istantanea verificata.
Cosa ti serve
-
Questo passaggio è privo di traduzione. Aiuta a tradurlo
-
Insert an opening tool or fingernail into the tab on the power button side of the phone.
-
Lift on the tab to pry the back cover off of the phone.
-
Continue to pry off the back all around the edges of the phone until the entire cover is fully removed.
-
-
Questo passaggio è privo di traduzione. Aiuta a tradurlo
-
To remove the battery, lift up on the thumb tab located on the bottom right corner of battery bay.
-
-
Questo passaggio è privo di traduzione. Aiuta a tradurlo
-
To remove the SD card and Sim card, look above the battery bay and slide the card out.
-
Insert an opening tool to lift up and the plastic plate that covers the LCD ribbon cable and remove it.
-
-
-
Questo passaggio è privo di traduzione. Aiuta a tradurlo
-
Use a size PH000 Phillips screwdriver to unscrew the nine screws located on the back.
-
-
Questo passaggio è privo di traduzione. Aiuta a tradurlo
-
Use a heat gun or a heating device to lightly heat the edges of the screen on the phone
-
Insert an opening tool between the screen and plastic bezel, then apply pressure to separate.
-
-
Questo passaggio è privo di traduzione. Aiuta a tradurlo
-
Use a plastic spudger to disconnect the ribbon cable from the loudspeaker unit.
-
Lift from the top of the loudspeaker unit to release from the phone.
-
-
Questo passaggio è privo di traduzione. Aiuta a tradurlo
-
Use a plastic spudger to disconnect the ribbon cable from the motherboard.
-
The camera will be free to remove.
-
-
Questo passaggio è privo di traduzione. Aiuta a tradurlo
-
Use a plastic spudger to disconnect LCD ribbon cable and front facing sensor.
-
-
Questo passaggio è privo di traduzione. Aiuta a tradurlo
-
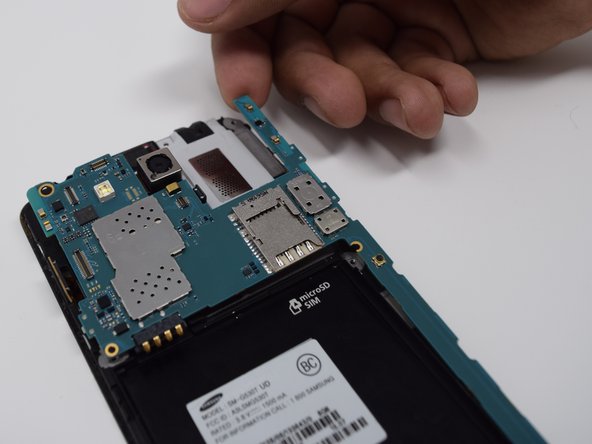
The mother board should now be free to remove.
-
Carefully lift each edge and lift to remove.
-
Flip the mother board over and use a plastic spudger to disconnect the rear facing camera ribbon connector to free the camera.
-
Make sure not to overly bend the ribbon connector.
-


Team

UW Tacoma, Team S1-G1, Liner Summer 2018 Membro di UW Tacoma, Team S1-G1, Liner Summer 2018
UWT-LINER-SU18S1G1
5 Membri
5 Guide realizzate