Introduzione
Segui questa guida per rimuovere e sostituire la batteria del tuo Samsung Galaxy Note 5.
Prima di smontare il tuo telefono, scarica la batteria al di sotto del 25%. Una batteria agli ioni di litio può prendere fuoco e/o esplodere se forata accidentalmente.
Se la tua batteria è gonfia, prendi le precauzioni appropriate. Non scaldare il tuo telefono. Se necessario, puoi usare un contagocce o una siringa per applicare dell'alcool isopropilico (>90%) attorno ai bordi della copertura posteriore per ammorbidire l'adesivo. Le batterie gonfie possono essere molto pericolose, quindi indossa degli occhiali protettivi e presta la dovuta attenzione, o portalo da un professionista se non sei sicuro su come procedere.
Dopo aver completato questa procedura, calibra la tua nuova batteria appena installata.
Cosa ti serve
-
-
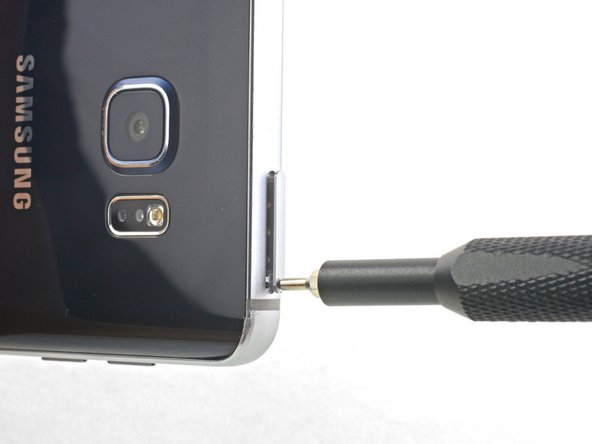
Infila uno strumento o una punta per l'eiezione della SIM, oppure una graffetta raddrizzata nel piccolo foro nel vassoio della scheda SIM sul bordo superiore del telefono.
-
Premi per espellere il vassoio. Questo potrebbe richiedere della forza.
-
Rimuovi il vassoio della scheda SIM.
-
-
-
Usando un'unghia, spingi il tasto della S-Pen finché non scatta ed esce dal telefono.
-
Rimuovi la S-Pen.
Hola mi priblema es que meti al reves el spen en el orificio y al sacarlo pues ya no funciona …. Tiene reparacion es un galaxy note 5
-
-
-
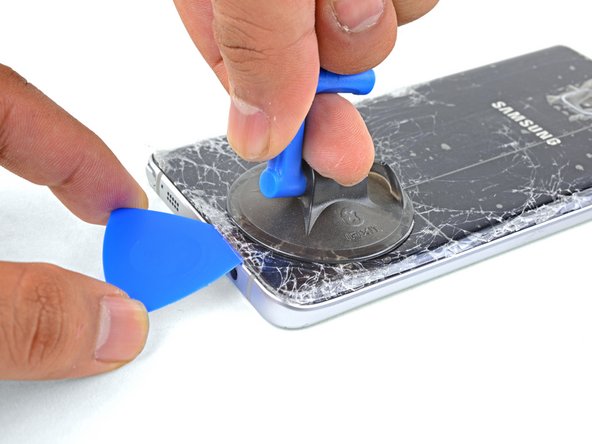
Appoggia un iOpener scaldato al bordo inferiore del telefono per un paio di minuti.
-
-
-
Fai aderire una ventosa il più vicino possibile al bordo inferiore del telefono.
-
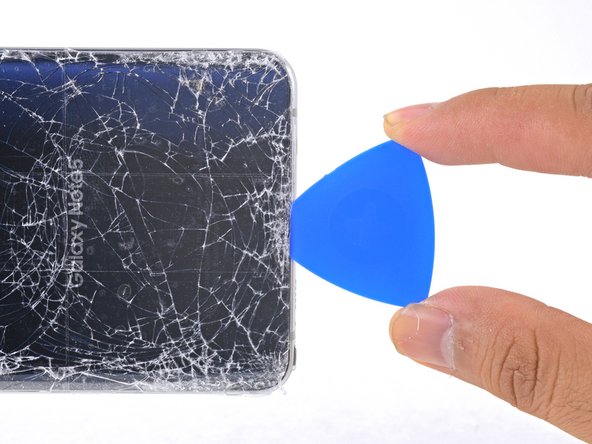
Solleva la ventosa ed infila un plettro sotto il vetro posteriore.
Yes very fragile, i dont know how to remove without cracking the glass back.
It IS possible, because I just did it. You have to be extremely patient and use firm but gentle pressure. It took me nearly an hour just to get the back off.
One more thing: I discovered that the only way that I could get enough heat into it to soften the adhesive it is to fold the hot iOpener so that you heat from both sides.
-
-
-
-
Usa delle pinzette per rimuovere tutto l'adesivo rimasto sia sulla copertura posteriore che sul telaio del telefono.
-
Pulisci le aree di adesione con dell'alcool isopropilico ad alta concentrazione (>90%) e un panno senza lanugine. Passa il panno in una sola direzione, e non avanti e indietro. Questo aiuterà a preparare la superficie per il nuovo adesivo.
-
Assicurati di accendere il telefono e provare la tua riparazione prima di applicare il nuovo adesivo e richiudere il telefono.
-
Dopo aver installato la copertura posteriore, fai forza costante sul tuo telefono per diversi minuti per aiutarlo a fare una buona presa, ad esempio mettendolo sotto una pila pesante di libri.
-
-
-
Svita le venti viti a croce Phillips da 3,3 mm.
the phone was gave to me and I bought a replacement battery but two of the screw around the camera won't come out it's like their stripped what do I do
-
-
-
Tieni il telaio intermedio dai bordi e sollevalo mentre spingi verso il basso la batteria con un dito.
-
Rimuovi il telaio intermedio.
During this step, I destroyed my phone. Some of the circuit board at the bottom of the battery is attached to the mid-frame. When I pushed on the battery as instructed, it broke apart. The phone is useless.
Hi Edward,
I’m sorry to hear that! My guess would be that a stray screw held the board to the midframe. If your phone had an extra screw that I missed, please notify me and I’ll correct it!
-
-
-
Usando la parte piatta di uno spudger, solleva il connettore della batteria dalla sua presa sulla scheda madre.
-
-
-
Infila un plettro sotto il bordo inferiore della batterie per sollevarla lentamente dalla copertura.
-
-
-
Solleva la batteria dalla copertura.
-
Rimuovi tutto l'adesivo rimasto dal telefono e pulisci le aree di adesione con dell'alcool isopropilico e un panno senza lanugine.
-
Fissa la nuova batteria con dell'adesivo pretagliato o del nastro biadesivo. Per posizionare correttamente la batteria, Applica il nuovo adesivo nel telefono, non direttamente sulla batteria. L'adesivo dovrebbe andare lungo il perimetro del compartimento della batteria, ma non nell'apertura rettangolare al centro (che è in realtà il retro dello schermo).
-
Premi saldamente la batteria in posizione per 5-10 secondi.
-


Confronta la tua parte di ricambio con quella originale: potrebbe essere necessario il trasferimento di alcuni componenti o la rimozione di protezioni adesive dalla nuova parte prima di installarla.
Per rimontare il tuo dispositivo, segui le istruzioni in ordine inverso.
Porta i tuoi rifiuti elettronici a un riciclatore certificato R2 o e-Stewards.
La riparazione non è andata come previsto? Prova delle soluzioni di base ai problemi, oppure rivolgiti alla nostra comunità Risposte per trovare aiuto.
Annulla: non ho completato questa guida.
Altre 119 persone hanno completato questa guida.
Un ringraziamento speciale a questi traduttori:
100%

Questi traduttori ci stanno aiutando ad aggiustare il mondo! Vuoi partecipare?
Inizia a tradurre ›


43 Commenti
Yes if you over heat the back for a long time. If you just heating it up to remove adhesive you should be fine.
Would doing this void my warranty?
Ofcourse it will void your warranty..You seriously think opening up fixed battery wont void your warranty lol..
By the time you need a new battery, your warranty will be out anyway most likely.
Kathy -
is the battery linked in this post the same one that comes in Note 5 stock? i'm hesitant to buy a battery that might be worse than i currently have.
Yes the battery is OEM
check the connections when it plugged in to the main board, see if any prongs are bent or broken. Make sure there are no tears in the ribbon from the batteries.
I swapped the battery and saw 24hr use with normal usage. Old oem battery had blown up and was all lumpy. Amazing how much better it is. I don't know how not to break the glass whIle removing the back cover though, would recommend buying a spare back cover just in case since it breaks easily.
joinhalo -
dbpaul, best way to avoid damages is to heat the back cover area and use 2 suction holders. 1 attached to the LCD and one to the back cover. gently pull them appart and the glues will begin to seperate. you can get them on this site for ~$3 a piece.
Suction Handle
Product code: IF145-361
What tool are you using to heat/melt the adhesive? I tried using a hair dryer but it did not work :(
Thank you so much (: i had to buy a heat gun from my local hardware store the blow dryer just didnt get hot enough . The most difficult part of this process was removing the actual battery it didnt just pop out like the video . it was glued in place i couldn't just rip it out either becaue the screen was on the other side i didnt want to yank it around to much and crack the screen underneath. but i slide a thin card and seperated the glue from battery (: yay all fixed !
Will you have to replace the back if it is cracked when you take it off?
Will you have to replace the back if it is cracked whenever you take it off to replace the battery?
I just did a battery replacement on my dad's refurbished note 5. Getting the back to 450F was enough to seperate it. Do not use a small suction cup. Find something that takes up alot more surface area so you don't have to pull as hard. If your back does crack buy a replacement one its like ~10$ and mine came with pre-applied adhesive.
I wouldn´t do that in advance, because it may damage some part and the phone is not waterproof and dustproof anymore.
I changed the battery and but forgot to take out the sim initially. I checked the sim on other phone and thats working ok. But on this phone, no sim is getting signals or registered... any idea.. did i spoil something?
Did you check the contacts in the phone for the sim? Are they in a good condition und clean? Try to clean them with a clean piece of cloth and a litte amount of alcohol on it.
Is samsung galaxy note 5 a strong phone to use, does the battery last?
Is samsung galaxy note 5 a strong phone to use, does the battery last longer, pls wats the major problems with this brand?
Grrrr lol, my first Note 4 and i cracked the digitizer and glass. I cracked them by gently pushing on the back of the battery so the sub-chassis could come out. Next time i’m putting the heat gun on Volcano to melt that %#*@ glue!! :-)
Grrrr.!!! I broke the screen and digitizer while gently pressing on the back of the battery so the sub-chassis could come out, but no, it didn’t come out. So, next time i’m setting the heat gun to Volcano and melt that glue the heck out of there!!! :-)
Thanks ,++Heat Gun++ setting temperature is?
These are some of the stupidest comments I've ever read in my life Samsung enclosed the housing to keep water in moisture from getting inside of the device seconds the Note 5 is a huge upgrade compared to this shity ass Note 4. And the expandable memory saying that's why they make Dropbox yes Samsung did not put expandable memory in this phone because they wanted everybody to buy the next model and yes that is kind of shity of them but they send signals and updates to your phone to slow it down so that you get the next phone. The reason being new technologies are coming out and they can't continue to produce old technology when they are making new technologies it's the wave of the future get used to it or don't use a %#*@ cell phone
Why is the Note 4 so bad? I went from the 3 to the 5, and they really aren’t much different at all.
I did it! Only casualty was the back case but I found an OEM on Amazon for that at 13 bucks. Since I use the Samsung S-view case, I am able to use my phone immediately. When the new back comes I will put that back on. Thanks Sophia!
This will be my 3rd battery replacement. Once you do it its not so bad, the factory outside shell was a major pain but my replacements have come off very easy and I did NOT have to replace it. 2nd battery was bad. 3rd was oem VERIZON compatiable MAKE SURE you get the battery for your service provider (att/sprint/verizon/etc..) it does make a difference, there are dozens if not more batteries out there.
THANK YOU FOR THIS TUTORIAL IT WAS SPOT ON EASY TO FOLLOW!!!!! Much easier than youtube
I’m currious as to whether or not my saved data, etc will be affected by a battery swap? I’ll back it up anyway, but is losing it something I need to worry about?
You should not lose any data when doing a battery replacement. That said, you are very wise to back it up in case something goes awry with the repair.
Do I need new glue to replace the old one ? I am going to buy a battery replacement on amazonkit but any glue seems to me included , is that ok ?
Without the glue its no more protected against humidity. If thats no problem for you, you don´t need to use one.
But I would recommend you to use it. Its not really expensive.
For example on ebay, you could get a pre-cut tape for some bucks.
I was able to complete the replacement without needing a new back glass cover. But I’d like to add a few observations:
1. The bottom side of my back glass was much more stubborn than usual, maybe it’s because my phone is 5 years old. No amount of heating and pulling revealed any opening on the bottom. But I was able to start the process on the right side instead. If the bottom side is too tough for you, maybe you can look around for other locations.
2. The black adhesive on my front display (what makes up the bezel on the top and bottom edges) started to peel when I was removing the midframe. I don’t know if this was avoidable, since it looked like the adhesive was stuck quite strongly to the midframe. The peeling is just a cosmetic blemish on the screen, but I heard that you can fix this by filling the peeled section with LOCA UV glue.
My battery was swollen and when I tried to remove it, I got a sweet smell from the battery.
Took it outside to let the gas fully escape. The battery was fully discharged for a few months and cold.
Should I attempt to remive the battery again, I assume the chance of ot catching fire would be less since the gas is gone.
If the battery is fully discharged and vented, you can proceed to remove the battery. Wear gloves and do not use heat to remove the battery.
We sell replacement Note5 batteries here!
Step 13 my phone was destroyed.
The bottom of the circuit board was attached to the top somehow. It broke apart during this step.