Salta al contenuto principale

Samsung Galaxy Note Midframe Replacement

Guida Archiviata
Questa guida è mantenuta solo per scopi storici. Usa la versione aggiornata della guida per eseguire la riparazione.

Cosa ti serve

  1. Samsung Galaxy Note Midframe Replacement, Battery: passo 1, immagine 1 di 3 Samsung Galaxy Note Midframe Replacement, Battery: passo 1, immagine 2 di 3 Samsung Galaxy Note Midframe Replacement, Battery: passo 1, immagine 3 di 3
    • Make sure the screen is face-down and the camera is opposite you.

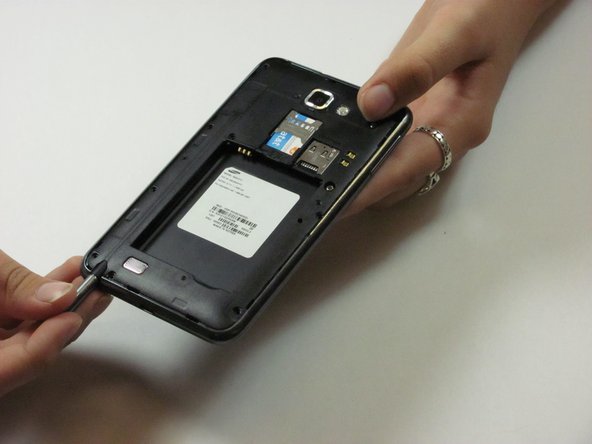
    • Insert the flat end of a spudger into the phone's top right rectangular slot.

    • Use the spudger as a lever to pry open the back of the phone.

  2. Samsung Galaxy Note Midframe Replacement: passo 2, immagine 1 di 1
    • With the spudger still inserted, carefully slide the spudger down the side of the phone.

    • Gently peel off the back cover with your hand.

  3. Samsung Galaxy Note Midframe Replacement: passo 3, immagine 1 di 1
    • Place the spudger in the battery's bottom right slot.

    • Gently pry to remove the battery.

  4. Samsung Galaxy Note Midframe Replacement, Midframe: passo 4, immagine 1 di 1
    • Remove the nine 3mm screws on the perimeter of the phone with a Phillips #00 screwdriver.

  5. Samsung Galaxy Note Midframe Replacement: passo 5, immagine 1 di 1
    • Remove the stylus from the bottom of the phone.

  6. Samsung Galaxy Note Midframe Replacement: passo 6, immagine 1 di 3 Samsung Galaxy Note Midframe Replacement: passo 6, immagine 2 di 3 Samsung Galaxy Note Midframe Replacement: passo 6, immagine 3 di 3
    • Pry all the way around the sides with a plastic pry tool and gently pop off the midframe.

    • If the cover does not come off easily, continue to pry along the phone's perimeter.

    • This step can take some patience. Prying too hard or forcing the screen off can crack or scratch the screen and break the thin plastic around the stylus case.

    • Separate the midframe from the phone. The midframe should now pull off easily.

Conclusione

To reassemble your device, follow these instructions in reverse order.

Altre 4 persone hanno completato questa guida.

David Ritter

Membro da: 04/14/13

758 Reputazione

6 Guide realizzate

Team

Cal Poly, Team 3-45, Amido Spring 2013 Membro di Cal Poly, Team 3-45, Amido Spring 2013

CPSU-AMIDO-S13S3G45

4 Membri

7 Guide realizzate

0 Commenti

Aggiungi Commento

Visualizza Statistiche:

Ultime 24 Ore: 0

Ultimi 7 Giorni: 0

Ultimi 30 Giorni: 0

Tutti i Tempi: 1,992