Salta al contenuto principale

Samsung Galaxy Note 4 Display Assembly Replacement

Cosa ti serve

Panoramica Video

  1. Samsung Galaxy Note 4 Display Assembly Replacement, Display Assembly: passo 1, immagine 1 di 1
    • NOTE: It is suggested to remove the battery, S Pen, SD Card, and SIM card (if your phone uses a SIM card).

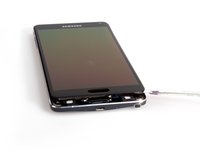
    • Begin by heating the edges of the screen. The adhesive on the Galaxy Note 4 is weaker than on newer generations and will release easier, requiring less heat and prying.

  2. Samsung Galaxy Note 4 Display Assembly Replacement: passo 2, immagine 1 di 1
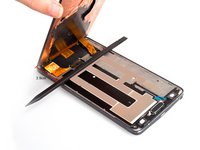
    • Slowly work your way around the edges of the screen with a pry tool or pick.

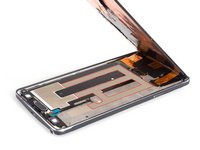
    • Work your way around the top and sides of the device, and very carefully approach the adhesive on the bottom of the phone. The Galaxy Note 4's touch-sensitive pads lay in the way of your opening picks and it is very easy to sever them.

  3. Samsung Galaxy Note 4 Display Assembly Replacement: passo 3, immagine 1 di 1
    • Insert the Jimmy underneath the LCD to cut the adhesive in the middle part. The adhesive is strong so make sure you are underneath the copper insulation before separating.

  4. Samsung Galaxy Note 4 Display Assembly Replacement: passo 4, immagine 1 di 3 Samsung Galaxy Note 4 Display Assembly Replacement: passo 4, immagine 2 di 3 Samsung Galaxy Note 4 Display Assembly Replacement: passo 4, immagine 3 di 3
    • Notice 1: The adhesive is in the red line.

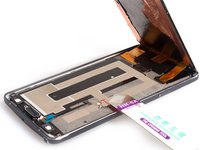
    • Notice 2: If you insert the spudger from right side, keep the length of the tool in less than 2.2cm, which is for avoiding damaging the home button flex.

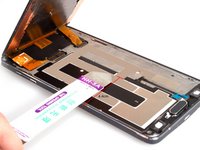
    • Notice 3: If you insert the spudger from left side, keep the length of the tool in less than 4.4cm for the same reason.

  5. Samsung Galaxy Note 4 Display Assembly Replacement: passo 5, immagine 1 di 2 Samsung Galaxy Note 4 Display Assembly Replacement: passo 5, immagine 2 di 2
    • Notice 4: Pay attention to the part with LCD screen flex. When you cut the adhesive, leave the top part alone to avoid damage the flex. But if it's the broken screen, you don't need to worry so much.

    • Be careful with the bottom side because there are the soft keys.

    • If the adhesive in the red line don't function any more when you place the new LCD screen, you can choose to use the 3M double side tape. It can help to fasten the new screen together with the LCD screen sticker.

  6. Samsung Galaxy Note 4 Display Assembly Replacement: passo 6, immagine 1 di 1
    • Release S Pen touch sensor film connector and LCD screen connector.

  7. Samsung Galaxy Note 4 Display Assembly Replacement: passo 7, immagine 1 di 1
    • Separate the LCD screen from the frame of the device.

Conclusione

To reassemble your device, follow these instructions in reverse order.

Altre 159 persone hanno completato questa guida.

Sophia

Membro da: 03/25/14

43.810 Reputazione

62 Guide realizzate

42 Commenti

Can I use a hair dryer instead of a heat gun

charlie - Replica

Yes, a hair dryer on the hot setting will work in place of a heat gun for this repair. You may have to heat it a bit longer but you will be able to tell when the adhesive is warm enough, as it will begin to separate a lot easier.

Brad -

Here in our tech community we have been discussing the foil under the LCD. We are doing more testing but there might be a connection with the foil functioning in conjunction with S-Pen and AirView. Can anyone confirm this?

Kevin Henson - Replica

Yes, the foil permits the s pen to function. If you have the part of the foil that was riped off you can tape it back.

Gianrene Padilla -

the foil itself has nothing to do with the functioning of the spen. It is for heat dissipation

Mentat Solutions -

Aggiungi Commento

Visualizza Statistiche:

Ultime 24 Ore: 3

Ultimi 7 Giorni: 16

Ultimi 30 Giorni: 92

Tutti i Tempi: 317,380