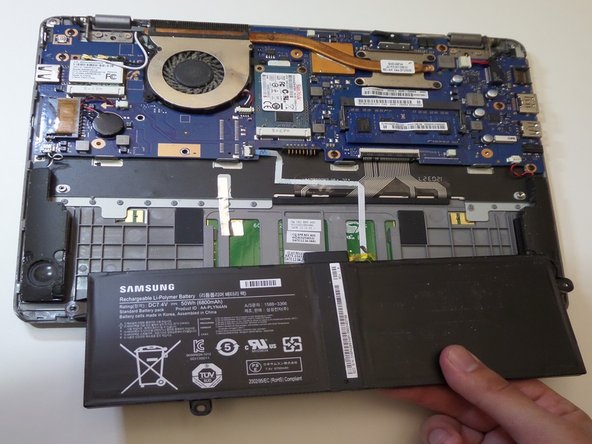
Salta al contenuto principale

Samsung Chromebook series 5 XE550C22 SSD Replacement

Cosa ti serve

  1. Samsung Chromebook series 5 XE550C22 SSD Replacement, Back Panel: passo 1, immagine 1 di 3 Samsung Chromebook series 5 XE550C22 SSD Replacement, Back Panel: passo 1, immagine 2 di 3 Samsung Chromebook series 5 XE550C22 SSD Replacement, Back Panel: passo 1, immagine 3 di 3
    • Turn the power off before beginning this step.

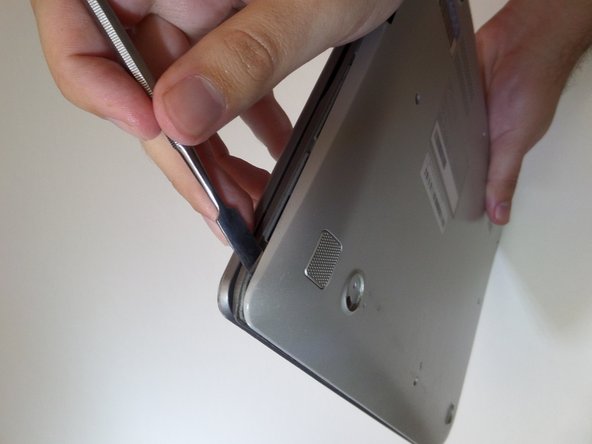
    • Using the spudger, remove the four 1/2 inch skid pads from the back of the laptop.

  2. Samsung Chromebook series 5 XE550C22 SSD Replacement: passo 2, immagine 1 di 2 Samsung Chromebook series 5 XE550C22 SSD Replacement: passo 2, immagine 2 di 2
    • Remove the eight 7mm screws using the J0 Screwdriver.

  3. Samsung Chromebook series 5 XE550C22 SSD Replacement: passo 3, immagine 1 di 3 Samsung Chromebook series 5 XE550C22 SSD Replacement: passo 3, immagine 2 di 3 Samsung Chromebook series 5 XE550C22 SSD Replacement: passo 3, immagine 3 di 3
    • Starting at the center front of the laptop, insert the metal spudger between the keyboard panel and the bottom panel, separating the bottom panel from the laptop.

    • Continue prying around the sides to release more brackets.

  4. Samsung Chromebook series 5 XE550C22 SSD Replacement: passo 4, immagine 1 di 2 Samsung Chromebook series 5 XE550C22 SSD Replacement: passo 4, immagine 2 di 2
    • After deconnecting all the brackets, pull the back panel away from the laptop.

    • Note: The back panel has some flex to it, don't be afraid to use some force.

  5. Samsung Chromebook series 5 XE550C22 SSD Replacement, Battery: passo 5, immagine 1 di 2 Samsung Chromebook series 5 XE550C22 SSD Replacement, Battery: passo 5, immagine 2 di 2
    • Remove the four 3mm screws holding the battery with the J0 screwdriver.

  6. Samsung Chromebook series 5 XE550C22 SSD Replacement: passo 6, immagine 1 di 2 Samsung Chromebook series 5 XE550C22 SSD Replacement: passo 6, immagine 2 di 2
    • Lift the battery up at an angle to disconnect the battery from the motherboard, then pull it away from the laptop.

    • Do not lift the battery straight up. This will damage the battery's connectors.

  7. Samsung Chromebook series 5 XE550C22 SSD Replacement, SSD: passo 7, immagine 1 di 1
    • Locate the SSD in the center of the Chromebook.

  8. Samsung Chromebook series 5 XE550C22 SSD Replacement: passo 8, immagine 1 di 3 Samsung Chromebook series 5 XE550C22 SSD Replacement: passo 8, immagine 2 di 3 Samsung Chromebook series 5 XE550C22 SSD Replacement: passo 8, immagine 3 di 3
    • Remove the single 3.5mm screw using the J0 screwdriver.

    • The SSD should "pop-up" on its own after it's unscrewed.

  9. Samsung Chromebook series 5 XE550C22 SSD Replacement: passo 9, immagine 1 di 2 Samsung Chromebook series 5 XE550C22 SSD Replacement: passo 9, immagine 2 di 2
    • Pull the SSD up and away from the Chromebook

Conclusione

To reassemble your device, follow these instructions in reverse order.

Altre 4 persone hanno completato questa guida.

Abel Osorio

Membro da: 09/11/17

330 Reputazione

2 Guide realizzate

Team

CSU Fullerton, Team S2-G7, Bruce Fall 2017 Membro di CSU Fullerton, Team S2-G7, Bruce Fall 2017

CSUF-BRUCE-F17S2G7

3 Membri

14 Guide realizzate

4 Commenti

Hello where can I get I higher SSD to buy

aduboa moses - Replica

The SSD on the Chromebook 3 is non-upgradable. This is a different model. Please post this guide in the model you have.

frontiergds - Replica

If you want to get more storage out of your chromebook get a sd card and you will only need it if you have a chrultrabook.

Will F - Replica

The samsung chromebook shown on this guide is Samsung Chromebook XE550C22. The samsung chromebook 3 ( XE500C13 ), is totally different model. I have edited the title and description to match the actual model.

coldspring21 - Replica

Aggiungi Commento

Visualizza Statistiche:

Ultime 24 Ore: 1

Ultimi 7 Giorni: 11

Ultimi 30 Giorni: 52

Tutti i Tempi: 5,115