Salta al contenuto principale
Unisciti alla Community delle riparazioni - Crea un account

Samsung Chromebook Series 3 Screen Replacement

Cosa ti serve

  1. Samsung Chromebook Series 3 Screen Replacement, Screen: passo 1, immagine 1 di 3 Samsung Chromebook Series 3 Screen Replacement, Screen: passo 1, immagine 2 di 3 Samsung Chromebook Series 3 Screen Replacement, Screen: passo 1, immagine 3 di 3
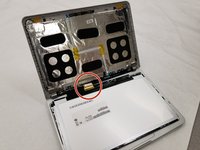
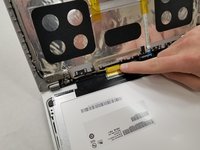
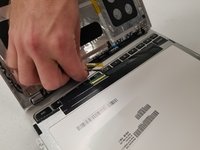
    • Use the iFixit opening tool to get under the front cover and pop it out of place

    Chiedi a FixBot

    Aggiungi Commento

  2. Samsung Chromebook Series 3 Screen Replacement: passo 2, immagine 1 di 3 Samsung Chromebook Series 3 Screen Replacement: passo 2, immagine 2 di 3 Samsung Chromebook Series 3 Screen Replacement: passo 2, immagine 3 di 3
    • Remove the four 2.9 mm screws with the Phillips #00 Screwdriver bit.

    • Using the iFixit opening tool, try to lift up the screen (it is held down by some adhesive).

    Chiedi a FixBot

    Aggiungi Commento

  3. Samsung Chromebook Series 3 Screen Replacement: passo 3, immagine 1 di 3 Samsung Chromebook Series 3 Screen Replacement: passo 3, immagine 2 di 3 Samsung Chromebook Series 3 Screen Replacement: passo 3, immagine 3 di 3
    • Lift the lever to release the cable and pull the cable out.

    Chiedi a FixBot

    Aggiungi Commento

  4. Samsung Chromebook Series 3 Screen Replacement: passo 4, immagine 1 di 1
    • You can now remove the screen.

    Chiedi a FixBot

    Aggiungi Commento

Conclusione

To reassemble your device, follow these instructions in reverse order.

Annulla: non ho completato questa guida.

Altre 6 persone hanno completato questa guida.

Team

IUPUI, Team S2-G1, Henning Spring 2019 Membro di IUPUI, Team S2-G1, Henning Spring 2019

IUPUI-HENNING-S19S2G1

3 Membri

6 guide realizzate

0Commenti sulla guida

Aggiungi Commento

Visualizza statistiche:

Ultime 24 ore: 1

Ultimi 7 giorni: 12

Ultimi 30 giorni: 66

Tutti i Tempi: 1,996