Salta al contenuto principale

Samsung ATIV Book 9 NP900X3K-S01US Battery Replacement

Cosa ti serve

  1. Samsung ATIV Book 9 NP900X3K-S01US Battery Replacement, Bottom Case: passo 1, immagine 1 di 3 Samsung ATIV Book 9 NP900X3K-S01US Battery Replacement, Bottom Case: passo 1, immagine 2 di 3 Samsung ATIV Book 9 NP900X3K-S01US Battery Replacement, Bottom Case: passo 1, immagine 3 di 3
    • Make sure that the Samsung ATIV Book 9 is powered off and not connected to any power outlets.

    • Close the device and rest it on a flat surface.

    • Flip the device over to access the ten 4.3 mm screws located on the bottom case.

    • Remove all ten screws using the Phillips #00 screwdriver.

  2. Samsung ATIV Book 9 NP900X3K-S01US Battery Replacement: passo 2, immagine 1 di 2 Samsung ATIV Book 9 NP900X3K-S01US Battery Replacement: passo 2, immagine 2 di 2
    • Gently lift and remove the bottom case.

  3. Samsung ATIV Book 9 NP900X3K-S01US Battery Replacement, Battery: passo 3, immagine 1 di 3 Samsung ATIV Book 9 NP900X3K-S01US Battery Replacement, Battery: passo 3, immagine 2 di 3 Samsung ATIV Book 9 NP900X3K-S01US Battery Replacement, Battery: passo 3, immagine 3 di 3
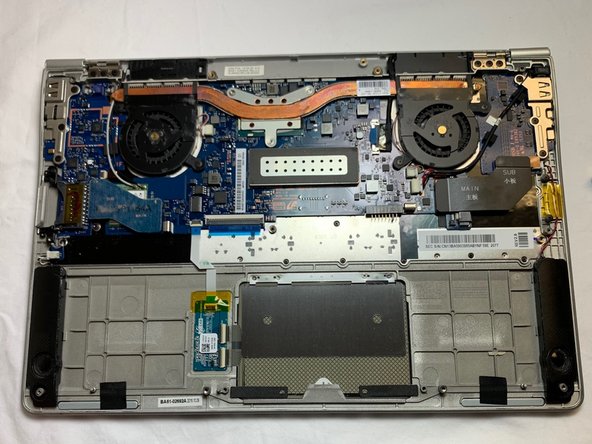
    • Using a Phillips #00 screwdriver, remove the six 4.3 mm screws securing the battery to the device.

  4. Samsung ATIV Book 9 NP900X3K-S01US Battery Replacement: passo 4, immagine 1 di 2 Samsung ATIV Book 9 NP900X3K-S01US Battery Replacement: passo 4, immagine 2 di 2
    • Carefully lift the battery out.

Conclusione

To reassemble your device, follow these instructions in reverse order.

Arthur Guz

Membro da: 02/05/19

85 Reputazione

1 Guida realizzata

Team

UC Davis, Team S18-G1, Lore Winter 2019 Membro di UC Davis, Team S18-G1, Lore Winter 2019

UCD-LORE-W19S18G1

3 Membri

3 Guide realizzate

0 Commenti

Aggiungi Commento

Visualizza Statistiche:

Ultime 24 Ore: 0

Ultimi 7 Giorni: 1

Ultimi 30 Giorni: 9

Tutti i Tempi: 772