Salta al contenuto principale

Salter Brecknell Model 311 Disassembly

Cosa ti serve

  1. Salter Brecknell Model 311 Disassembly, Prepare to disassemble: passo 1, immagine 1 di 2 Salter Brecknell Model 311 Disassembly, Prepare to disassemble: passo 1, immagine 2 di 2
    • Flip the scale over, remove batteries.

    • It requires 4 AA batteries and has two plastic clips to hold the upper batteries.

    • Be careful not to break the plastic clips.

  2. Salter Brecknell Model 311 Disassembly, Remove primary set of screws: passo 2, immagine 1 di 1
    • Remove screws at 1 o'clock and 7 o'clock positions, using the mini screwdriver.

    • Be careful with the mini screwdriver to refrain from stripping the head of the screw.

  3. Salter Brecknell Model 311 Disassembly, Remove secondary set of screws: passo 3, immagine 1 di 1
    • Remove screws at 5 o'clock and 11 o'clock positions, using the mini screwdriver.

    • Unscrew them slowly, keeping the tool directly perpendicular to the surface to avoid damage, as they are self-tapping.

  4. Salter Brecknell Model 311 Disassembly, Remove aesthetic top cover: passo 4, immagine 1 di 2 Salter Brecknell Model 311 Disassembly, Remove aesthetic top cover: passo 4, immagine 2 di 2
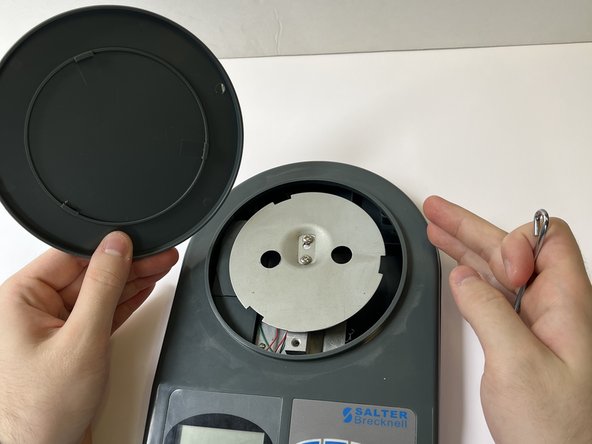
    • Remove the weighing platform by unscrewing carefully.

    • Rotate it about 60 degrees so that it can be lifted vertically.

  5. Salter Brecknell Model 311 Disassembly, Split Open Plastic Shell: passo 5, immagine 1 di 1
    • Gently tap the side of the upper plastic half, be careful as it can be snapped easily.

    • There are two clips that attach the upper half to the bottom half.

    • Be careful to avoid breaking the clips off.

  6. Salter Brecknell Model 311 Disassembly, Remove Central Screws: passo 6, immagine 1 di 1
    • Remove the two central screws, connecting the scale weight.

    • The tightness of the screws can affect the scale's accuracy, so it is important to take note of this.

  7. Salter Brecknell Model 311 Disassembly, Separate the Plastic Shell: passo 7, immagine 1 di 1
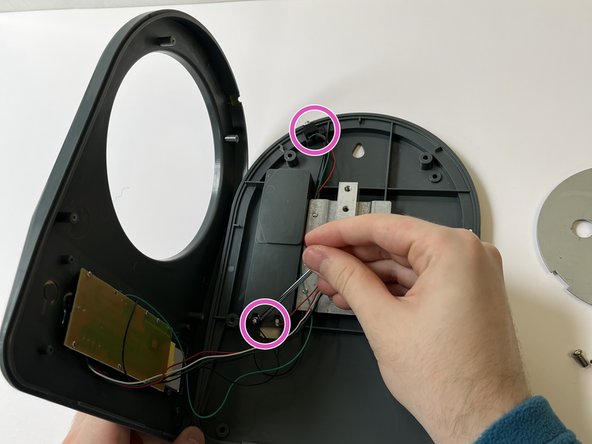
    • Lift the top half of the plastic shell to the side. Be careful, as the electrical circuit board will connect both parts.

    • The wires are exceptionally thin, be careful to not rip them.

  8. Salter Brecknell Model 311 Disassembly, Inspect the wiring: passo 8, immagine 1 di 2 Salter Brecknell Model 311 Disassembly, Inspect the wiring: passo 8, immagine 2 di 2
    • Check for wiring issues connecting to components; look for torn cables.

    • Look for loose wires or connections. Every single wire should be fully attached at both ends.

  9. Salter Brecknell Model 311 Disassembly, Inspect the circuit board: passo 9, immagine 1 di 1
    • Check back and front of circuit board for liquid damage.

    • Sometimes you can see damage from the back, but if you inspect the front side, it should be very obvious.

    • If brown stains are visible on the board, there is likely liquid damage on the board.

    • If you find liquid damage, unscrew the mini screws, and replace the board.

    • You will need to re-solder the electrical cables if you replace the board.

  10. Salter Brecknell Model 311 Disassembly, Important Reassembly Actions: passo 10, immagine 1 di 1
    • Reassemble by inverting steps 1 - 7.

    • Remember to only torque the central screws till they will not back out, not more.

Conclusione

To reassemble your device, follow these instructions in reverse order.

Steven

Membro da: 06/22/23

191 Reputazione

1 Guida realizzata

0 Commenti

Aggiungi Commento

Visualizza Statistiche:

Ultime 24 Ore: 0

Ultimi 7 Giorni: 2

Ultimi 30 Giorni: 7

Tutti i Tempi: 76