Introduzione
The pressure relief valve of this machine can get stuck and no longer be properly working. It is also possible for the valve seal to be damaged. Here's how you can revise or replace the valve.
Note: You can also remove the pump with the pressure relief valve without removing the heater. However, it is much easier to access without the heater. You can skip the corresponding steps according to what you want to do,
Cosa ti serve
-
-
The coffeebean supply is fixed with two screws. Unscrew them and lift it off.
-
There is a black rubber lid under the bean hopper that you can easily lift off, leaving a large opening.
-
The adjuster of the grinder has to be solved. Mark the position or just take a picture. This type is fixed with a screw, others are only sticked together.
-
-
-
The screws are situated on the underneath of the cover. This type is held by four screws.
-
-
-
-
Now the cover can be raised: first grip on left and right rear side and lift about 10 cm (4 in). Sometimes the cover jams a little bit.
-
Solve the hoses which lead to the water tank. Perhaps you have to pull out some contacts, (e.g. the yellow-green protection lead), don´t forget to put them on again later.
-
The cover can be drawn aslant towards the front, sliding it over the hot water pipe.
-
Most repairs can be done with the cover being laid up partially , it must not be completely removed.
-
-
-
Here the pump viewed from above, a Ulka EX5 with 230V. The pump is stored in rubber pieces.
-
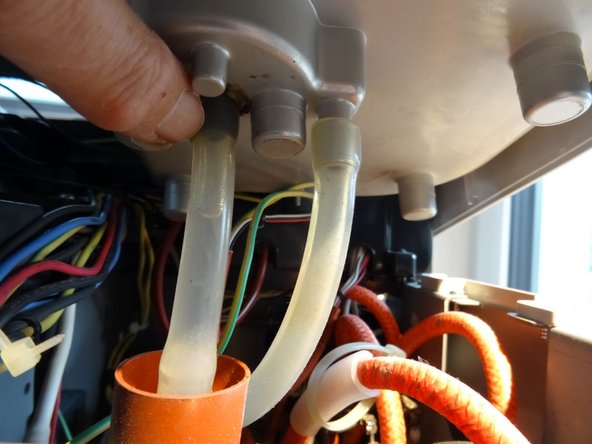
Pull the silicone hose off the rear elbow.
-
If not already done, remove the clamp on the pressure hose on the pressure relief valve. Then remove the pressure hose.
-
-
-
In the first picture, the pump has already been removed. The red marking shows the catch that holds the rubber molded part. You can easily pull it out when the catch is pressed down.
-
Pull the angled molded rubber parts out of their spots on the floor.
-
Lift the pump with the rubber moldings out of the machine.
-
-
-
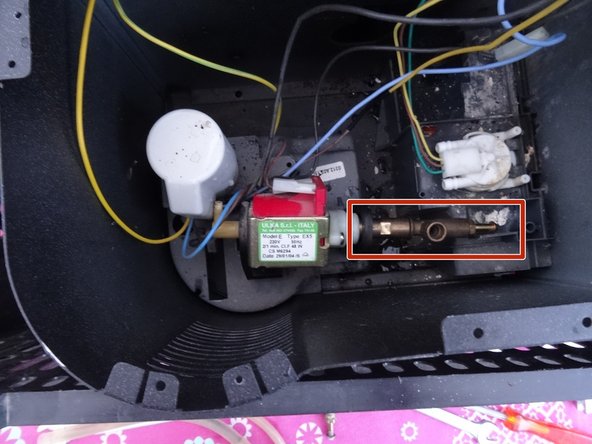
Unscrew the pressure relief valve with two wrenches SW 10 and 13.
-
Only the pump itself as well as the relief valve will remain.
-
If you want to replace the pump, you'll have to transfer the pressure relief valve to the new pump. You should also service your valve while you're at it.
-
-
-
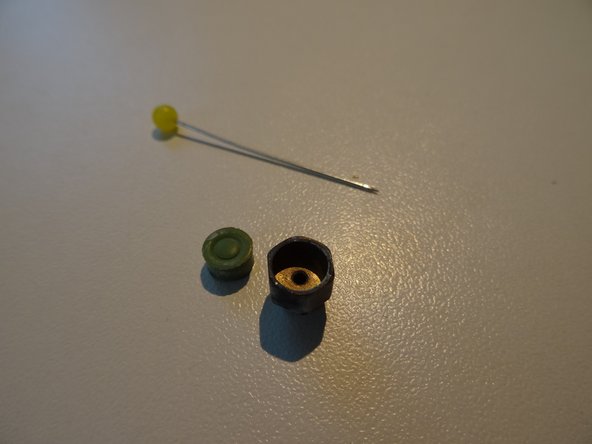
The pressure relief valve can be opened with a 10mm open-end wrench. The screws can be very tight.
-
-
-
Check if the piston is stuck. If it is it will be necessary to free it.
-
Look at the seal: is there a deep circular groove pressed into it? If so, then it is possible that it does not close properly anymore.
-
The whole valve can be replaced with a new one.
-
It is also possible to gently pry out the seal with a needle and then turn it over. The back of the seal will seal properly if it is flat and smooth. Picture two and three show the front and back.
-


To reassemble your device, follow these instructions in reverse order.
To reassemble your device, follow these instructions in reverse order.
Annulla: non ho completato questa guida.
Un'altra persona ha completato questa guida.
Un ringraziamento speciale a questi traduttori:
100%


Questi traduttori ci stanno aiutando ad aggiustare il mondo! Vuoi partecipare?
Inizia a tradurre ›
Team

Repair is War on Entropy Membro di Repair is War on Entropy
Community
25 Membri
1.107 Guide realizzate
3 Commenti
Moin,
kurze frage ist der Zwickel nicht eingeklebt? (Deswegen evtl. auch schwergängig) und müsste dieser, wenn ja dann nicht auch wieder eingeklebt werden?
PS: Im Schritt 21 ist im Bild die Ventilfeder und der Ventilstempel verkehrt herum. Der Stempel muss zuerst in das Gehäuse. Die Kräfte von Feder und Wasser müssen gegeneinander auf den Stempel einwirken, nicht gemeinsam.
So wie es auf dem Bild gezeigt ist, öffnet dieses Sicherheitsventil z.b bei einer Verstopfung nicht mehr und einer der Teflonschläuche wird platzen. Was dann dazu führt, dass unkontrolliert Wasser in der Maschine rumspritzt. Mit glück hat kein Mensch in diesem Moment mit der Maschine kontakt und eine Sicherung fliegt sofort. Von dem anderen Scenario reden wir mal nicht.
Grüße
Danke für den Hinweis. Natürlich liegt der Stempel in Bild 21 falschrum und muss zum Druck hin zeigen. Ich habe den Stutzen bisher noch nie eingeklebt, keine Probleme.
VauWeh -
Das Bild ist jetzt richtig. Der Stempel zeigt zur Pumpe hin.
VauWeh -