Salta al contenuto principale
Unisciti alla Community delle riparazioni - Crea un account
Rocketfish RF-WHTIB-A Receiver Wireless Audio Module Chip Replacement

Rocketfish RF-WHTIB-A Receiver Wireless Audio Module Chip Replacement

Caitlin Charlton

Caitlin Charlton e 3 altri collaboratori

Ultimo aggiornamento il January 20, 2025

10 - 15 minuti
Facile
Vigilanza sulla Grammatica

Introduzione

Vai al passo 1

A sender that is unresponsive in connection mode may indicate a problem with the wireless connection chip within the device. Replacing a faulty chip can help restore the device's function. This guide will help users replace a faulty wireless module chip indicated by an unresponsive connection between the sender and receiver devices.

Cosa ti serve

Strumenti

Mostra di più…

  1. Rocketfish RF-WHTIB-A Receiver Wireless Audio Module Chip Replacement, How to Open the Rocketfish RF-WHTIB-A Receiver: passo 1, immagine 1 di 1
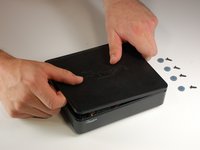
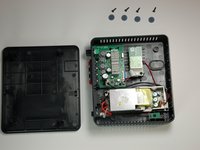
    • Remove the 4 rubber tabs on the bottom side of the receiver.

  2. Rocketfish RF-WHTIB-A Receiver Wireless Audio Module Chip Replacement: passo 2, immagine 1 di 1
    • Unscrew the four 12 mm screws on the bottom side of the receiver.

    • Use a Phillips #1 screwdriver for this step.

  3. Rocketfish RF-WHTIB-A Receiver Wireless Audio Module Chip Replacement: passo 3, immagine 1 di 2 Rocketfish RF-WHTIB-A Receiver Wireless Audio Module Chip Replacement: passo 3, immagine 2 di 2
    • Remove top casing from the receiver.

    • The receiver top casing is difficult to remove. Internal clasps may have to be broken in order to remove the top casing (this will not effect the device's function)

  4. Rocketfish RF-WHTIB-A Receiver Wireless Audio Module Chip Replacement, Receiver Wireless Audio Module Chip: passo 4, immagine 1 di 1
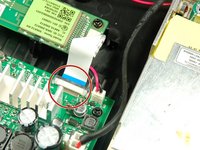
    • Unscrew the 10 mm screw holding the wireless audio module.

  5. Rocketfish RF-WHTIB-A Receiver Wireless Audio Module Chip Replacement: passo 5, immagine 1 di 2 Rocketfish RF-WHTIB-A Receiver Wireless Audio Module Chip Replacement: passo 5, immagine 2 di 2
    Attrezzo utilizzato in questo passaggio:
    Tweezers
    $4.99
    • Slide the black retaining flap securing the ribbon cable away from the white bar.

    • There should be only a small space between the white bar and black retaining flap.

    • You may want to use tweezers for this step.

  6. Rocketfish RF-WHTIB-A Receiver Wireless Audio Module Chip Replacement: passo 6, immagine 1 di 1
    • Using your fingers, slide the ribbon cable out from the under the black retaining flap to completely disconnect it from the device.

Conclusione

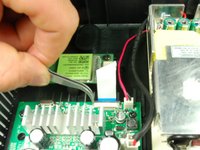
To install the new wireless audio module chip, follow these instructions in reverse order.

Un'altra persona ha completato questa guida.

Team

Baylor, Team 4-2, Williams Spring 2015 Membro di Baylor, Team 4-2, Williams Spring 2015

BU-WILLIAMS-S15S4G2

3 Membri

6 Guide realizzate

1Commento della guida

This is a very long time later, but where do you get the receiver chip??? Rocket fish doesn't support the product anymore

Michael Jay - Replica

Aggiungi Commento

Visualizza Statistiche:

Ultime 24 Ore: 0

Ultimi 7 Giorni: 4

Ultimi 30 Giorni: 17

Tutti i Tempi: 2,184