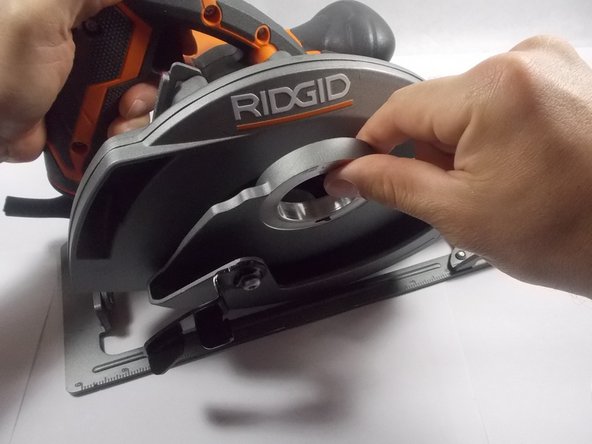
Salta al contenuto principale

Ridgid Circular Saw R3205 Lower Blade Guard Replacement

Cosa ti serve

  1. Ridgid Circular Saw R3205 Lower Blade Guard Replacement, Blade: passo 1, immagine 1 di 2 Ridgid Circular Saw R3205 Lower Blade Guard Replacement, Blade: passo 1, immagine 2 di 2
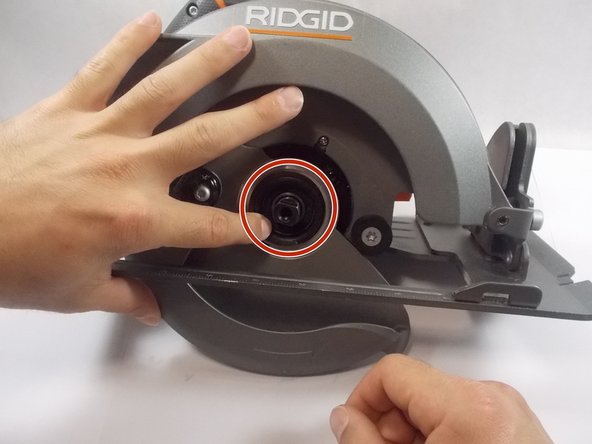
    • Press the black spindle lock and hold it down.

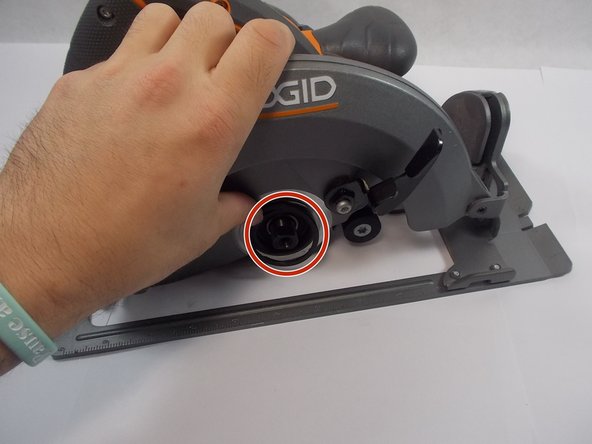
    • While keeping the spindle lock pressed down use a 6mm allen wrench to remove the 5/16-18 x 0.55 inch screw.

  2. Ridgid Circular Saw R3205 Lower Blade Guard Replacement: passo 2, immagine 1 di 1
    • Release the spindle lock and remove the outer flange by lifting it off the output shaft.

  3. Ridgid Circular Saw R3205 Lower Blade Guard Replacement: passo 3, immagine 1 di 3 Ridgid Circular Saw R3205 Lower Blade Guard Replacement: passo 3, immagine 2 di 3 Ridgid Circular Saw R3205 Lower Blade Guard Replacement: passo 3, immagine 3 di 3
    • With the outer flange removed retract the lower blade guard into the upper blade guard housing by pushing on the black lever.

    • Slide the blade out of from the bottom of the saw.

  4. Ridgid Circular Saw R3205 Lower Blade Guard Replacement, Lower Blade Guard: passo 4, immagine 1 di 2 Ridgid Circular Saw R3205 Lower Blade Guard Replacement, Lower Blade Guard: passo 4, immagine 2 di 2
    • Use a prying tool or your fingers to remove the inner flange.

  5. Ridgid Circular Saw R3205 Lower Blade Guard Replacement: passo 5, immagine 1 di 3 Ridgid Circular Saw R3205 Lower Blade Guard Replacement: passo 5, immagine 2 di 3 Ridgid Circular Saw R3205 Lower Blade Guard Replacement: passo 5, immagine 3 di 3
    • Remove the external retaining ring with a screwdriver by expanding it and then prying it out.

  6. Ridgid Circular Saw R3205 Lower Blade Guard Replacement: passo 6, immagine 1 di 1
    • After removing the external retaining ring, remove (OD50 x ID42 x 0.8t) washer.

  7. Ridgid Circular Saw R3205 Lower Blade Guard Replacement: passo 7, immagine 1 di 2 Ridgid Circular Saw R3205 Lower Blade Guard Replacement: passo 7, immagine 2 di 2
    • Remove the lower blade guard after removing the washer.

Conclusione

To reassemble your device, follow these instructions in reverse order.

Altre 3 persone hanno completato questa guida.

Joshua Caron

Membro da: 04/05/19

792 Reputazione

5 Guide realizzate

Team

Un commento

Thank you so VERY much! I was stuck and this was perfectly described!

Chris Bishop - Replica

Aggiungi Commento

Visualizza Statistiche:

Ultime 24 Ore: 1

Ultimi 7 Giorni: 7

Ultimi 30 Giorni: 20

Tutti i Tempi: 1,967