Salta al contenuto principale
Retroid Pocket 3 Trigger Button Replacement

Retroid Pocket 3 Trigger Button Replacement

Max Briseno

Max Briseno e 2 altri collaboratori

Ultimo aggiornamento il June 12, 2024

15 minuti
Facile

Introduzione

Vai al passo 1

If your trigger buttons on the device are sticking or are not responding, use this guide to access the trigger buttons on the console to remove the faulty buttons and install the replacement buttons. This process will take approximately 10-15 minutes, and the tools needed for the project are listed below.


Cosa ti serve

Strumenti

  • T5 Torx Screwdriver
    T5 Torx Screwdriver
  • Spudger
    Spudger
  • Phillips #00 Screwdriver
    Phillips #00 Screwdriver

Mostra di più…

  1. Retroid Pocket 3 Trigger Button Replacement, Battery: passo 1, immagine 1 di 1
    • Unplug any cables connected to the Retroid Pocket 3+.

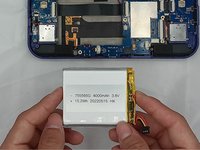
    • Ensure your device has a charge of 5% or less as a charged battery can be dangerous if punctured.

  2. Retroid Pocket 3 Trigger Button Replacement: passo 2, immagine 1 di 3 Retroid Pocket 3 Trigger Button Replacement: passo 2, immagine 2 di 3 Retroid Pocket 3 Trigger Button Replacement: passo 2, immagine 3 di 3
    • Remove the four 6 mm screws from the backplate of the device with a T5 Torx screwdriver.

    • Use a plastic opening tool or spudger to gently pry apart the backplate from the device.

  3. Retroid Pocket 3 Trigger Button Replacement: passo 3, immagine 1 di 2 Retroid Pocket 3 Trigger Button Replacement: passo 3, immagine 2 di 2
    • Remove the four 4.5 mm screws with a Phillips #00 screwdriver.

    • Lift off the metal plate.

  4. Retroid Pocket 3 Trigger Button Replacement: passo 4, immagine 1 di 3 Retroid Pocket 3 Trigger Button Replacement: passo 4, immagine 2 di 3 Retroid Pocket 3 Trigger Button Replacement: passo 4, immagine 3 di 3
    • Use a plastic opening tool or spudger to unclip the battery connector.

    • Carefully lift the battery from the case.

    • The battery has double-sided tape at the bottom. Gently push a spudger or opening tool underneath the battery to help free it from the adhesive. Do not bend or puncture the battery.

    • Lift and remove the battery.

  5. Retroid Pocket 3 Trigger Button Replacement, Trigger Button: passo 5, immagine 1 di 3 Retroid Pocket 3 Trigger Button Replacement, Trigger Button: passo 5, immagine 2 di 3 Retroid Pocket 3 Trigger Button Replacement, Trigger Button: passo 5, immagine 3 di 3
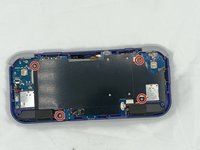
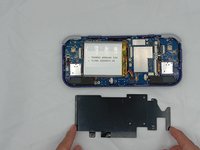
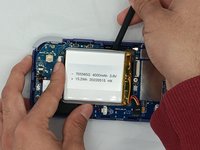
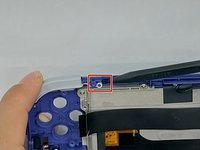
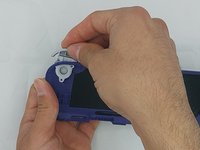
    • Using the spudger, put the tip under the top round clip at the top.

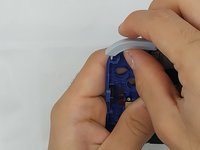
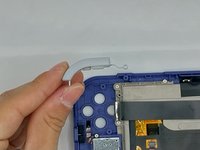
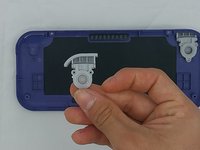
    • Carefully start lifting the clip to slide it off the plastic pin on the case, tilting the trigger button as you lift it to remove.

  6. Retroid Pocket 3 Trigger Button Replacement: passo 6, immagine 1 di 3 Retroid Pocket 3 Trigger Button Replacement: passo 6, immagine 2 di 3 Retroid Pocket 3 Trigger Button Replacement: passo 6, immagine 3 di 3
    • Remove the six 4.4 mm screws on the trigger buttons with a Phillips #00 screwdriver.

    • Gently pull the trigger button through until it has come undone.

Conclusione

To reassemble your device, follow these instructions in reverse order.

0Commenti sulla guida

Aggiungi Commento

Visualizza Statistiche:

Ultime 24 Ore: 5

Ultimi 7 Giorni: 15

Ultimi 30 Giorni: 63

Tutti i Tempi: 572