Questa versione può contenere modifiche errate. Passa all'ultima istantanea verificata.
Cosa ti serve
-
-
Svita le seguenti otto viti che tengono ferma la copertura inferiore:
-
Due viti Pentalobe P5 da 1,8 mm
-
Quattro viti Pentalobe P5 da 2,9 mm
-
Due viti Pentalobe P5 da 6,1 mm
-
-
-
Usa la parte piatta di uno spudger per tenere premuto il tasto dorato " battery disconnect".
-
Se il LED di alimentazione è acceso, continua a tenere premuto il tasto finché il LED si spegne, quindi rilascialo. Questo può richiedere fino a 10 secondi.
-
Se il LED non si accende, rilascia il tasto dopo 5-10 secondi. Premilo ancora per 5-10 secondi, quindi rilascialo. Infine, premilo ancora per 5-10 secondi e rilascialo.
-
-
-
Ruota attentamente il MacBook in modo che la copertura inferiore sia appoggiata al piano.
-
Ruota la copertura superiore/gruppo dello schermo ad un angolo di circa 90° e appoggialo contro qualcosa di robusto in modo da non doverlo tenere.
-
Aggiungi un pezzo di nastro adesivo vicino al trackpad per fissarlo alla copertura superiore ed evitare dei movimenti accidentali.
-
-
-
Come precauzione aggiuntiva, puoi scollegare fisicamente la batteria infilando un blocco per batterie tra la scheda madre e il connettore della batteria.
-
-
-
-
Usa delle pinzette per rimuovere il nastro nero che copre il connettore del cavo dello schermo.
-
-
-
Usa uno spudger per ruotare verso l'alto l'aletta di bloccaggio sul connettore ZIF del cavo a nastro del gruppo del doppio microfono.
-
-
Questo passaggio è privo di traduzione. Aiuta a tradurlo
-
Prepare an iOpener and apply heat to the upper case directly behind the microphone assembly.
-
-
Questo passaggio è privo di traduzione. Aiuta a tradurlo
-
Use a fine-tip probe or pick to gently peel the dual microphone assembly away from the case.
-
-
Questo passaggio è privo di traduzione. Aiuta a tradurlo
-
Remove the two 3.3 mm T5 Torx screws securing the display cable assembly.
-
-
Questo passaggio è privo di traduzione. Aiuta a tradurlo
-
Remove the single 4.3 mm Phillips #00 screw securing the USB-C port ribbon cable.
-
-
Questo passaggio è privo di traduzione. Aiuta a tradurlo
-
Unfold the USB-C port ribbon cable until it lays flat, allowing access to the bracket beneath.
-
-
Questo passaggio è privo di traduzione. Aiuta a tradurlo
-
Lift and remove the metal bracket securing the USB-C port ribbon cable connector.
-
-
Questo passaggio è privo di traduzione. Aiuta a tradurlo
-
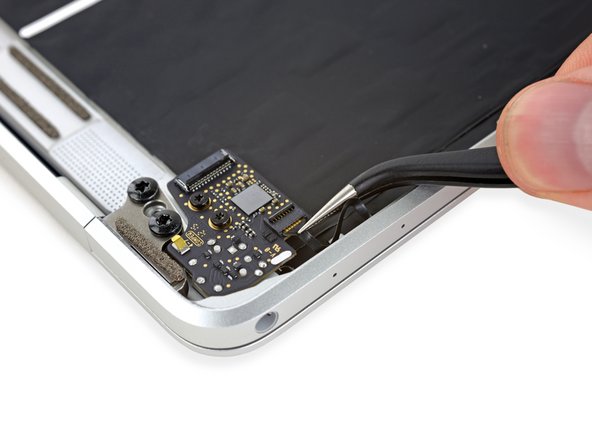
Use a spudger to disconnect the USB-C port ribbon cable by prying the connector straight up.
-
Pry from the side nearest the back edge of the MacBook.
-
Remove the ribbon cable.
-
-
Questo passaggio è privo di traduzione. Aiuta a tradurlo
-
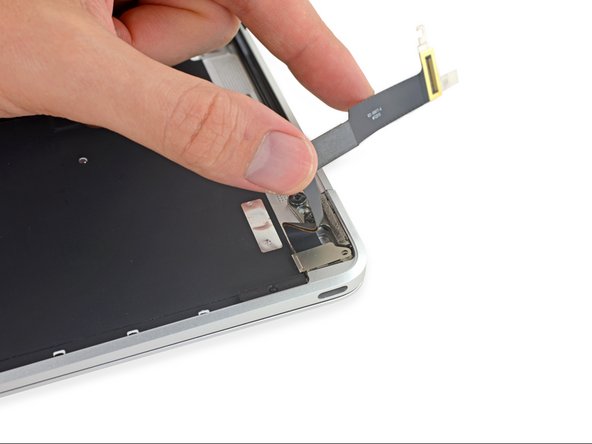
Fully open the display.
-
Set the MacBook down on its right edge with the display facing away from you, as shown.
-
-
Questo passaggio è privo di traduzione. Aiuta a tradurlo
-
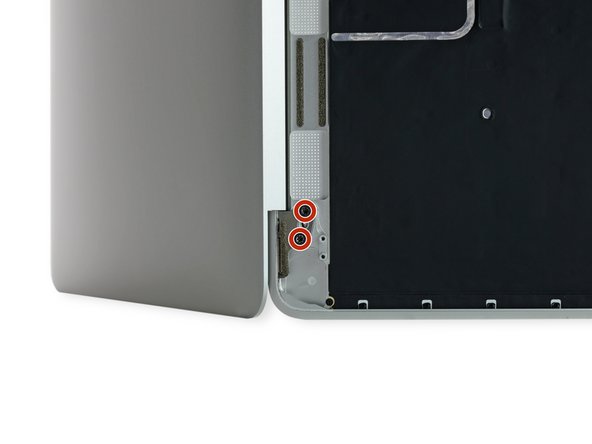
Remove the four 4.8 mm T8 Torx screws securing the display hinges.
-
-
Questo passaggio è privo di traduzione. Aiuta a tradurlo
-
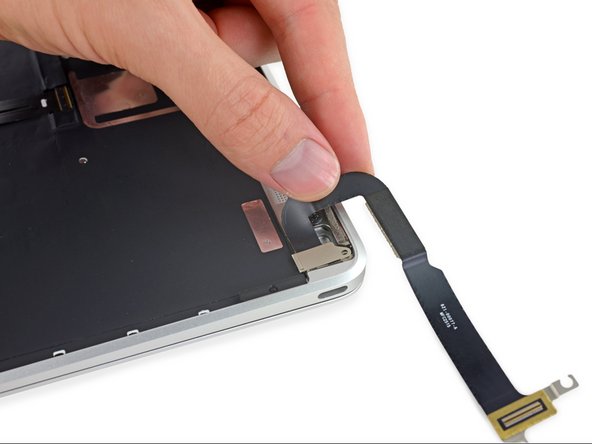
Holding the display assembly with one hand and the upper case with the other, push them together slightly to move the hinges out of their recesses in the the upper case.
-
Push the upper case forward while pulling back gently on the display.
-
Once the two display hinges have cleared the upper case, remove the display and set it aside.
-
-
Questo passaggio è privo di traduzione. Aiuta a tradurlo
-
Remove the single 2.9 mm T3 Torx screw securing the USB-C port to the upper case.
-
-
Questo passaggio è privo di traduzione. Aiuta a tradurlo
-
Slide the USB-C port out of its recess in the upper case, and remove the USB-C port.
-
-
Questo passaggio è privo di traduzione. Aiuta a tradurlo
-
Use a pair of tweezers to remove the tape covering the keyboard ribbon cable connector on the trackpad.
-
-
Questo passaggio è privo di traduzione. Aiuta a tradurlo
-
Using a spudger, flip open the retaining flap on the keyboard ribbon cable ZIF connector.
-
-
Questo passaggio è privo di traduzione. Aiuta a tradurlo
-
Gently pull the keyboard ribbon cable out of its slot in the frame.
-
-
Questo passaggio è privo di traduzione. Aiuta a tradurlo
-
Remove the five 2.5 mm T3 Torx screws securing the trackpad to the case.
-
-
Questo passaggio è privo di traduzione. Aiuta a tradurlo
-
Use a spudger to flip up the retaining flap on the keyboard ribbon cable ZIF connector.
-
-
Questo passaggio è privo di traduzione. Aiuta a tradurlo
-
Gently peel the keyboard ribbon cable up from the case, and remove the cable.
-


Annulla: non ho completato questa guida.
Altre 20 persone hanno completato questa guida.

4 Commenti
please where do i have to put the mushrooms screws? 923-01012
If you look closely at this image in Step 36 you can see them pretty clearly.
I changed the keyboard itself; you follow the instructions to step 35 (skipping 29 to 30, microphone removal) and then remove the keyboard ribbon cable connector to the trackpad (step 45). Maybe the most complicated step is ungluing the black backing stuck to the back of the keyboard and then there are almost a hundred tiny screws holding the keyboard to the frame, mostly only an eye strain. Got the keyboard through ebay (spanish keyboard layout).
I replaced my keyboard and it won’t turn on.