Questa versione può contenere modifiche errate. Passa all'ultima istantanea verificata.
Cosa ti serve
Panoramica Video
-
-
Svita le seguenti otto viti che tengono ferma la copertura inferiore:
-
Due viti Pentalobe P5 da 1,8 mm
-
Quattro viti Pentalobe P5 da 2,9 mm
-
Due viti Pentalobe P5 da 6,1 mm
-
-
-
Usa la parte piatta di uno spudger per tenere premuto il tasto dorato " battery disconnect".
-
Se il LED di alimentazione è acceso, continua a tenere premuto il tasto finché il LED si spegne, quindi rilascialo. Questo può richiedere fino a 10 secondi.
-
Se il LED non si accende, rilascia il tasto dopo 5-10 secondi. Premilo ancora per 5-10 secondi, quindi rilascialo. Infine, premilo ancora per 5-10 secondi e rilascialo.
-
-
-
-
Ruota attentamente il MacBook in modo che la copertura inferiore sia appoggiata al piano.
-
Ruota la copertura superiore/gruppo dello schermo ad un angolo di circa 90° e appoggialo contro qualcosa di robusto in modo da non doverlo tenere.
-
Aggiungi un pezzo di nastro adesivo vicino al trackpad per fissarlo alla copertura superiore ed evitare dei movimenti accidentali.
-
-
-
Come precauzione aggiuntiva, puoi scollegare fisicamente la batteria infilando un blocco per batterie tra la scheda madre e il connettore della batteria.
-
-
Questo passaggio è privo di traduzione. Aiuta a tradurlo
-
Use a pair of tweezers to remove the tape covering the keyboard ribbon cable connector on the trackpad.
-
-
Questo passaggio è privo di traduzione. Aiuta a tradurlo
-
Using a spudger, flip open the retaining flap on the keyboard ribbon cable ZIF connector.
-
-
Questo passaggio è privo di traduzione. Aiuta a tradurlo
-
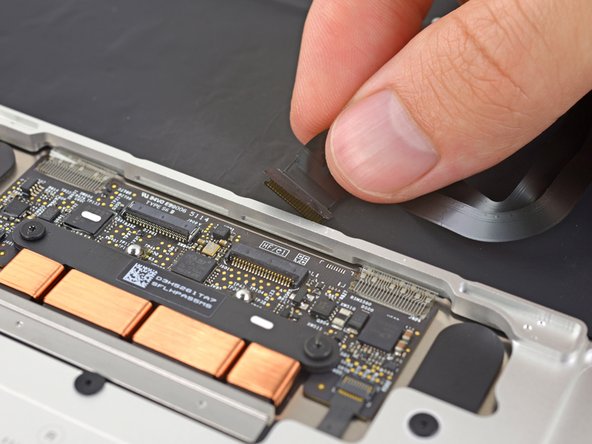
Gently pull the keyboard ribbon cable out of its slot in the frame.
-
-
Questo passaggio è privo di traduzione. Aiuta a tradurlo
-
Remove the five 2.5 mm T3 Torx screws securing the trackpad to the case.
-
-
Questo passaggio è privo di traduzione. Aiuta a tradurlo
-
Hinge open the display just slightly to free the trackpad assembly from the upper case, and remove the trackpad assembly.
-


Annulla: non ho completato questa guida.
Altre 12 persone hanno completato questa guida.


2 Commenti
Excellent instructions, a big thanks to the author. After completing them the MACBOOK worked OK and then I started to get intermittent problems with the power button and the system bringing the shutdown dialogue without pressing the power button. On closer examination and second removal of the trackpad IPD flex ribbon cable (which also routes keyboard signals to the logic board) the cable came apart at the fold half way along the cable. This cable is very fragile and as mentioned in step 7 you need to be very careful on handling them. In my case I think the cable was fatigued or mechanically damaged where the fold was during manufacture . A replacement cable has been installed and the laptop now works ok.
Hi. I've replaced the trackpad after the old one got damaged and started heating up. Macbook turns on perfectly without any trackpad connected, but doesn't even boot when the new trackpad is connected. The motherboard's LED near the battery connector is blinking. Is there something im missing?