Questa versione può contenere modifiche errate. Passa all'ultima istantanea verificata.
Cosa ti serve
-
-
Svita le seguenti otto viti che tengono ferma la copertura inferiore:
-
Due viti Pentalobe P5 da 1,8 mm
-
Quattro viti Pentalobe P5 da 2,9 mm
-
Due viti Pentalobe P5 da 6,1 mm
-
-
-
Solleva insieme la copertura superiore e lo schermo dal bordo anteriore ad un angolo di circa 45°.
-
-
-
Usa la parte piatta di uno spudger per tenere premuto il tasto dorato " battery disconnect".
-
Se il LED di alimentazione è acceso, continua a tenere premuto il tasto finché il LED si spegne, quindi rilascialo. Questo può richiedere fino a 10 secondi.
-
Se il LED non si accende, rilascia il tasto dopo 5-10 secondi. Premilo ancora per 5-10 secondi, quindi rilascialo. Infine, premilo ancora per 5-10 secondi e rilascialo.
Wow okay could someone explain why this is necessary? What happens if you skip this step and simply undo the screw to disconnect the power?
Removing the screw does not disconnect the power—power comes from the battery terminals contacting the underside of the logic board, and they’re tricky to separate reliably at this stage of disassembly. This step is the safest and easiest way to kill power; don’t skip it.
Hi what will happen if i skip this step, coz i did tried to power down the battery by pressing small gold button, but no avail. the LED light still there even after more than 5 times press (5-10secs or more) each press.
Did you learn the answer to your question? I'm having the same issue -- I keep pressing the gold button but the battery light stays on.
R McP -
Mi laptop doesn’t turn it on doing that ):
-
-
-
Solleva il bordo anteriore della copertura inferiore ad un angolo di circa 45°.
Before the IPD flex cable can be removed the battery disconnect button has be held down for up to 10 seconds. If the LED near the battery connector is switched on it shows that there is power going through the logic board from the battery, once the button is pressed and this light goes off the machine is safe to be worked on.
-
-
-
-
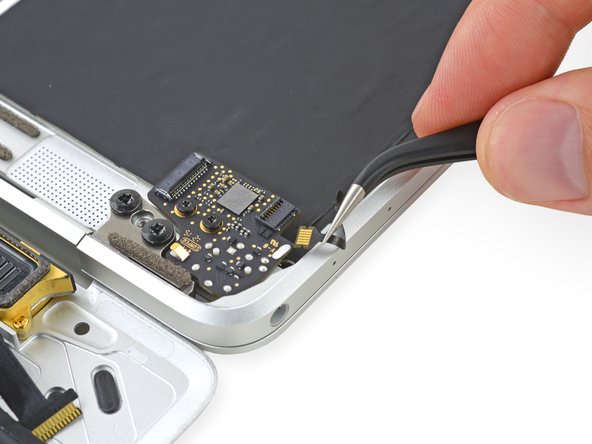
Usa delle pinzette per rimuovere il nastro nero che copre il connettore ZIF del cavo del trackpad.
Only peel back the first half of the tape covering the trackpad cable ZIF connector—do not completely remove.
Gently - lift tape while wiggling cable side to side. Be sure tape is released, but do not remove completely
-
-
-
Usa uno spudger per ruotare attentamente verso l'alto l'aletta di bloccaggio sul connettore ZIF del cavo del trackpad.
This is very tricky indeed - at least on my computer. I failed at this point - having skipped to it as sugested above so as not to stress the ribbons on the other side. The ZIF was not as I expected. They had opened when I pulled up the stick cover and I found I was working on the socket itself. The top edge came adrift after almost no pressure being put on it. The ribon did not come free with gentle pulling though. At that point I put the back on again… waited until the battery recharged a bit and found I had not nroken it after all. I doubt I shall try again. It is much harder to replace than the 15 inch - much…
I’ve just found that I have broken it after all. No keyboard. Bluetooth still works so I can use the machine.
All in all, an expensive mistake. BTW - I did NOT get the kit from IFIXIT - not sold here.
I found “Recognizing & Disconnecting Cable Connectors”
Riconoscimento e scollegamento dei connettori dei cavi
useful, esp. for someone who has not used ZIF connectors and retaining flaps before. There are several retaining flaps that need to be opened. The first time is tricky as you need a sense of how much force to apply. I used the flat end of the provided spudger. Apply progressively firmer upward pressure until the retaining flap pops open. The first time is tricky, but straightforward thereafter.
Mouse back and forth between the two right-side thumbnail photos and you will get a little animation feel showing how these ZIF connectors operate—it's very helpful. Apply light but consistent pressure to pop them up. Helps to go side to side if they're a little stubborn.
-
-
-
Scollega il cavo a nastro del trackpad dal trackpad stesso tirandolo delicatamente attraverso la sua fessura nella cornice.
it would be nice to have a specific picture of the cable and contacts and how it is oriented in the ZIF connector. This isn't clear in any of these photos or text.
My trackpad cable snapped so had to replace it and none of the replacement cables have the tape which is on the smaller end to the trackpad. The other end is fairly easy to figure out but the trackpad end isn't as the cable makes a 180 degree turn inside the case (poor design).
-
-
-
Ruota attentamente il MacBook in modo che la copertura inferiore sia appoggiata al piano.
-
Ruota la copertura superiore/gruppo dello schermo ad un angolo di circa 90° e appoggialo contro qualcosa di robusto in modo da non doverlo tenere.
-
Aggiungi un pezzo di nastro adesivo vicino al trackpad per fissarlo alla copertura superiore ed evitare dei movimenti accidentali.
You can open the laptop screen all the way open with it flat in the table (screen facing up) and the keyboard should stay up.
-
-
-
Svita la vite Torx T5 da 2,9 mm che fissa il connettore della batteria alla scheda madre.
the moment you opening macbook case and before any tinkering with connections, you MUST press little yellow button on logicboard, located on the right from battery connector - this will disable all power to the board. You can check by looking at the small led on left side of the battery connector - if there is very faint light, it means that power is still there. After pressing button light should go off. Removing screw is not necessary at all, and like I said - you MUST disable power before any touching to connections etc.
Where it says
“2015 models have a silver grounding clip with two foam pads directly under this screw“
I have a 2015 MacBook & the grounding clip is not there!
I’m using this guide to investigate why there are lines on screen or darker screen at certain angles of opening it. Also a background ghosting effect on screen too.
No obvious damage or loose connectors so wondered if the lack of grounding clip can cause these symptoms?
Anybody out there know?
Either buy the clip and check, or replace the screen (or LB), but the macbook would more likely not start if there is a missing grounded connection, depending on what is being grounded.
Sean -
-
-
-
Come precauzione aggiuntiva, puoi scollegare fisicamente la batteria infilando un blocco per batterie tra la scheda madre e il connettore della batteria.
I HAD TO DO THIS TWICE. After replacing the battery while following this guide to a 'T', the battery was not being recognized by the logic board. Strangely, with the power unplugged it would still light up the screen and tell me the battery was at a critical level, but it would not boot. Resetting the SMC had no effect. I thought I killed my computer or got a bad battery, so as a last ditch effort I re-opened the case, pressed the battery disconnect button, removed the screw and inserted the battery separation tool again to Physically Disconnect the battery from the mainboard. After about 5 minutes I then removed the tool and reassembled everything, plugged in via 5v iphone charger and USBA-C cable again and LO, the battery is now reporting correctly, charging correctly and allowing me to boot on its power .
-
-
-
Svita le due viti che tengono ferma la copertura del cavo della porta USB-C.
-
Una vite Tri-Point Y00 da 1,1 mm
-
Una vite Torx T5 da 3,5 mm
I should have read the comments before using the provided 1.1 mm Tri-point Y00 bit. I almost stripped the screw but was able to use a small flat head bit to open the screw.
Ifixit: you may want to update this part in the instructions. Not everyone reads the comment section, esp. when it comes to specification of bits which is basic and must be accurate. This is one of the more critical ones in the procedure that can easily go south. The rest of the instructions are excellent.
early 2015 model here. I’ve used a Y1.5 with cautiously applied down force.
My 2015 had a 2.5mm Y screw not a Y000.
Adding to the helpful comments above, on replacing the 1.1mm tripoint screw, I found the the magnetism of the nearby speaker coil overcame that of the driver and would draw the screw away or the combo of forces would fling it out of the work area! After fiddling with it for too long, I used some of the battery adhesive removed earlier to attached the screw to the driver. Wax would probably work better if I’d had some.
I used the PH00 head to unscrew what they call the “1.1 mm Tri-point Y00 screw”, NOT the Y00 head, and it unscrewed perfectly fine.
Agreed, my screw was a PH00.
I have an early 2015 MacBook and it was a PH00 head I needed to use.
-
-
-
Usa la parte piatta di uno spudger per scollegare la copertura del cavo della porta USB-C tirandola verso l'alto dalla scheda madre.
Emphasis on aligning the bracket correctly. What the pictures do not show is that underneath the flat part of the metal bracket (the area between the two screw holes) is a connector that needs to be accurately aligned. Aligning the two screw holes does not imply that the connector is seated correctly.
After I re-assembled my 2015 MacBook power would not come on. I thought I had damaged the logic board despite being careful and following instructions. Diagnosing the problem took a while. Retracing the steps and focusing on power supply I was able to determine that the metal flap which hides the connector underneath had not made proper contact.
What I did was to use a finger to get a tactile feel for the connector underneath the metal bracket aligning properly and then press down vertically when it seemed to be aligned. It’s a subtle tactile feel. After re-doing this step, I got power back. Be careful not to damage the connector as noted in the instructions.
Good tip. It’s so easy to damage these fragile connectors by forcing the plug in and reattaching the mounting plate screws
-
-
-
Scollega il cavo a nastro della scheda della presa jack sfilandolo parallelamente al connettore ZIF.
The audio jack cable is a bit of a pain to reinsert. I found if I turned the screen and the bottom on its side, like an open book, I had much better orientation and it was much easier to insert.
Excellent guide and all works like a sharm, but was one issue. After full assemble there wasn't sound. Then I open Macbook again and disconnect and connect audio cable. You must insert cable so, that white stripe will not visible. And sound reveal!
This helped me, thanks!
-
-
Questo passaggio è privo di traduzione. Aiuta a tradurlo
-
Use a spudger to flip open the ZIF connector retaining flap for the dual microphone assembly ribbon cable.
-
-
Questo passaggio è privo di traduzione. Aiuta a tradurlo
-
Disconnect the microphone assembly ribbon cable by pulling it straight out of its connector.
Does anyone know were I can buy the “microphone assembly ribbon cable“? It is the most delicate cable and cant seem to find spare part.
-
-
Questo passaggio è privo di traduzione. Aiuta a tradurlo
-
Remove the two 3.2 mm T5 Torx screws securing the audio jack board to the case.
-
-
Questo passaggio è privo di traduzione. Aiuta a tradurlo
-
Remove the audio jack board.
-


Annulla: non ho completato questa guida.
Altre 3 persone hanno completato questa guida.


Un commento
https://d3nevzfk7ii3be.cloudfront.net/ig...
Please Can Someone Tell me Where i Can Buy a Replacement Ribbon Like the One Shown in this Picture? i Damaged Mine And Now The Macbook is Dead.
If, like me, you didn’t have a P5 Pentalope screwdriver but did have one that fits an iPhone.
You can sand down the tip until it’s the right size.
Stuart - Replica
Thank you Stuart! I would never have thought of this and it worked perfectly.
R McP -
Hello,
where do I plug the USB-C to USB-A cable on MacBook MacBook Pro (Retina, 15-inch, Mid 2015)
I can’t any port suitable for USB-c !??
sissi - Replica
My MacBook had P4 pentalobe screws, notP5
Greg Lavardera - Replica
Big thanks to Jeff for such thorough and detailed instructions. This is definitely a more advanced repair so if you're not comfortable with making such repairs, like having experience working on iPhones, computers, etc., you might think twice before attempting. It's very helpful to read all the instructions thoroughly before starting. Plan on 3 to 4 hours—the battery removal along with its adhesive is a real $@$*-show, but totally doable if you followed Jeff's recommendations.
I'll post a few tips in the comments on each step that I think is worth noting but I will mention here one of the trickier steps. ZIF connectors on the flat cables can be a little tricky, especially if you have never done these. Before attempting to do the first one (step 8) review the others in steps 16, 20, and 25. You'll get a better sense of how these little retaining flaps flip up and what they actually look like when you study each photo in each step—they are very tiny and fragile.
Steven Gibson - Replica
Just finished replacing the battery. I followed the directions that came with the battery instead of this guide. In short, Steps 15 to 35 are not necessary. You don't have to completely disassemble the laptop to replace the battery.
Andrew Mohan - Replica
Thanks. I skipped it too and it worked.. It was a painstaking to remove the two side batteries as the cables were connected. But a little patience gets the job done. I did however remove the audio jack connector but from the audio board. Removed the display connector and the usb-c bracket to get the bottom case free.
Paras Tolani -
READ EVERY STEP, AND EVERY COMMENT FOR THAT STEP BEFORE ATTEMPTING! Go slow. Think first. Be organized. No probs.
David Nagle - Replica