Salta al contenuto principale

Replacement of Graphics Processing Unit (GPU) in a HP Pavilion 690

Cosa ti serve

  1. Replacement of Graphics Processing Unit (GPU) in a HP Pavilion 690, Graphics processing unit in a HP Pavilion 690.: passo 1, immagine 1 di 1
    • Power off the desktop and unplug the power cable.

    • Hold power button for 5 seconds to discharge the capacitors.

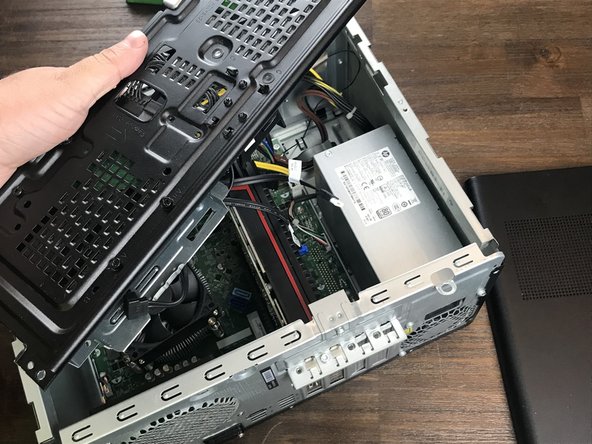
    • Remove the side panel from the computer.

  2. Replacement of Graphics Processing Unit (GPU) in a HP Pavilion 690: passo 2, immagine 1 di 1
    • Remove screws and place screws in bowl for safe storage.

    • Place the screws in a small bowl or on a magnetic mat so they don't get lost.

  3. Replacement of Graphics Processing Unit (GPU) in a HP Pavilion 690: passo 3, immagine 1 di 2 Replacement of Graphics Processing Unit (GPU) in a HP Pavilion 690: passo 3, immagine 2 di 2
    • Disconnect CD-ROM drive from the computer.

    • Caution: Ensure that you are properly grounded before touching any electrical components. Computer equipment is highly susceptible to damage through electric shock.

  4. Replacement of Graphics Processing Unit (GPU) in a HP Pavilion 690: passo 4, immagine 1 di 1
    • Press in the small black lever on the back of the CD-ROM drive.

  5. Replacement of Graphics Processing Unit (GPU) in a HP Pavilion 690: passo 5, immagine 1 di 1
    • Remove the CD-ROM drive from the computer.

  6. Replacement of Graphics Processing Unit (GPU) in a HP Pavilion 690: passo 6, immagine 1 di 2 Replacement of Graphics Processing Unit (GPU) in a HP Pavilion 690: passo 6, immagine 2 di 2
    • Disconnect the wires connecting the storage housing to the motherboard.

  7. Replacement of Graphics Processing Unit (GPU) in a HP Pavilion 690: passo 7, immagine 1 di 1
    • Remove the storage housing from the computer.

  8. Replacement of Graphics Processing Unit (GPU) in a HP Pavilion 690: passo 8, immagine 1 di 2 Replacement of Graphics Processing Unit (GPU) in a HP Pavilion 690: passo 8, immagine 2 di 2
    • Unscrew the screws on the latch on the back of the computer.

  9. Replacement of Graphics Processing Unit (GPU) in a HP Pavilion 690: passo 9, immagine 1 di 2 Replacement of Graphics Processing Unit (GPU) in a HP Pavilion 690: passo 9, immagine 2 di 2
    • Flip the open the latch on the back of the computer.

  10. Replacement of Graphics Processing Unit (GPU) in a HP Pavilion 690: passo 10, immagine 1 di 1
    • Disconnect the power cable from the GPU.

  11. Replacement of Graphics Processing Unit (GPU) in a HP Pavilion 690: passo 11, immagine 1 di 1
    • Press down on the small lever at the base of the GPU to release the component.

    • Caution: When reassembling do not press this lever. It can lead to an improperly seated GPU and may damage the slot or the GPU.

  12. Replacement of Graphics Processing Unit (GPU) in a HP Pavilion 690: passo 12, immagine 1 di 2 Replacement of Graphics Processing Unit (GPU) in a HP Pavilion 690: passo 12, immagine 2 di 2
    • Pull the GPU gently out of the computer.

  13. Replacement of Graphics Processing Unit (GPU) in a HP Pavilion 690: passo 13, immagine 1 di 2 Replacement of Graphics Processing Unit (GPU) in a HP Pavilion 690: passo 13, immagine 2 di 2
    • Slide the replacement GPU into the slot.

  14. Replacement of Graphics Processing Unit (GPU) in a HP Pavilion 690: passo 14, immagine 1 di 1
    • Plug the power cable into the replacement GPU.

Conclusione

To reassemble your device, follow these instructions in reverse order.

Yousif Al hamadani

Membro da: 10/06/22

229 Reputazione

1 Guida realizzata

0 Commenti

Aggiungi Commento

Visualizza Statistiche:

Ultime 24 Ore: 2

Ultimi 7 Giorni: 4

Ultimi 30 Giorni: 19

Tutti i Tempi: 405